I was lucky enough to visit it in the 1990s. And yes, I forever saw my own trusty 1960s-era Cenco hair-raiser as a mere miniature Van de Graaff in comparison. Boston's behemoth is stunning.
What may turn out to be the most shocking (yeah, that didn't take long) aspect of my Van de Graaff demonstration sequence is how I could possibly have left your favorite VDG demo out. What was I thinking? By all means, let me have it in the comments—don't hold back.
Charging Ahead - Movie Export
If you can forgive me, I selfishly included all of my favorites. And they're not so bad. My favorites are ones I can mine for good physics that I believe my students can gather and grasp.
Mop Head, Pie Tins vs. Styrofoam Bowls, Bubble Brigade (soap bubbles), Bad Hair Day, Green Wig, and I Blew My Top. Again, light me up in the comments for omitting the cool VDG demo you do.
There is also an explanation of how the generator works.
Here is the second qualitative electrostatics lab redesigned and video clip enhanced for use in Distance Learning. The first was "A Pithy Matter" shown in a separate post.
For "Electroscopia," we swap out the pith balls for a can-form electroscope. These were sold with cardboard inserts with angle markings to make them more electrometer-ish. In practice, removing the insert allowed students working on opposite sides of the electroscope to see the pointer without obstruction.
The activity works through a series of observations involving charge typing, induction, and the differences between conductors and insulators. It closes with some questions students should be able to answer with the benefit of evidence.
There are appearances of the Fun Fly Stick, a latex balloon, and my head in this activity. Not to be missed!
In practice, students "ask for help" to summon the instructor to their breakout room. Once there, students request an Object or a Charge and identify their room number. The instructor shares their screen while showing the appropriate clip, then leaves the breakout room as students interpret the observations.
Sure, there's some kind of force involved in the rubbed plastic/pith ball interactions. But do we really need to consider it a whole new force? Isn't it just some form of gravity or magnetism? Let's experiment.
This qualitative exploration of electrostatics features: electrostatic attraction and repulsion, a triboelectric sequence (but we don't use the T-word here), an electrophorus (with pronunciation guidance), and two rounds of Pith Ball Ping Pong. What's not to like?
Let me just add that nothing—nothing—turned my most jaded, been-there-done-that high school seniors into elementary students more than this activity. When the pith balls started flying, their giddy glee was an involuntary reaction that expressed itself before they could so much as attempt to stifle it.
A Pithy Matter - Observations (HTML export as linked within the GoogleDocs document). This is a sequence of video clips showing interactions between cloth-rubbed plastic and pith balls, with special appearances by an electrophorus (ft. slow-motion electrophorus ping). Here's the movie export of the observations for use on devices that struggle with the HTML export—link also included in gdoc).
A Pithy Matter - Special Observations (HTML export for use by the instructor). They will seem silly to experts with content knowledge, but they are actually critical for the purpose of this activity.
This activity was designed for use with video conferencing (e.g., Zoom). Students need to check in with the instructor to see the "Special Observations". It's a redesign of what was an in-class lab. I consider it a mark of success that I am able to use the same lab quiz (ported to Socrative for online use, of course) to assess student performance on the activity.
The roughest edge for students in this activity is recognizing that the brick is far and away the "most gravitational" object in the apparatus and how it can be used in this lab. The instructions make an attempt to steer, but still... Once they get past that, most groups catch on to the value of the bar magnet. Most; not all.
To the best of my knowledge, this activity is not duplicated or even simulated elsewhere in teh interwebz. No Pivots; no PhETs. I will be corrected in the comments if I am mistaken.
In Distance Learning, I'm everyone's lab partner in addition to being the instructor.
This floated through my social media feed today...
The comments were appropriately brutal. And it wasn't the anthropomorphization that the commentariat was ruffled about. I suppose that's a risk inherent to advertising on social media. Your sponsored posts are subject to comments. At least they are for now. Facebook, Twitter, et al will no doubt figure out how to fix that so as to reap even greater profits. And why wouldn't they?
In any case, you could certainly acquire one just so that your students could rightly lambaste you during your lessons on circuits, if you're into that sort of thing. By the way, will we even be teaching circuits outside of AP and IB in the NGSS future? I don't see it in the high school physical science DCIs. But I could be wrong. Again, I digress.
Rather than supporting this electronic transgression with my hard-earned money, I downloaded an image or two of the offending item and will add it to the things we talk about when we talk about circuits in class.
True. And this is the excuse I will give for keeping old vintage equipment that still demonstrates some physics. The same could be said for my father-in-law, a retired hospital mechanic that got to keep a lot of old equipment when it was replaced. He recently gave me a National Twin-Control Transformer, pictured below. It was used in the surgical wards to change the voltage of the lights (left dial) and cauterizing gun (right) from the 120 V wall outlet. I found a few more of these online for sale as interest pieces, luckily no one suggested actually plugging it in. There is an on/off dial at the top and what appear to be banana-type lead ports underneath each control.
The art deco style seem to be from the 1920s or early 1930s. The plastic shell is Bakelite, the first synthetic plastic for which the American Chemical Society named it a National Historic Chemical Landmark. One of its most common applications were casings like this for electric devices because it was very electrically resistant.
I took the front of the case off so that I could see the very large transformers inside. My father-in-law had cut the cord internally, just in case any students decided to get too curious. The transformer wire gauge is quite large and the whole mechanism quite heavy. I took it out to show some students but I'm concerned about some of the wrap components so it will probably be left sealed up in between demos.
It would be interesting to encase the transformer opened up so students could see it but it was safe from curious hands. Its a reminder that what we teach them is actually used for something and hopefully they are able to recognize similar components.
Throughout the year I mentally categorized everything as either pre- or post-AP. When I finally made it to the promised land of post-AP testing I then encountered a new challenge, keeping students engaged for a few weeks when they want to do absolutely nothing. I had many options, even putting a poll to them just for information (reserving the right to completely disregard their #1 choice of "do nothing"). I could talk about topics not covered in AP C like waves or optics or thermo or relativity? We could do a research project or have some kind of demo build? They could present a talk? Some ideas seemed better than others but the timing wouldn't work.
I finally settled on doing a series of group competitions, something different each day, something hands on and fun. I found lots of ideas online, some from labs I didn't get to do, but did struggle to find ones that were Electricity & Magnetism (second semester) focused instead of Mechanics (first semester) focused. I was hoping that the competitions could be on the same topics they would later be tested on for their end-of-semester final. Unlike most AP classes, I opted not to give students a final prior to the AP test. The argument is usually that students need the practice of an AP-like exam prior to the test; so we completed mock AP exams for practice but not for a grade. My students may take up to six AP classes in their junior or senior year so they have several weeks of high stakes testing (class finals) before more high stakes testing (AP exams). I decided that the practice and their mental health was more important than their grades at that point in time and they could take the final exam during finals week.
Since I was building the competition up from scratch there was a lot of writing, re-writing, last minute tweaking and of course post notes for next time. In the end it was a workable model with no major issues but as is often the case with the first time through, it wasn't quite right. In either case now I have examples and procedures for a series of activities to either use in the same way next year or throughout the year.
Day 1: Explanation and Bridge Building
On the first day I explained to them that they would be arranged into groups and competing each day for the rest of the school year. Each group was assigned a Greek letter and asked to come up with a clever name using the letter. I tried to split Chi, Psi, Pi, etc. from being in the same class and removed Alpha to save as my example of "The Alpha Academics." As expected, my students were way more clever than I and came up with some great names: Gamma's Cookies Oof (Omicron upper and lower case) Beta Testers Mooupsilon Kappa-citor An Iota of Understanding
I introduced the format of the competition using this powerpoint. It had the rules, grading specifics and the explanation for each day's competition, which was never revealed ahead of time. I explained to students that coming up with the name for our little competition was hard, I almost decided on the Phunger Games (like the Hunger Games series) but just couldn't. It came down to the morning of when brilliance struck and I decided to name it the PhysX-Games, complete with logo based on the popular X-Games:
Students were of course very concerned about how their grades would be affected by the competition. I did not wanted to punish them if their group didn't win every day but I wanted everyone to put effort in. I also wanted them to be rewarded for working well as a team and accomplishing tasks. I opted for a system that separated individual effort from group effort. Each day that students were present they could earn 5 points for actively participating. Each group would earn points for the day for accomplishing the task but they would earn more points for being the best at it. Good participation on an individual level required helping their group for the whole period. Sleeping, doing other homework or being caught with a cell phone meant zero points for the day. These participation points went into students' lab category so it was a welcome bump for most. If a student was caught with a cell phone that day their group could not win the competition, but it did not negatively affect the other group members' individual points. I would keep a running tally of each group throughout the competition so we could always see who was in the lead.
But why care if you are "winning"? The prize had been another sticking point initially. What do I offer students who are only a few weeks from graduating, that are mentally "done" after AP testing? I hadn't offered extra credit all year so it seemed like a good reward. Specifically I decided to add enough extra credit to their individual final exam grade so as to boost their semester grade by 1%. Yet with three classes of AP Physics C I had to find a way to limit my first few periods from giving the last class the "answer" to the challenges each day. I needed a way to keep groups between classes competitive. So I upped the reward. The group with the most points in each class would get points added to their final exam to raise their grade 1% but the group with the most points across all three classes would get 2% added to their grade. This was met with hoots and hollers in my classes. I need not worry about answers being shared between classes, they were in it for a grade bump and the competition was fierce.
After the explanation and group naming we didn't have time for a long competition on the first day. Instead we started with something basic, balancing uniform sticks over a table edge. Groups were given five uniform paint stirrers and five uniform meter sticks. They were given instructions which included the rubric I would be grading them on. Without attaching the sticks in anyway to the table or counter-weighting them students were to extend each group of five out as far past the table edge as possible. Points were awarded for balancing the sticks and a bonus was given to the group with the farthest reach for paint sticks and another for the farthest reach for meter sticks. I did find that my naming it a Cantilever bridge was a bit of a misnomer; the activity is similar to the Take It From The Top activity from the Exploratorium.
Initially students tried to use some of the meter sticks as their own counterweight so we had to specify that the farthest extended meter stick had to be the top one. Students were to calculate the hypothetical Center of Mass of the system based on their measurements and assume no thickness to the sticks. The record for paint sticks was 41.4 cm and the record for meter sticks was 120 cm off the table. Groups would go back and forth, adding millimeters at a time as the record was erased and rewritten on my front board. It was a tense day in Physics!
Day 2:Mass & Spring
To review oscillations and simple harmonic motion (SHM) I adopted a lab practical challenge I had read about but unfortunately can't remember where. Students were challenged to hang the correct mass from a spring so that it's period was as close to 1 second as possible. Again their instructions included the rubric so they knew how to earn points. Students are given no other information however, and have to first determine what they need to know about the spring in order to find the needed mass. Once calculated, students would hang the mass and spring from a Vernier Dual Range Force Sensor and start it oscillating. They would use the software to determine the period for five cycles then divide by 5 to find the period for one cycle. Each class was assigned a different target, 0.5 s or 1 s or 1.5 s. I had used stiff, old springs that students had not worked with before so that they had unknown larger spring constants. This meant that the 1.5 s period required a large mass and so I changed it to 0.75 s for that class. Students used the Vernier probes to calculate the spring constant as well and so everyone got very accurate results as seen at below.
The second stage of the competition was to determine the mass of an unlabeled or hidden mass using the same procedure but in reverse. I used several old masses found in the back of my cabinet that had had their labels worn away over the years. I also made unknown masses out of toilet paper tubes and dead batteries. Each mass was measured and recorded so that I could see how close each group came. If they calculated the unknown mass to be within 10% of the actual they received group points. The group closest to the actual mass received bonus points; bonus points were also awarded for the group that got closest to the assigned period.
In the future I think I will decrease their accuracy by only providing a spring scale for the initial determination of the spring constant. This will make it harder for groups to get so close to the assigned period and award groups that employ careful lab techniques. I would still use the Vernier probe to determine the period of the oscillating mass.
Day 3: Flying Cups
Since our competition started during the second week of AP testing there were still students that were occasionally gone to take AP Exams. On those days they did not earn their individual points for participating in the PhysX games but they were also not penalized for missing them, it was excused. If they were *cough cough* "sick" that day however, they would have to complete a make-up activity. If the equipment could be easily gotten at home they could do it there but some competitions required sample data for their alternates because students did not have the equipment at home.
The Flying Cups competition however, could easily be done at home. I saw this for the first time at an elementary school Science Night and immediately decided to do it in my classroom. This video (also below) explains the how to's and the teacher flies several different models. Essentially two identical cups (made of paper or thin plastic) are taped together at the bottom. A chain of four or more rubber bands is made and wrapped around the center of the cups and held on one end. When the cup is released and the rubber band chain pulled the cup is launched forward.
Each period, 30+ AP students were completely engrossed in flying these cups. They tried all kinds of models, trying to figure out if paper or plastic worked better, a longer rubber band chain or shorter, more rubber bands or fewer, added mass at the center or the edges, etc. In the end a few smart students realized that launching from on top of a picnic bench gave them a distance advantage. Soon everyone caught on and eventually the whole class launched from a small hill in the center of our school. Some students were better launchers than others, one of the more successful being a varsity baseball pitcher. Groups earned points for each meter their cup traveled before striking the ground (not rolling) and had a bonus for the farthest in each class. By the end of the day the record was 14.7 m, with most groups over 9 meters. It was a simple activity, definitely mechanics but very fun.
Day 4: Leyden Jar
This was an activity that I used to do for years in my regular Physics and even Conceptual Physics classes. I taught students about parallel plate capacitors by having them build a simple Leyden Jar out of a film canister. I still hoard film cans to this day even though I haven't had time in the curriculum to do this for years. For the competition students were instructed to use a small film can, or a jar if they brought their own, to make a simple capacitor. This old video of mine shows the basic construction:
I had asked students to bring in cups for the flying cups activity and jars for the Leyden Jar activity without telling them what it would be for (so they didn't research it in advance). A larger jar would increase the capacitance their jar could hold, something they realized too late. Students were challenged to build a Leyden Jar that would hold a charge and then asked to hypothetically calculate what the capacitance should be using the cylindrical parallel plate equation they found in their textbook. After their calculation we charged up their Leyden Jars with my Whimhurst machine and measured the capacitance using my new capacitance meters.
I found that you have to be careful to stop charging the jar before it discharges itself, something that happened quickly for sloppily made jars. I used alligator leads to connect the Whimhurst machine (with discharge electrodes far apart) to the inner and outer surface of the jar being tested. At least one of the leads had to be removed for testing or you would measure the capacitance between the much larger Leyden Jars of the Whimhurst machine.
Students got HUGE errors between their theoretical and measured capacitance, as in the hundreds ofpercent. I need to improve the testing system if I ever want points to be awarded based on their error. Students had to research the dielectric constant of their jar, be it plastic or glass, and there is a lot of variety in that value depending on the actual material. Also without a pair of calipers students had to try to estimate the thickness of their jars as best they could. One creative group asked to borrow box cutters to cut off the thicker lip around their film can so that they could more accurately determine the thickness. Generally the smaller film cans had a higher percent error and a smaller capacitance. The large jars brought from home tended to be more accurate and their larger surface area gave them a larger capacitance. My students were able to produce capacitors from 10 (film cans) to 100 (glass mason jars) picofarads.
While I liked the review of capacitance, specifically what it was and what physical attributes of the capacitor affects its capacitance, the build was pretty easy. There wasn't too much difference between the capacitance of a well made or sloppily-made jar from the same film can. One student made a simple flat capacitor about 4x6" just for fun and it had a capacitance several orders of magnitude larger. Another variation may be to assign a certain dielectric material, plastic or paper or cardboard, etc. and a certain capacitance. Students would have to determine the size of the parallel plate capacitor for that particular thickness of that particular dielectric to achieve that particular capacitance. I feel like it would be more accurate, easier to test and I could judge them based on their accuracy to their hypothetical.
Day 5: Mystery Circuit
This was a variation on my Electric Building (House) Project for regular Physics and Conceptual Physics. I gave each group a shoebox that had a lid with their instructions and made paperclips, brads, wire cutters, wire strippers and holiday lights available. Unlike the previous project students got to design whatever circuit they want as long as it met the conditions:
1. Uses only one 9 V battery.
2. Has at least 8 lights.
3. Has at least 2 switches.
4. All lights can be lit up, all lights have to be able to be turned off (for storage).
Groups were to design their circuits, build it so that just the lights were visible on the outside of the box (rest of wiring hidden on the inside) and make a matching circuit schematic. That earned them the minimum points for accomplishing the task. When they were done each group were to exchange their mystery circuit box with another group and try to guess the schematic. Each group that they successfully stumped earned their a bonus point. I told them that it was quite possible that each group would be stumped and earn points after the exchange.
We did have a few hiccups on this one that I was not anticipating. In my first class of the day we found one LED strand of lights that was masquerading as an incandescent one. Since LEDs are directional it was very difficult for students to build a working circuit with them. And since relative brightness of bulbs is usually how students guess how bulbs are connected the equally bright LEDs wouldn't work for this task. Some of these groups got pretty far into their build before the mistake was recognized and ratified. I had also expected that since students had built a simpler circuit in the same way last year in regular physics they would be able to build this more complicated one quickly. I was wrong. We ended up taking two days to complete this and some groups never did.
There were a few groups that made their circuits so complicated that even they weren't sure how it worked, or the load was too high and it never did. Hurried and/or loose connections made it difficult to judge if their circuits matched their diagrams. Some made simple light connections but used the switches to complicate it, which was more of what I was hoping for, like below:
In the future I think I will limit the number of lights, switches and perhaps more strongly emphasize that all lights must light (not that "Technically a microamp could be flowing through it even though it looks off"). I will have to give them more instructions on how to make the switches, strip wires, etc. I expected students remembered those skills from the previous year; which assumes they did actually build the project they turned in. In the end the activity worked but I wasn't really satisfied with the quality of the project or their efforts.
I had also hoped to keep this year's projects (hence the requirement that they had to be completely turned off) so that perhaps the next year I just asked groups to map the mystery circuits made this year. So few were working a week later when I went to dismantle them that I had to abandon this idea and instead scavenged them for parts. Side note: I take apart all but the very best Electric House projects each year to save the parts (brads, paperclips, bulbs, 9Vs, motors) for the next year.
Day 6:Defibrillator
I got this idea from Frank Nochese on Twitter about challenging students to build a defibrillator model like an RC circuit. I researched defibrillators and put a call into my sister who is a registered nurse to get the low down on how they were actually used and how that related to the circuits my AP students had used. Turns out that the typical movie scene is completely wrong (and a pet peeve of medical professionals everywhere). Usually a patient is shown flat lining (no more heart beat) and it is then that a defibrillator is applied and the doctor charges it up and shouts "Clear!" and a big thwump is heard as the person/ body jumps up on the table. This is repeated until a heart beat is restored. In reality the defibrillator can only be used when there is still a heart beat but it is irregular. A loss of a heart beat means that chest compressions must be applied in order to restart the heart and get it beating again.
When I researched how they actually worked I found that the first prototypes used AC current and modern ones used inductors. I didn't have any inductors so I opted to still use Frank's original plan using an RC (resistor-capacitor) circuit. Real defibrillators use inductors so that the current oscillates, the oscillation can be controlled to match the desired heart beat. An RC circuit model would simulate one "beat" if you will because it would only charge and discharge once. My research led to a few additional questions about defibrillators and the more physics related concepts that I've added to the bottom of the instructions page.
Groups were told that they could use whatever resistors and capacitors they wanted to meet the requirement to save their "patient." I made little paper hospital gowns to go around the "patient" resistor so that students wouldn't get confused when they had multiple resistors in the circuit. It needed a little paper cot as well. These just might turn into fabric ones by next year ...
Each class was assigned a specific "patient" resistance, the maximum current that could go through it and a maximum charge on the capacitor. Groups had to first figure out what their circuit might look like then use those maximum values to determine the specific size capacitor and total resistance to use. I had 100 or 2200 microfarad or 1 farad capacitors for groups to choose from. Almost everyone ended up using the 2200 microfarad. I had a shoebox, literally, of organized resistors for students to work through. They were not as organized when we were done. Some groups couldn't find exactly the value of total resistance they needed but found getting within a few ohms was fine. A few groups wanted to stick to only one resistor (or mistakenly thought that the "patient" resistor was the only one allowed in the circuit) and therefore tried to add a few capacitors in series or parallel.
Once students had built a circuit that allowed them to charge their capacitor (not through their patient) and discharge it through the patient they attached meters. We could probably have done it with multimeters as Frank did initially but I opted for our Vernier voltage and current probes since we had them. Since the currents were in the milliamp range the graphs are so small. Most groups got a good decay curve for the current through the "patient." I had wanted students to also measure the voltage across the capacitor and the resistor but often this was not done due to time.
Next time I won't have all my resistors out. I shudder to think of the order of the envelopes of resistors in that box when I go to look again. I would still have a variety but will try to pair down their options. I did not assign the additional context questions (below) that I wrote this time, they were my backup in case it didn't work at all. Next time I would definitely include them as I like them and think they bring some background to the activity. Other than that I think it was a great lab practical for RC circuits that Frank came up with and I will definitely use it in the future. This is one that I would like to add to my regular curriculum, if we have time.
Day 7: Trivia
This was the Tuesday after Memorial Day weekend, the last real class day before finals. I thought the last day of competition would be a good day to review the material for their final. Rather than using a Jeopardy type format, in which can be slow and often leads to one group keeping control of the game, I opted for a pub trivia format. If you aren't aware a lot of pubs or breweries have Trivia Nights that include teams that come back each week and multi-month tallies of points. Rather than having groups shout out answers or use a buzzer groups submit their answers to questions in writing. Everyone who gets the answer right can get the point, the question move along quickly and you can maintain a bit more decorum. I wrote up over 60 questions spanning the whole Electricity & Magnetism semester, some were multiple choice, some shorter response and some calculations. Each question had a timer for either one minute (conceptual) or two minutes (calculations & short responses) on the slide itself.
Before we began I went over the rules with each class:
•All
groups will be asked the same questions and record their answers on a sheet of
paper to be turned in and graded later.
•NO
CELL PHONES OR OTHER ELECTRONIC DEVICES, TEXTBOOKS OR NOTES ALLOWED. These are
questions to be answered by your brains alone.
•Do
not shout out answers. Do not talk to other groups. Whisper with your group.
•Groups
earn points for each right answer. The group with the most points will earn an
extra 5 points.
•Each
question has a time limit before the next one is shown but you can write
answers to previous questions if you have extra time on another question.
•You
can have more than one paper and pencil out but must turn in one answer sheet.
Groups used whiteboards for their work or discussion/ debate drawings but kept all their "final answers" on a separate piece of paper I would collect at the end. I was able to sit down and read each question as it came up, the counter ticked by and then moved the slide forward for the next one. Students kept on task and most groups attempted all questions. Sometimes there was a lull as they answered a question in less time than was given but sometimes they ran out of time. I encouraged them to record information for questions they ran out of time for so that they could go back on questions that they had extra time for. In the end I collected all the papers and graded them, awarding a point for each right answer. Since there was only one per group it did not take long and sometimes I offered partial credit. The group with the most questions correct also got the bonus points.
What was difficult was the mixing of the questions. We weren't going to get through all 60+ questions in each class so I tried to skip around so that they got a sampling from each major unit (electrostatics, current electricity, magnetism, etc.). This confused some of them as they had to number their answers with the question number which may not have been the number following the last one. There were some questions I wanted every class to get and I found myself having to record on a scratch piece of paper which classes got which question. I'm sure there is a program or website that would improve on this model and I'll have to look for it before next year.
In the end the competition did what I needed it to do: engage the students in some fun physics exploration until the end of the school year. I think my students enjoyed it, especially since they didn't have homework, but it could use some improvements. For one, I don't think it did as good of a job helping them to review for their final exam. Their final exam scores were lower than I would have like, especially since for many it was their only "real" final exam after earlier AP finals. I expected the activities to keep them thinking about the content, which to an extent they did, but it did not help with remembering the finer details and tougher problems they needed to review. Many thought they still knew the material well enough not to have to study, a problem unrelated to the competition.
The points for several groups in each class were quite close, the winners only being a point or half a point ahead of the rest. It was nice to see though that different groups won different competitions. A few groups won twice over the course of the competition (thus earning bonus points) but it was not necessary to be the winner in each class. I would want to tighten up the system of awarding points, try to find activities that require more content knowledge for this semester and increase the difficulty of some of the activities. It wasn't bad for a first run but I anticipate the PhysX-Games of 2019 will be much better.
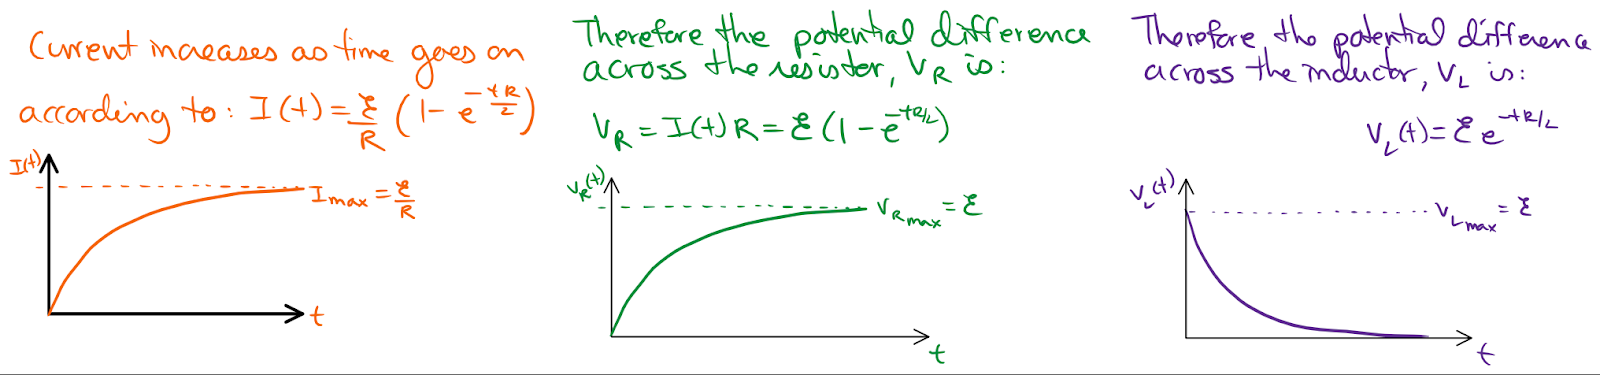
During my electromagnetism unit in my AP Physics C course I wanted my students to investigate a resistor-inductor circuit to reinforce the relationships for potential difference and current. Resistor-inductor circuits and resistor-capacitor circuits share a lot of similarities, including difficult-to-derive equations. While the derivations are a bit complicated they follow a similar format and once students have some practice they should see a pattern. Here is a write-up I made for my students for the resistor-inductor circuit equations. I tried to emphasize the patterns of decay and rise of each to reinforce the behavior of the current and potential difference over time. In a resistor-inductor circuit the current is initially zero when the switch is closed as the inductor produces an emf equal to the battery but in the opposite direction. We say that the inductor acts like a broken wire when the switch is first closed. Over time the current rises exponentially and the inductor produces a smaller and smaller emf until eventually the inductor acts like a solid conducting wire. As the current rises, so does the potential difference across the resistor.
As the switch is left closed for a long time the current of the circuit reaches the maximum current as if the inductor was not there at all. If the circuit can be completed without the battery then the inductor will initially produce the same current as before the battery was removed. The current decays over time, therefore the potential difference across the resistor does as well.
When my students were learning about resistor-capacitor circuits I had them use real lab equipment and confirm the potential difference and current equations they had derived. But I did not have inductors to use in a lab for a resistor-inductor circuit. I found this Falstad simulation and it is amazingly powerful. You can make any complex circuit you want! Below is one I mocked up for a homework problem. I screenshot the circuit and added more text to explain it to my students.
I constructed the circuit I wanted my students to explore and exported a link to the circuit. That is something I plan to do again; I can construct a problem-specific simulation and save that simulation forever as an exported link or screen capture. In the #GraphFails post I shared some terrible excel graphs my students had made. Since they obviously need more Excel practice I also decided to make a portion of this lab an Excel lesson.
Students started by drawing a Resistor-Inductor circuit and the appropriate meters to measure the potential difference across the inductor, resistor and the current through the circuit. They were to pick any value they wanted for the battery, resistor, and inductor. They used those values to write specific equations for the potential difference across the inductor, resistor and current when the switch is first closed and then as the switch is moved to exclude the battery. They calculated the time constant and maximum current for their circuit.
Students then opened either Excel or Google Sheets to create their data. I taught them how to make a data table and apply simple equations to fill in their data tables. The equations for resistor-inductor circuits were not the easiest thing to learn to type into a spreadsheet so my instructions included a simple method and a more complex one. By graphing their data students were able to confirm that their equations and data were correct if the shape of their graph matched their expectations.
Students learned to label all the parts of their graphs, resize them, change their legend, etc. They printed out their data tables and graphs for both the rise and decay of current.
The final step was to follow the link to the Falstad simulation and create their circuit. Since I had set the circuit up students just had to right click on each element to change the values to what they had set up in the beginning of their lab. Students then ran the simulation watching the current rise and then change the switch after it leveled off (after 5 time constants) and decayed. They were able to pause the simulation and doublecheck that their values determined by equations matched the simulations.
Overall I felt like it was a successful lab simulation. Students practiced complex equations, double checked their graph predictions with computations, learned how to use Excel/ Google Sheets to write equations, create multiple graphs and customize them, and created a visual of their personal circuit to see the values change with time. In the future I'd love to get a real resistor-inductor circuit lab going but I think that I would add it to this lab rather than replace it.
Lots of students surprised themselves with their accuracy, some getting too excited, "We have no error!" That was inevitably followed with the slow realization, "Wait, everything was done with equations ... we shouldn't have any error." No, you should not. So when a student did produce a graph that disagreed with their prediction they were able to work it backwards to find out where they had made a mistake. All in all Falstad may be my new favorite electric circuits simulation. Shhhh.... don't tell PhET. ;)
Induction is one of those things that make students go "Whhaaaatttt???"
You have probably seen and demonstrated a moving wooden meterstick like this:
Usually when I do that demo in regular Physics my students call me a witch. I don't exactly correct them. I wanted an equally "wow!" demo but didn't want to repeat myself in AP Physics C. While searching for something completely different I stumbled upon this small image of an induction experiment.
At first I wasn't sure if I could do it but after some experimenting I found a set up that worked. I set a nail on a styrofoam cup (made some grooves in it so that it would stop the nail from rolling) instead of a metal rod. I couldn't find any metal rods that weren't gross and rusty. I used a rubber rod and wool but any friction kit combination should work.
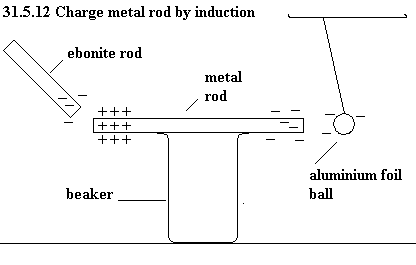
First I charged the pith ball through induction with the rod. Then I moved the nail point close but not touching the pith ball. I would recharge the rod and bring it close but not touching the nail. The pith ball on the other end would repel. My students were amazed. They watched me do it but they still had to think about which item was charged vs neutral. It led to lots of additional questions, some we were able to answer experimentally, some would probably require some more charge:
1. What happens if you touch the nail with the rod? The nail would then have the same charge as the rod and pith ball. I presume the nail would continue to repel the pith ball even when the rod were removed. We tried this but could not confirm with the small amount of charge we had.
2. If the pith ball is charged won't it be attracted to the neutral nail without the rod inducing a separation of charge? Yes! You'll notice in the video below that I move the nail in after the pith ball is charged. Otherwise I found that the pith ball would pull towards the nail immediately.
3. Would it work with an insulator? I presume so but didn't get a chance to try it.
Below is the video of the demonstration for absent students:
Depending on the strength of your charge source you could set up a wide variety of things like this as discrepant events for your students to puzzle over.
I am a huge fan of a CBC podcast called "Under the Influence with Terry O'Reilly". Tales of drunk Canadians engaged in Molson-fueled shenanigans? No. Each half-hour episode tells a carefully woven story connecting some element of advertising or marketing to the world where you live. You will learn things you didn't know about things that you do know with each episode. And each episode is the product of 20-30 hours of research. Subscribe to the podcast right now while you're thinking about it.
In an episode called "When Madison Avenue Met Broadway: The World of Industrial Musicals," O'Reilly played a few seconds of "Be Direct With Me". Just a few-second bite with not much to identify it. But I was transfixed. I deployed my hard-earned blue belt in google-fu and sourced the track. I then saw it was available on iTunes and paid for it immediately (I'm old and from the midwest).
I quickly set the track to a Keynote preso and roughed out a nice delivery. Then I spent several days refining and improving. I simply had to show this gem to my colleagues at the High School Share-a-Thon attached to the American Association of Physics Teachers Winter Meeting 2018 in San Diego.
High School Share-a-Thons can be lively affairs, typically held in the evening on Day 2 of the conference: between the workshops and the invited/contributed talks. For reasons nobody ever explained to me (and I asked), this year's Share-a-Thon was scheduled for 8:30am on Day 2, conflicting with many workshops. And... in the morning!
A few dozen intrepid instructors braved the San Diego rains and made it to the event. Sadly, the session presider did not. A few years ago (I want to say it was the Omaha Summer Meeting), the Share-a-Thon was left without a presider and I stepped up to awkwardly host.
Someone in the room in San Diego remembered that, and promptly ratted me out. So I was once again drafted into service. When the session began, only two of the several dozen attendees signed up to share. We had the room from 8:30am until 10:00am. I made the executive decision to dispense with the five-minute time limit and encouraged my colleagues to not be bashful—we're all friends here!
I showed a couple of things (videos of those things, anyway, as has become the trend among traveling physics sharers). Then I hit them with the video below. I truly didn't want to be up first for this event, but it was what it was.
In any case, the presentation. You will want to be sitting down for this.
I had a few more slides of humor and fun for my live preso; I intend to show it again at the NCNAAPT Spring Meeting.
Eventually more folks came up to share. Questions were asked and answers were given. We ended the session at 9:59:50am.
But industrial musicals? I had no idea. And they were huge in terms of budget, scale, and talent.
UPDATE: GE's Go Fly a Kite—the industrial musical from which this song comes—was written by the composer/lyricist team of Kander and Ebb, who also wrote Cabaret and Chicago. The double-album original soundtrack (souvenir recording) can be had via eBay for $99.99 as of this update. But it has also been posted to YouTube. I found "Be Direct With Me" as the opener for Side 3. The video shows the liner notes and dress rehearsal stills that correlate to the currently-playing track. While Valerie Harper was arguably the biggest enduring star in the cast, she did not sing "Be Direct With Me". Who did? Carole Woodruff. The only other credit I was able to find for her was a musical called Pleasures and Palaces, written by Frank Loesser and choreographed by Bob Fosse. It ran for a month in Detroit and was not reviewed kindly. Woodruff is the last singer listed in the credits. I have found no other relevant information on her.
At the 2017 Summer AAPT meeting in Sacramento Arbor Scientific had a booth in the exhibit hall showing off all their great demos. This Electricity & Magnetism Light Bulb demo caught my eye. It involves an incandescent light bulb with a long loose filament that can be turned on using AC or DC current. While on, a strong neodymium magnet is brought near the bulb with different results depending on the setting. When on DC the filament moves towards one pole of the magnet and away from the other. When on AC the filament vibrates when either pole of the magnet is brought close to it. I wanted one, but the reasonable price was still hard to manage for a once a year demo.
Last year I wanted to show my Conceptual Physics students a working dimmer switch and a simple light bulb. My retired father-in-law made me a self contained box with a dimmer switch and an incandescent bulb:
While shifting equipment around in my room I came across it again while my magnet cabinet was also open. As I recalled the Arbor Scientific demo I thought, "I wonder if...." and grabbed my biggest neodymium magnet.
With the light bulb on dim so that the filament can be easily seen I moved the magnet close to the bulb. Since my bulb's filament wasn't as long as the one in Arbor Scientific's demo you don't see as much movement but it is vibrating! The second video is easier to see the motion.
Now I know that my simple demo has a dual purpose and can be used in my current electricity unit and come back in my electromagnetism unit!
Every year, for as long as I can remember, I've shown a clip from the British show Brainiacthat makes a giant pendulum mirroring the in-class bowling ball demo. My downloaded copy is grainy and pixelated so I decided to try and find a better version. I downloaded one Brainiac episode (Season 1, episode 3) with the intention of editing it down to the 4 minutes or so that I wanted. I ended up watching the whole 40 minute episode and editing out six clips to use in my classroom. Not too shabby for some fun TV time.
Conservation of Energy and a giant pendulum:
Well explained and stands alone well.
Oil Slip & Slide:
Even really slippery surfaces have a coefficient of friction that slows down moving objects. You could have students estimate it using the values given in the clip.
LN2 filled water bottle:
Quick example of pressure, boiling and of course liguid nitrogen.
Does a duck's quack echo?
Sometimes students just won't believe you unless they see it for themselves. Or in this case hear it.
Don't microwave a CD:
#ThingsThatShouldGoWithoutSaying
Playground G forces:
Brainiacs (the volunteers and staff that put on the science of the show) try to get the most G forces possible out of a playground merry-go-round. You could get more but they are limited by human power.
Iron in cereal:
This is an easy demo to do in the classroom but it does take some prep, the right cereal, etc. This is a super short clip that demonstrates it if you don't have the time.
Now I want to watch more of it. Besides the energy pendulum the only other clip I have seen prior to this was another all time favorite, "The Electric Fence." It is pretty much all the things you wish you could do in your classroom but couldn't:
Update: For an exhaustive video demo lesson on the Brainiacs: Electric Fence clip, see this old Blog of Phyz post:
Years ago while I was at the Exploratorium Teacher Institute an employee came in and had managed to get a bunch of real life traffic lights. They had asked a city worker who was changing them out what they were going to do with them and ended up walking away with a lot. I took home two green and one red and unfortunately left them to sit in a box all these years. I finally managed to check with Zeke Kossover about wiring them up and was surprised to learn that they ran off only 120 V. I had it in my head that they would need much more and I would have to use a transformer. So I bought a heavy duty plug for each light and hooked them up. You can find traffic lights of all varieties on eBay. It was very easy and now I have three giant lights!
I'm not quite sure what I will do with them but I have some ideas:
- Use the red and green lights to indicate to students when to keep working and when to stop on an activity.
- Use the red and green for a giant Colored Shadows demo (I haven't tested if this works yet).
- Have students use light sensors to investigate the light intensity at different distances. I expect that this is bright enough students from all over the classroom will be able to take data off this one light source.
This is one of those easy things to make that students get excited about. An easy set of review questions can be turned in to a kinetic activity for students. Students use the boards using a small circuit made of a light bulb and a small battery. I use a bulb and wire cut from an old strand of Christmas lights and a AA battery. Students connect one end of the wire to the hole near the question, for the orange vocabulary one on the right for instance they would hold this wire to the hole under #1. That wire connects to the light bulb and to the battery and the other end connects to the answer choice the students use. If their answer is wrong, the light bulb won't light up. If they are right and choose D. Ampere the light bulb will light!
These are easy for you to make or for your students to make. You can use use either card stock or a manila folder, the advantage of the manila folder is that the back can be hidden. You or your students must write questions with multiple answer choices on the front of the paper. Ample spacing will be necessary. Using a single hole punch, make a hole next to each question and near each answer choice.
Cut small strips of foil half an inch wide. On the back of the paper connect the question to the hole of the correct answer choice so it covers the open hole at each end. Be sure this strip doesn't block any other holes. Cover the strip with masking tape, it's easiest to cover it by matching the length of the foil to the length of tape. Put a small piece of foil behind the other answer choices, this foil can block more than one answer choice as long as it does not touch the correct answer choice foil. Again cover with masking tape. From the front there should be no differences in the look of the multiple choice answers.
On the left the orange example board is the vocabulary matching one shown above. In this type the insulating masking tape is important so that the light bulb only lights when the correct term is matched with that question. The other answer choices not used are given foil and tape but aren't connected to the question side and thus will never light the bulb if chosen. On the right a close up of the example one I added red circles to show you where the original hole punches are. Make sure the foil you added to the wrong answers (so that they don't look any different from the front) don't touch the piece of foil that connects the right answer to the question.
This takes a small amount of prep but the engagement is much higher. Students are more excited to check their answers to problems when they can visually see the light bulb light up. You can also use a small electrical buzzer the same way. How else do you think you can use this technique?
I have a ripped apart, non-working toaster and I want to use it to show my students a by product of electricity is heat. Since I took out the controlling circuit board and detached the plug I needed to hook it up to a voltage generator. When I first played with the toaster I was able to get a bit of heat but it was cumbersome to hold the wires and hold the toaster up for students to see.
I mounted the toaster to a piece of wood with two screws and added an angled piece of wood underneath so that it would be easier for the class to see. The toaster is actually on its side; the white plastic piece is the carriage that moves the bread up. I opened one side so that the heating elements were easy access. I soldered two alligator clips to the wires so that it would be easy to connect to the voltage generator.
Since the toaster isn't connected to a standard 120-V outlet the filaments don't get red hot. You can feel the heat near the filaments but the whole point of this demo was to show an entire class how it worked. Taking the time to (and the risk of) students putting their hands near the toaster wasn't going to work.
I hooked up the toaster to a voltage generator and used thermo paper to "show" the heat. Of course a heat vision camera would do the job nicely as well. I have three different temperature ranged pieces of thermo paper from Educational Innovations: 20-25 °C, 25-30 °C and 30-35 °C. The first was too low to be useful but the other two when held near the filaments showed the heat coming off the coils. I held the paper with a binder clip, not because it was hot near the toaster but because I was hot. *badum ching* Seriously, my own body heat would register on the thermo paper (as seen in the upper left of the last part of the clip) and thus would affect the visual.
Some of you may be worried about mounting an exposed toaster that gives off heat to a piece of wood. Don't worry, I checked and its okay. I left the toaster on for a few minutes then after I turned it off I used the 25-30 °C thermo paper to visualize the heat still coming off the filaments and then below them on the metal that actually touches the wood. No heat registered on the metal against the wood.
My kids got these killer whale bubble blowing light up toys on a trip to Sea World (thanks to grandma). The toy quality was about what you'd expect and soon they stopped working. Destined for the bottom of the outside toy box my daughter brought one to me and asked, "Mommy can you fix this?"
I said sure, then realized it was DOA. So I decided to do an autopsy. I had taken apart a bubble blower hoping to fix it and when I tested the motor directly connected to a battery I found that it was broken. I expected the same for this whale bubble blower so I started pulling it apart. Inside I found a motor, capacitor and a small circuit board that controlled the LEDs that had been in the mouth, tail and along the side.
I was surprised to find that the motor still functioned. I tested it by using a AA battery connecting one white wire from the motor and other to the solder point on the other motor terminal. The motor spun fine and sometimes the LEDs lit up as well. For awhile I thought that the LEDs were only lighting up when I touched the end of the capacitor across the motor terminals. Connecting the battery to the end of the capacitor, but not the solder point, the LEDs would blink. Each time I tried to recreate this though, the results were different. After some fiddling I found that just as the battery was connected or removed the LEDs would flash but not when the battery was connected for a time. Once I determined that I had a realization: I'm an idiot. Well, not exactly. I remembered that what had attracted me to this circuit was the capacitor in it. [In my defense I was simultaneously fending off little fingers that thought the wheel on the motor looked like fun.] With the capacitor in the circuit the LEDs were only lighting up as the capacitor was being discharged.
After this project was ferried back and forth in my grading bag (I kept promising myself that this night or that prep time I would fiddle with it) a few of the wires have fallen out. I'll have to re-solder it to get the circuit to work again. If I want it to - so what do I want to get out of it?
On one hand its a practical use of a capacitor to show my students. I can either use this circuit or model more with the same premise for students to experiment with.
Or I can scrap it for parts. I have a pile of miscellaneous electronics parts that occasionally come in handy so I can toss it in there. And I now have a motor with a fit wheel and worm gear on one end.
A great outcome was making this little motor holder. To fend off the eager "helpers" that were watching my whale autopsy I put some magnets on a mason jar to hold the motor. It worked great as an extra hand and helped hold it up high enough I didn't worry about the fan hitting anything. I'm thinking all future dead toys will get the same treatment. Mommy needs some new parts!