Showing posts with label Mr. Equipment. Show all posts

Friday, June 09, 2017

Radiacmeter & Dosimeter: #UnknownEquipment no more!

I thought I had another #UnknownEquipment post for @ThePTSOS but I managed to identify this one! While cleaning out a common prep room I came across an old cardboard box that has been sitting out on a table for literally a year (since the last time I cleaned the room). While opening it with my colleague Matt I said, "What is a dos-i-meter?" (Imagine me saying it like a kindergartener learning to read.) 

He got all excited since he is a Navy veteran that worked on a nuclear sub. "I used one of these," he said, "But it didn't look like this!" The larger box had smaller boxes with a cylindrical radiacmeter and wooden dosimeter adapter kits. 


After reading the instructions for both we were able to get a better idea of what they did and how they worked. Well Matt already knew, but was very excited to see the "antique" version. Note the box is stamped April 1953! My school is old but we don't usually find equipment this old. 

The cylindrical radiacmeter measures radiation exposure and would have been worn in the pocket of servicemen in the 1950s. This page has images of different models. The cost of this one is labeled as $26.00 in March 1951, which is approximately $243 in 2017! The instructions said: 

A pocket radiacmeter which measures and indicates the accumulated dose of X and gamma radiation to which the wearer has been exposed. At one end of the radiacmeter is an optical eye-piece and at the other end is the charging contact. The radiacmeter contains an ionization chamber into which is mounted a small electrometer. A radiac-detector charger is required to charge the electrometer. A scale is calibrated in milliroentgens is mounted in such a manner that the amount of radiation to which the wearer was exposed since the charging of the electrometer can be read directly by holding the radiacmeter up to a source of light and looking into the eye-piece.


The dosimeter is the device that was needed to measure the radiation exposure after the fact which surprised me. I know some modern dosimeters give live alerts when radiation levels reach dangerous or lethal levels. These older models would only alert wearers if they looked through it after their suspected exposure. The Roentgen unit is actually pretty complicated, its scale depends on the type of radiation its exposed to and it has fallen out of use. This gives it some scale: "An exposure of 500 roentgens (~5 Sv) in five hours is usually lethal for human beings." 

The dosimeter adapter instructions provided some interesting information. The adapter was really a holder to make it easier to charge the radiacmeter as part of a larger circuit using a 1 megaohm resistor and two 45-V batteries. The Wikipedia link below says that the radiacmeter would need 150-200 V to charge! The huge resistor is added at the battery for safety. To check your radiation levels you look through the end of the radiacmeter towards a bright light. This allowed you to see the scale inside (at left). There was a warning on the instructions not to use the dosimeter near AC wiring as the "alternating field surrounding the probe will make the fiber vibrate 120 times per second and appear as a nearly invisible blur against the scale."

That gave me some more information to research. "Radiacmeter" didn't give me many results about this particular device as the label is outdated. It seems more appropriate to call it a "Radiacmeter-Dosimeter" as at the top of the instructions. The more common "Dosimeter" was too broad of a category but "pocket dosimeter" or "quartz fiber dosimeter" on Wikipedia yielded something  more like what I had: "A quartz fiber dosimeter, sometimes called a self indicating pocket dosimeter (SIPD) or self reading pocket dosimeter (SRPD), is a type of radiation dosimeter, a pen-like device that measures the cumulative dose of ionizing radiation received by the device. It is usually clipped to a person's clothing and worn to measure one's actual exposure to radiation."

Continuing on in the article I learned that a dosimeter essentially acts as an electroscope! The quartz fiber is inside a sealed cylinder and attached parallel to an electrode. By connecting the circuit as describe above the electrode becomes negatively charged. By conduction the quartz fiber is as well and it repels from the electrode due to an electric force according to Coulomb's Law. Below is a schematic I found that shows the internal components:
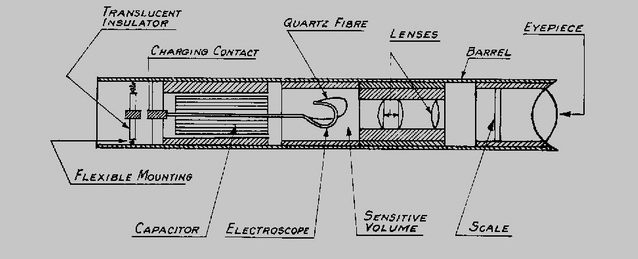


This image shows the quartz fiber laying parallel to the hook of the electrode (looks just like a Leyden Jar huh?) and as it is repelled it is pushed away. A more modern image is here and very similar. If you were exposed to radiation then neutral atoms inside the cylinder would become positive and negative ions. The positive ions would be attracted to the negative electrode decreasing it's charge, decreasing the magnitude of the electric force as per Coulomb's Law and the quartz fiber would move closer to the electrode. 

This image below from the Nondestructive Testing Resource Center shows the view through the eyepiece as well as the internal components of the dosimeter. The vertical line around 100 milliroentgen is the quartz fiber. With this orientation I assume that the fiber would be all the way to the left (at 0 milliroentgen) when fully charged and thus max deflection but there is no radiation present. If there was radiation exposure then the fiber's repulsion to the electrode will decrease and it would move closer. That means that the electrode would be on the right side (at the 200 milliroentgen side) I think.


Several times in the instructions it was mentioned that the dosimeter has to be recharged. So I worried that you might think you had been exposed to radiation as the quartz fiber drifted back towards the electrode (and the high side of the milliroentgen scale) as the charge leaked off it over time. How would you know if you'd actually been exposed?? The NDE had the details though: a dosimeter is expected to lose 2% of its charged in 24 hours. Whew! So if you charged it and recorded base levels at the beginning of each shift it would be fairly accurate.

So this tiny little thing left somewhere in my school for going on 65 years turns out to be pretty cool! And what can I do with it? Well now that I know how it works and what its used for I think it could be brought up a couple of times:

1. During electrostatics after students are introduced to traditional electroscopes I can show students how this is charged and how the quartz fiber moves along the scale. We can talk about which parts of the device should be an insulator and which should be a conductor and why.

2. During current electricity we could discuss the basic albeit super dangerous circuit required to charge this thing the size of a pen.

3. During our light unit as students are introduced to the electromagnetic spectrum we can discuss why only X or gamma (and sometimes beta) radiation would trigger this device. I want to ask students why looking at a bright light source wouldn't move the scale of the dosimeter. (And of course not let them try to look at the sun through it to test out any theories!)

4. During an optics unit we could look at the arrangement of the lenses inside the device and talk about their shape and their position.

Basically I want to use it all year. I would love to get it charged up but I don't know if I have a DC power source that can go that high. It may have to become my new favorite useless accessory just so people ask me what it is.

Monday, January 12, 2015

Momentum Mobile: Have you seen this equipment?

Demonstration or lab equipment for physics classes can vary from homemade of scraps and junk to store bought and polished shiny pieces. I believe there is a place for each in the classroom but sometimes there is no beating a truly well made purchased piece. An advantage to purchased pieces is that they often stand the test of time and are used year after year (or decade after decade depending on your teaching experience).

Many of us keep a "wish list" of sorts for our classrooms. This may be mental or you may actually have a collection of marked catalogs or ripped out pages. A wise physics teacher (*cough* Dean *cough*) once told me that keeping such a list could help get equipment for your classroom when random money falls from the sky. While it doesn't quite rain I have been lucky enough to have such lists ready at the end of the fiscal year or at the beginning of a new program when an administration is asking for things to buy. That's right, sometimes they ask us and you better be ready!

Yet sometimes you know just what you want to buy but you don't know where to find it. It may have been something you saw at a conference or in a catalog somewhere sometime and you can't quite place it. Whatever it is you just know, "If I had this then my students would completely understand [insert tough concept here]." Perhaps the most frustrating part is that you know the equipment is out there, somewhere, you just don't know where to look. But someone does; maybe avid Blog of Phyz readers?

Another Physics teacher in my district recently said that he wanted this momentum cart he had read about years ago. The cart has a slanted back (higher at the front, lower at the back) and marbles or ball bearings are placed in it. At the start the marbles are stopped from rolling out with a hand at the back of the cart. When you remove your hand the marbles start to roll out and because of conservation of momentum the cart starts to move forward. The marbles fall out one at a time and as they continue to fall the cart speeds up. The teacher said that he thought he remembered the second to the last marble would be the fastest and then the last marble is at rest. This part did not make sense to me but we will have to get the cart to experiment with.

I made this simple image based on his description and he said it looks like what he had seen but didn't know where to find one. Over the years a few students have tried to make it but they have not been successful. Has anyone ever heard or seen anything like this before? Have you seen it for sale anywhere? Perhaps you know what is is properly called and a quick internet search can help us find it. Any and all help would be appreciated!

Bree Barnett Dreyfuss
Amador Valley High School

Monday, April 30, 2012

The Magic Circle

The Northern California and Nevada Section of the American Association of Physics Teachers held its Spring Conference at Lake Tahoe Community College Saturday, April 21. Beautiful campus; beautiful day.

In the back of the meeting room, officers had prepared a poster of "Mister Equipment" (Mystery Equipment). There were photos of strange-looking apparatus. New teachers often inherit apparatus whose purpose is not intuitively obvious. At meetings, there is a healthy mix of new teachers and veterans. The vets can often identify and describe the mystery apparatus. I hadn't seen the lonely poster until the end of the meeting, when an officer asked if any of the apparatus were—as yet—unclarified.

Even when I made a hasty scan of the assorted oddities, I passed an item at the top of the poster. It was titled "The Magic Circle." It wasn't really a piece of apparatus. It was a simple graphic image.


"That's mine!" I exclaimed. "The Magic Circle is my 'invention.'"

The Magic Circle is a kind of graphic mnemonic I designed in 1988 because Susie Klippi was just not getting graphical kinematics. She wanted to; she was trying. But it wasn't happening, and I wanted to help her. I did the best I could as a still very green one-year "veteran."

The context is the challenge of being able to translate between position and velocity graphs during uniform accelerated motion. The velocity graphs have diagonals, and the position graphs have curves. Physics learners have trouble with these things because it's really calculus that's going on here. The slope of the position graph indicates the value of the velocity graph, and all that jazz.

I spent too much time on kinematics back in those days, and gave it too much weight in the scheme of things. Still, it was my own "No Child Left Behind" that compelled my to design a mnemonic that would help struggling students get past this hurdle.

At the end of graphical kinematics units in subsequent years, I would reveal The Magic Circle. At that point, students had been slogging through the exercises, some with more joy than others. When I show the Magic Circle now, students' minds are ready for it, and a wave of happiness \ briefly sweeps through the classroom. But students soon complain: "Why didn't you show us this 'trick' in the first place?" Rather than engage them in the finer points of pedagogical philosophy, I simply tell them to add this to the growing list of ways I've managed to disappoint them.

I eventually prepared a manuscript for publication in The Physics Teacher, but it was rejected by then-editor, Cliff Schwartz. I still show the trick to my second-year AP students, where graphical kinematics still holds some importance. But they are less in need of the mnemonic. All in all, The Magic Circle © 1988 by Dean Baird has faded in significance for me.

But there it was on Saturday. I gave a quick, impromptu lesson in the oddly-configured meeting room. It was not my best presentation, and I don't think I sold The Magic Circle to any of the conferees still present at the end of the day.

Here's the unpublished manuscript if you're interested.

The Magic Circle: A Training Wheel for Graphical Kinematics

Sunday, January 30, 2011

PTSOS: What IS this thing?

IMG_0056


A PTSOSer brought this device in hoping to learn what it was and how to use it. Click the pic to access more pics.

It appears to be a transformer whose inner (secondary?) coil is connected to electrodes who come close to one another. The upper arm can be moved to change the space of the gap.

There are no binding/connecting posts above or below. The underside is clean.

Our collective wisdom, such as it was, suggested connecting an AC source to the outer (primary?) coil via alligator clips or equivalent. That outer coils appears capable of handling many amps.

It has a Welch nameplate (before the merger with Sargent).

Have you seen such a thing? Please advise (in the comments) as to its function and proper setup. (I've added a new post tag: Mr. Equipment—it's like the words "mystery" and "equipment" joined together.)