Showing posts with label optics. Show all posts

Saturday, March 20, 2021

The Rainbow Connection—To Physics

Science Friday had a nice segment on rainbows.

The Rainbow Connection—To Physics

Seventeen minutes well-spent. Discussion includes tertiary and quaternary rainbows, why Hawaii is the rainbow capital of the world, and what rainbows might look on other planets (oh, that's a good one!).

Friday, July 12, 2019

Adhesion Cohesion Lens-hesion

The correct reaction here is "I saw that when she posted it" because you subscribed to Physics Girl's YouTube channel ages ago. If not, proceed.

This Weird Straw Effect | EVERYDAY MYSTERIES


This seems to beg for further investigation using different liquids. Cooking oil? Corn syrup?  The interplay of adhesion and cohesion is central here.

It's fun to think about the extremes:

1. How would this have turned out if the liquid had maximum cohesion and minimal adhesion?

2. How would this have turned out if the liquid had minimal cohesion and maximum adhesion?

There are more questions that might be nice, too. If you think of a question (or a liquid), drop it into the comments.

Tuesday, June 18, 2019

The best laid plans

It's true: I see the world in physics. You might, too. So when I saw a thing at Panera Bread, I spun it into a narrative that's too good to verify. Meaning I could have it a bit wrong, but it feels right. It's 2019, so... good enough.

In any case, here's the observation: an LCD screen in portrait orientation goes dark when viewed through polarized sunglasses. Unless you tilt your head sideways!


My story is that the LCD was manufactured to be used in landscape orientation, as is the case for 99.9% of such displays. In that orientation, the polarization inherent in LCDs was set to be viewable even through polarized sunglasses. But the Panera queue application required portrait mode. Hence the trouble.

And honestly, if you're indoors at Panera, why are you wearing your sunglasses? (Actually, if they're prescription, keeping them on while waiting for your coffee might not be so unreasonable.)

Note that your modern smartphone can be viewed in portrait or landscape through polarized sunglasses. Their displays have been depolarized! Some kind of sorcery is at work here.

Wednesday, March 13, 2019

All in a Mouse's Night ... Vision

If your curriculum visits light and color, here's a nice tangent worth traveling. Not sharks with fricken lasers, but mice with night vision.
Scientists have figured out how to confer a superpower, like those wielded by the mythical X-Men, at least to mice. Using nanoparticles that convert infrared (IR) light to visible light, researchers have given mice the ability to see in the dark. If the same technique works in humans, it could offer soldiers night vision without the need for goggles and possibly counter ailments that cause patients to gradually lose their sight.
There are important details. Read about them in this article from Science:
Nanoparticles give mice night vision

As a veteran of titling blog posts and lab activities, and as a long-time fan of progressive-era Genesis, "All in a Mouse's Night" quickly came to mind. Trust me, this gift is as much a curse as it is a blessing.

Wednesday, July 05, 2017

Polarization demonstrated by a photographer

In the era of digital photography and Photoshop, the use of filters in photography has declined. Some effects of photographic filters can be simulated in post-production software.

Polarization is not one of those things. I use a polarizer in my own landscape and (to some extent) wildlife photography quite heavily. (Links to that work can be found at The Treks of Phyz.)

This video recently bubbled up at Digital Photography Review (my favorite resource for digital camera news and reviews). It's a photographer's description and demonstration of polarizers. Nicely done, and it can certainly act as a springboard for the discussion of polarization in the classroom.

Take a look for yourself.

Monday, August 08, 2016

Illusions on Rainy Lake

I spent part of my vacation with my son and other family and friends fishing. We were staying on the shore of a very large body of water on the Minnesota/Canadian border called Rainy Lake. The weather, fishing, and companionship were all fantastic. One morning the winds were very light and  the sun was shining over the chilly lake water. I noticed something strange on the horizon. There appeared to be trees floating in the sky.


This did not look like the typical mirage. I recalled something about a type of mirage that is often seen over ice or cold bodies of water. I kept a watch on the horizon as we pulled one walleye after another into our boat. I had my Cannon HD video camera that can take pretty good 8 MB low-light stills. Over the next hour or so I took pictures of some other strange sights on the horizon.


Some small islands and parts of the shoreline joined the trees in the sky. We were witnessing the formation of superior mirages. These form when there is a layer of cold air below a layer of warm air. The cold lake water was keeping the air near it cooler than the air above, forming a temperature gradient known as an inversion layer. Light from distant objects was bending down as it encountered the less dense warmer air. The path of the light from the objects can follow the curvature of the Earth, allowing objects beyond the horizon to be seen. This effect can be demonstrated by partially dissolving sugar or corn syrup in an aquarium. If done carefully, the density gradient of the sugar mimics that of the inversion layer, causing the path of a laser beam to bend down.


Inversion layers are stable, allowing the mirages to be seen for long periods. They also lack the shimmering of inferior mirages often seen on the road on a sunny day. This makes superior mirages seem more real and provoked an eerie feeling. Some of the images I had a hard time explaining. This one shows a superior mirage forming in front of an island.


On returning from my trip I did some reading about mirages to learn more about what I had seen. Superior mirages have been reported throughout history and have sometimes altered it. Early explorers trying to find the Northwest Passage turned around when they saw a mountain range looming in the distance. Later explorers returning to the same place saw no mountains. They had probably been discouraged by a complex superior mirage known as a Fata Morgana. Another stranded group of arctic explorers saw the polar night end two weeks early when the sun formed a superior mirage over the ice. In fact, anytime you watch the sun rise or set its image is being refracted around the curve of the Earth by the density gradient always present in the atmosphere. This is technically not a superior mirage because the density gradient is pressure, not temperature-based but the effect is the same.


There are other fascinating stories of superior images and Fata Morgana sightings that are worth reading. I found the Wikipedia article about mirages and Fata Morgana useful, as well as this website and this one. I am now better prepared for the next time I observe this unusual phenomenon. Another illusion on Rainy Lake was self created. When posing with my 23-inch walleye, we found we could make it look a lot bigger with some creative posing. If anyone from the Fish and Wildlife service is reading this, we did throw it right back in the water.

Friday, August 05, 2016

Two way mirror box

The last on my School's Out, Tools Out build list was a two way mirror box. Once while visiting Tap Plastics I saw a small black box on a shelf. There was a mirrored front and a sign that said "Flip the switch!" When I did a light bulb appeared inside the black box as it turned on. Turning it off made the light bulb "disappear." I bought a square foot of two-way mirror acrylic on the spot for about $20 and added it to my mental build list. 

This summer I finally built it. I used an old bureau bookcase we cleaned out of our garage because it already had routed tracks for a sliding door. I planned on building it myself and just needed to borrow my father-in-law's chop saw to make the angled cuts. Well, he's retired and likes projects so he ended up building it for me. It was a hard gift to refuse a few weeks before school started.

In retrospect I would have liked to spray paint the inside of the box black before adding the mirror. I can still paint it black by hand. The box has to have a sliding panel on the back in order to access the light bulb for replacement. I built a simple light base using a plastic lampholder, in-line cord switch and a plug at the end with some extra wire I had. The wire could be pulled through a hole in this back panel but light leaks are an issue so use some kind of gasket on it. I would like to find a remote operated light for dramatic effect so I don't have to be next to the box flipping the switch.

You can see in the picture at right the actual light bulb in the front and its reflection in the back. The two-way mirror has a mirrored finish on only one side, I put this mirrored side to the inside. As far as I could tell it would work either way but this way the more delicate mirrored side is inside the box. You can see the groove that was used for the back panel.

In order for the box to work well the inside has to be as dark as possible and the room it is sitting in as bright as possible. If you look closely enough you can barely see the light bulb inside before it is turned on. In these pictures below I enjoyed surprising my kids. The room lighting did not change, my camera however did change its light settings making the outer room look darker because of the brightness of the bulb.
Here's a video, although again there is a big change in the camera light settings. I swear I wasn't simultaneously turning off the room lights. You can see the inside of the box is unpainted.


Students always ask about two way mirrors when we talk about light reflection and refraction. We talk about transparent vs translucent vs opaque materials and I ask students which one describes a mirror. Most students correctly identify it as an opaque material, something that reflects or blocks all of the light letting (almost) none of it through the mirror. "But what about a two way mirror?!" Then a series of comments like "This one time in this one movie..." follow. Now I can pull this out from behind my demo table with a "ta da" flare and demo it on the spot.

Here is a video that explains how they work if you are unfamiliar:

Friday, July 22, 2016

Using a laser to pop balloons—with a surprise

AAPT's SM16 included the customary picnic and demo show on its last night (which precedes its last day).

Rutgers' David Maiullo, star of That PHYSICS Show led a capable crew of physics demo artists through a fun-filled demo show.

I caught most of the "balloons popped by a laser" sequence (at 240 fps). But upon further review, I noticed something unexpected. Who doesn't love something unexpected (in this context, anyway)?

Have a look. What surprised me, and what's the explanation?

Laser Balloon Pops

Saturday, April 16, 2016

Don't look at the sun!

Anecdotal but an example of the burden of being a science teacher and knowing better. ;)

A neighbor boy was all excited to show me his magnifying glass, a little plastic thing he probably got in a goody bag. “Look Bree, if I look at the sun it burns a bit!”

You can probably imagine how loudly I shouted “Nooooo!” He was persistent and I had to actively block his eye and the magnifying glass from the sun for a while with my own shadow. I tried to direct him to looking at things on the ground with the magnifying glass. I had him hold the magnifying glass at arm’s length to view another neighbor. “He’s upside down!?”

He continued to play with it for quite a while, and my science-oriented heart swelled a bit, when he conducted some side experiments with a translucent cup on the ground.

“Look, the shadow is green like the cup! If I tilt the cup the shadow changes. If I move the magnifying glass the little sun changes.”

Out of respect for my friendship with his mother I did not teach him about the heat at the focus of the magnifying glass. Although when he briefly aimed it skyward again I was tempted.

The next time we got together I brought home some of my eclipse viewing glasses. I told all the neighbors (there are nine under the age of ten within a few houses) that they were the only safe way to view the sun. Their response was less than impressed, “Oh, it looks like an orange ball.” Then they tried to see if they could ride their bikes or walk or play tag while wearing them. Hey, everyday can’t be a victory.

Sunday, December 13, 2015

Periscopes take 2 ... well 3

After I wrote the "Down Periscopes" post I bought more PVC, more plastic mirrors and planned to make a few variations of more periscopes. The 4" diameter PVC pipe I used the first time was a bit large and cumbersome for in-class demos if I wanted to use more than one at once so I decided to go with a smaller 1.5" diameter pipe. I had bought scrap plastic mirror from TAP Plastics and planned to cut them down to fit into the smaller PVC pipe since they didn't have pre-cut mirror pieces in a smaller size. My first cuts were too long to be at a 45-degree angle within the right angled ends. Life got in the way for a few weeks and when I went back to it after some home renovations, I hit a construction snag. We had managed to burn through, blow up or break the motor shaft of three different Dremel multi-tools during the remodel. Without a tool to make a clean cut on the plastic mirrors I opted for one inch square glass mirrors I already had in my class room. (I've already admitted to being a hoarder of potential equipment.) My son wanted to help, he thinks all my PVC parts are his building blocks.


I've made three different periscopes of the same length:
1. A periscope sealed on the end that goes into the water and is thus filled with air. (This could be sealed on both ends as with the original but it is not necessary.)
2. A periscope sealed on both ends and filled with water.
3. A periscope not sealed on either end which allows the water to fill it.

The periscope to be filled with water has a hole in it that fits a rubber stopper. I was surprised how much water the periscope took and you do have to rock the perisope back in forth to move the bubbles around. The periscope has to be filled with enough water to submerge both mirrors. I also quickly found that the hot glue leaked on the "sealed" ends. But the leak was slow enough that I was still able to conduct the experiments initially.

On the left, viewing a small tiger toy through the air filled periscope
and on the right viewing it through the water filled periscope
without both mirrors submerged. 
I put a few of my children's toys in the bottom of a bucket with a light directly above me and viewed the toys through each of the periscopes when holding the periscope vertically. I expected the air filled periscope to give a clear image of the toys as with the original, and it did. When I looked through the periscope that allowed water to get into it I could only see the surface of the water in the tube and a vague bit of color.

I expected the water filled periscope to be blurry, and it was, looking about the same as trying to view something under choppy water from above. The pictures were difficult to get with a camera phone as the images in the eyepiece mirrors were quite small. I found that the water level had dropped in the water-filled periscope so that only the bottom mirror was submerged. I had to try holding the periscope horizontally to keep both mirrors submerged in water. I found that the toy could not be directly underneath the mirror and be seen out of the other end.

At first I thought it was refraction, but the medium did not change as the light traveled from the water in the bucket to the water in the periscope. After thinking about it for awhile I realized that although I had planned to hold the periscope horizontally as per the picture below I did not hold it perfectly parallel to the floor. This would account for the apparent shift in position as the mirror was aimed at the toy but not directly above it. Now I'm happy my husband tried to take an "embarrassing" photo of me experimenting in my pajamas.

I did recreate the water filled experiment being sure to keep the periscope more horizontal and found the mirror to be nearly right above it. After some trial and error, a better camera and more caulking on the water filled periscope, I was able to get clearer images.

I found that even with caulking on the ends because the clear plastic circle sat on top of the 90-degree elbow instead of inside it as with my other model it was never going to be perfectly sealed. When I presented this at the Fall 2015 NCNAAPT Meeting & Conference at Sacramento State my water-filled periscope leaked quite a bit.

Through that presentation I was able to refine my plan for using these periscopes in class a bit more. Several members enjoyed playing with my periscopes but then asked, "These are great, but what are you going to do with them?"

I've decided that the best use of my periscopes is as a discrepant event. Students can either look through the periscopes individually or the image can be seen through a document camera. I can show students the view through the air-filled periscope which produces a clear image. Then I can show them the view through the periscope open to air and water which produces a blurry image. Based on these two experiences I can ask students what they would expect to see from a water filled periscope. After they have a chance to discuss it they can actually see the image through the water filled periscope which is about as clear as the air-filled periscope. I hope to lead this into a discussion about refraction.

The air-filled and water-filled periscopes produce about the same image because there is no refraction between the object, mirrors and then your eye. (Consider the small change through the plastic circles to be negligible.) Only in the periscope open to water and air do you see refraction at the water-air boundary that affects the clarity of the image you see.

Tuesday, June 23, 2015

Samsung's "Transparent" Safety Truck

They finally did it: a truck with an index of refraction n = 1.0. Well, no. But still, this uses readily available technology to do something very groovy.

This seems like a great idea. It should be mandated for any large vehicle (trucks, RVs) on two-lane roads.

Samsung Safety Truck (Versión en Español)


Samsung Safety Truck (Versión en Español)

Fragile floating rainbow whales

These ephemal bubble clouds flourish where the breezes are gentle and humidity is high. Small children delight in seeing them, but are also all to eager to destroy them. Still though, these amoeba-like examples of fluid dynamics, surface tension, and thin film interference are mesmerizing.

Giant Stinson Beach Bubbles


I especially love the longitudinal shot from behind the bubble master. The disintegration is magical.

Monday, June 22, 2015

Down Periscope!

Using the loosest form of the word, I am the advisor of our high school's AVBotz Robotics Team. These students are self- or peer-taught and exceed the electronics knowledge I can bestow on them in a regular Physics classroom. They have built an autonomous underwater vehicle (AUV) and compete in the International RoboSub competition every summer against universities such as CalTech, Cornell, Penn State, ASU, etc. (Notice I said universities!)

When the sub is being water tested some students are on the deck editing code on their computers at a safe distance from the pool while others are in the water to manipulate the sub and task props. At a recent water test we frequently asked the swimmers what the sub was doing since we couldn't see it in detail from above the water. The poor swimmers had to duck underwater then return up to say "It's heading straight," duck down and up again to say, "Now its dropped a foot," etc. as the sub was going through maneuvers.

It is probably the first time in my life I thought, "I need a periscope."

Although it wasn't the first time I had thought of building one. The Exploratorium's "Square Wheels" book of demonstrations by Don Rathjen and Paul Doherty has a project called "Periscope With A Twist." The instructions explain how to make a PVC periscope you can twist and see how the orientation of the image changes. I knew I would have to modify the design because I wanted to have part of it underwater. As light moves from air to water it refracts or bends because light waves travel more slowly in water. If I had used the original design the mirror I was looking into would give me a view of the water level within the tube but would not allow me to see underwater. I needed to seal the mirror with something transparent at least on the end that would go into the water. I decided sealing both sides would be best so I wouldn't ever accidentally dip the unsealed end in the water.

So I was off to TAP Plastics and got two of my favorite planar mirrors for a few dollars each. I was planning on cutting some transparent scrap to seal off my ends when I found pre-cut circles 4 inches in diameter. It required me to up my PVC pipe size but I found 4 inch solid PVC drainage pipe and two 90 degree elbows to fit. The pipe only came in 10 foot lengths so for awhile I awkwardly maneuvered my son in a shopping cart through Home Depot while holding the pipe vertically. (FYI the fine-toothed hack saw in the molding aisle is the best cutting option if you didn't bring a truck.) The TAP Plastics bill was $10; the pipe was $10 but I have enough for two more periscopes at least and the two elbow joints were less than $7. That makes the total cost of the raw materials to be about $20 per periscope.


I was pleasantly surprised to find that because I had increased the pipe size I did not have to cut the elbow joints to hold the mirrors as in the original plans. The mirrors fit nicely into the pipe and I was able to hot glue them in place (A). The hot glue job is not pretty; it was difficult to glue a rounded corner of a planar mirror to the inside a PVC pipe on a curve when I wedged all four corners in at once (B). But they seem secure! The 4 inch circles fit nicely into the elbows and a bit of hot glue secured them (C). There was not enough hot glue for me to feel that they were waterproof though. I used window caulking around the circles and the ends seem water proof (D). I used PVC glue between the elbows and the straight piece. I added some more window caulking along the straight pipe and elbow seam even though it was glued (E).


I had a periscope! Of course I had to test it out in a pool and my daughter was happy enough to help me out. As I expected the periscope is very buoyant, it is almost 4 feet of air filled tube after all. If you hold one end in water only one elbow will be submerged; it takes some force to hold more of the periscope under water if you would like to view objects deeper. If I had not been holding the periscope for my daughter it would have risen up too high for her to look through.

I do plan to make another periscope that is not sealed and not glued in place so that I can use it as the original project plans intended. There may also have to be a third one built for my kids; they don't like watching me make toys for school that they don't get to keep. Explaining this periscope alongside an unsealed one will bring up refraction, planar mirrors, image orientation, buoyancy and more!

Saturday, June 13, 2015

A giant eyeball… in your classroom!

When we talk about the refraction of light in physics it can seem abstract to students which surprises me since it is everywhere in their daily life. I like to bring up the convex lens of the human eye as an example and despite having a lot of AP Biology and anatomy students, they really haven't put the two concepts together. I model the way the eye works to my class by focusing light from outside our classroom onto a piece of white paper through a convex lens. I usually send a student outside to move around so the rest of the students can see his/her image and darken the room. The comments they make in disbelief are similar year to year: "He's upside down!" or "OMG its moving!" or my personal favorite, "She's in color!"

This year I added my own version of the Exploratorium's eye model exhibit using an old laundry room light. Since it was translucent white already, I masked off all but the top and spray painted it black. The original exhibit has a two foot diameter plastic sphere about the same shape that is clear except for a white colored portion the size of what I left white.


This demonstration would not work if I did not have a convex lens with a focal length that matched the height of the light. Luckily I had a magnifying glass that was very close and focuses an image on the white portion is held just outside the bottom of the light. If I push the magnifying glass right against the bottom of the light the image is not focused and it models how slight changes in focal length can create vision problems. (Although the focal length isn't changing the slight position change of the lens means that the retina isn't at the focal length and thus produces a fuzzy image.)

From there I show some basic images of nearsighted and farsighted lenses and discuss how their focal length varies. I ask students to decide if a convex or concave lens would fix them and we discuss how they would adjust the focal length by making it longer or shorter. Its interesting to take a poll of the class and ask who is nearsighted and farsighted; there are more farsighted than nearsighted people and it's rare to have a near-sighted student in class. Before I ask the students though I try to guess if they are nearsighted or farsighted based on the appearance of the eyes. A nearsighted person will have eyes that appear smaller since a concave lens is used to correct it; although it is easier to see if the sides of their face are closer together than the rest of their face when viewed through their glasses. A farsighted person will have eyes that appear larger since a convex lens is used to correct it.

And to bring in your more literary students you can reference the optics mistake in The Lord of the Flies. The character Piggy is described as being nearsighted (myopic) which would require corrective concave lenses. Early in the book Piggy's glasses are used to start a fire, something that could only be done by focusing sunlight from a convex lens. Tell your students to bring that up to their English teachers; it's cross-curricular learning!

Color subtraction—reflected color

They say necessity is the mother of invention and it's very true for teachers. I found myself wanting to do a reflected color (color subtraction) lab in my Conceptual Physics class that was observation based and introductory before a lecture. An internet search found nothing I could use so I had to come up with something myself.

NOTE: Any reflected color demonstrations or labs have to be in utter darkness. Any light from an outside source can be reflected off your object and will not produce the results you want.

At first I wrote one that used my light ray boxes and shone light through filters on a paper that students would color with Mr. Sketch markers. When I tried the experiment myself though, I wasn't getting the results I wanted using the filters. I turned to my trusty Inova Microlights in red, green and blue and found that they worked well when shone on the same paper but I didn't have enough for lab groups nor the time to get to an electronics warehouse that carried them locally. It was the night before I wanted to do the lab and I felt like a first year teacher not knowing what I would do the next day.

I thought if I didn't have a light source in the colors I wanted then perhaps I could make them using my computer. I started making images in the colors I wanted and trying to project them before I thought, "Someone must have done this already." Sure enough I found an app called Color Light Changer (free version) which did exactly what I needed it to. The program allows you to choose colors using either HSV, RGB or HEX color systems. To produce as colors with the right amount of red, green and blue as possible and for easy student manipulation I chose RGB. I set it up to produce red, yellow, green, cyan, blue, and magenta with little transition time. [See also RGB Colors and RGB Explorer.]


Now I had a reliable light source in the colors I wanted but I had to still find somethings that were the right colors to reflect that light. Since my kids were in bed as I was contemplating this as I put away their toys and found myself looking at exactly what I needed. First I used a set of four wooden balls that were red, green, yellow and blue. With the help of my patient husband that just wanted to go to bed I took this video of the four wooden balls under the changing light.

I only had one set of the wooden balls which wouldn't work for eight lab groups and I really wanted my students to try it themselves. I was pleased with the results but found that I wanted the other two primary pigments, magenta and cyan. I found one or two Duplos pieces in magenta but since we purposely don't have many "girl" Duplos I didn't think I'd have enough. But after dumping my kids' entire Duplos collection out onto the floor I managed to find enough magenta and a surprise store of cyan! Although humorously heterogenous, each primary pigment and secondary pigment was represented for each of my lab groups.


At this point I was promising we would be able to go really soon ... just as soon as I made a second video using the Duplos pieces:


For the actual lab the next morning students either used their own phones after downloading the app or used one of a few Samsung tablets that I borrowed from another classroom and preloaded with the app. Each group was able to observe the reflected color from the Duplos and of course anything else they could get in front of the light. It ended up being simple to do, relatable and more importantly for any light experiment it worked like it was supposed to.

Color addition egg

I enjoy teaching color and light not just because its fun hands-on physics but because I get to blow my students' minds. There is a special pep in your step on days you get to mess with them and tell them their elementary school teachers lied to them. My color and light lecture days are almost as fun as Van de Graaff demo day when I shock them repeatedly; almost.

Students "oooh and ahhh" over color addition; they never believe that red and green make yellow until they see it and some of them not even then. I have a few favorite color addition demos: "Colored Shadows" from The Exploratorium Snackbook; a Mysterious Glowing Ball from Educational Innovations; and this year a color changing egg. I found this at a local toy store and bought it for my son for Easter. It cycles through colors and I ask my students how it is able to create six different colors. Most students come to realize that there are only three LEDs in the egg; sometimes only one is on and sometimes two.

Since my daughter broke the first one we bought (she wanted to play with her brother's toy—she replaced it with coins from her piggy bank) I plan to take it apart so I can show my students the inner LED lights without the translucent white egg exterior. At less than $10 from a variety of sources (Amazon, etc.) it is a cheap and easy demonstration of color addition. Below is a video I took of it cycling through colors although it is better to see it in person.

Thursday, May 28, 2015

99.96% Black

A black purer than Ivory soap.

The substance, which is made out of carbon nanotubes and grows on aluminum foil, appears almost like a black hole because, in a way, it acts similarly to our eyes. Black holes produce such a large gravitational pull that light cannot escape it. Vantablack, on the other hand, absorbs so much light, roughly 99.96 percent, that it appears just as dark as a black hole. Even though the two objects are very different, they both confuse our eyes, which are not used to such an utter absence of light.

Click over to the article to see an image. Black can be a difficult subject for photographers.
This Material is So Black That Your Eyes Can't Fully Understand It

What else is black of late on the Internet?

Strindberg's need.


This Norah Jones track.

Sunday, March 22, 2015

The real world keeps taking away my real world physics

Once upon a time (a few years ago), a reasonable high school physics question was, "Why do the first broadcasters in a given television market get the lowest channel numbers on the dial?" In Sacramento, for example, that would be the NBC affiliate, KCRA, who got Channel 3. Channel 1 was never licensed to anyone by the FCC, and Channel 2 was given to the neighboring San Francisco market. The channel numbers correspond to broadcast frequencies: lower channel numbers broadcast on lower carrier frequencies. The corresponding longer waves are better at diffracting over hills and into valley, delivering commercial messages to more viewers.

But broadcast technology changed in 2009, so the problem is no longer relevant, as far as I know.

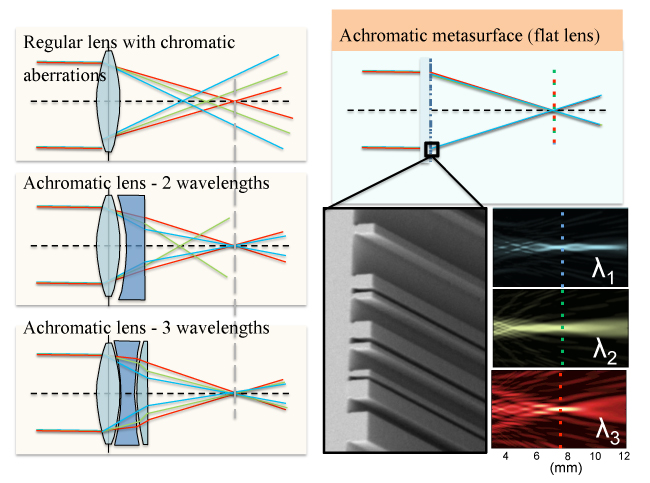
And now chromatic aberration? Researchers at Harvard have apparently developed a flat lens that focuses all colors at the same point.

Perfect colors, captured with one ultra-thin lens
NO NEED FOR COLOR CORRECTION—HARVARD PHYSICISTS’ FLAT OPTICS, USING NANOTECHNOLOGY, GETS IT RIGHT THE FIRST TIME


Well, we'll always have The Dark Side of the Moon.


Thursday, January 22, 2015

Captain Disillusion—Russian Ghost Car Debunk

Captain Disillusion is at it again…

Russian Ghost Car DEBUNK


CD is always entertaining and informative. The language can veer off into the "earthy" category from time to time, so don't show 'em in class without screening them first!

Sunday, January 11, 2015

FLIR's next generation smartphone thermal camera

The Consumer Electronics Show (CES2015) was recently held, and vendors were pushing their latest and greatest gizmos.

This includes FLIR, whose FLIR One thermal camera case for iPhone 5/5S was discussed in a previous post.

The biggest complaints about FLIR One was that it was limited to the previous-generation iPhone. People with an iPhone 6 or an Android were left out of the thermal imaging party.

FLIR aims to address these concerns with their next generation FLIR One model. It's not a case, but an attachment.

Next Generation FLIR One (CES2015)