| The Forces Playlist of Phyz | ||
| SONG | ARTIST | YEAR |
| Carry That Weight | The Beatles | 1969 |
| First Push | DeVotcKa | 2005 |
| Force of Nature (Bonus Track) | Lenka | 2008 |
| Force Ten | Rush | 1987 |
| Forces ... Darling (Featuring Earl Zinger) | Koop | 2006 |
| Friction | Imagine Dragons | 2014 |
| Friction | Morcheeba | 1998 |
| Friction | Shame | 2018 |
| Friction | Tauk | 2014 |
| Friction | Television | 1977 |
| The Girl With the Weight of the World in Her Hands | Indigo Girls | 1990 |
| Grace In Gravity | The Story | 1991 |
| Gravity | Against The Current | 2015 |
| Gravity | Daughtry | 2018 |
| Gravity | Jesse Cook | 2005 |
| Gravity | John Mayer | 2006 |
| Gravity | A Perfect Circle | 2003 |
| Gravity | Sara Bareilles | 2008 |
| Gravity | With Confidence | 2017 |
| Gravity (feat. JMR) | Jai Wolf | 2016 |
| Gravity (Stripped) | Wage War | 2017 |
| Please Push No More | Gary Numan | 1980 |
| Pull | Blind Melon | 1996 |
| Pull | Microwave | 2019 |
| Pull Shapes | The Pipettes | 2007 |
| Pulling Mussels (From The Shell) | Squeeze | 1980 |
| Push | Matchbox Twenty | 1996 |
| Push | Sarah McLachlan | 2003 |
| Push on for the Dawn | Corinne Bailey Rae | 2016 |
| Stop Draggin' My Heart Around | Tom Petty & The Heartbreakers | 1981 |
| Tension Is A Passing Note | Sixpence None The Richer | 2002 |
| Weightless | Adam French | 2017 |
| Weightless | Blondfire | 2004 |
| Weightless | Brina Eno and Daniel Lanois | 1989 |
| Weightless | Chris Burkich | 2016 |
| Weightless | City And Colour | 2011 |
| Weightless | Third Eye Blind | 2016 |
| Weightless | Washed Out | 2013 |
| Weightless | 311 | 2011 |
| Weightless (feat. Shungudzo) | Hayden James | 2019 |
Showing posts with label gravity. Show all posts
Showing posts with label gravity. Show all posts
Wednesday, September 25, 2019


Friday, November 03, 2017
Simple demo big gains
I have noticed a big difference in student comprehension when the problems become real to them. Simple visuals can have a big impact on the students "getting it." I can't count the number of times I've tossed a tennis ball around to make a point. Somehow holding the tennis ball at different heights or just tossing it up to catch it again can lead to "Oooh now I see what's happening!" So I have several simple demos that help students visualize their problems, a block or two hanging from the ceiling with spring scales, a stuffed toy in a bucket, etc.
 When we studied springs I found a Pasco spring demo set with five springs all of the same length but different spring constants. The first stage was to hang a 20 g mass from the red spring and see it barely settle above the table. I asked students what would happen if I were to hang a 500 g mass then from the green (which they assumed was identical). They were surprised at its shorter elongation and when I asked why they all said "it has a larger spring constant."
For the next stage I set up two large ring stands with another bar clamped horizontally between them. I dramatically assure students it is level with the springs hanging at their relaxed length. Then I hang a 500 g mass from each and they can see the slight differences in elongation. Then the 500 g masses are switched out for 1 kg and the difference between them becomes more pronounced (left). Applying this to Hooke's Law they could all calculate the spring constant for each spring. But this made it way more interesting than five given forces and elongation lengths to calculate the spring constant from a word problem.

When my AP Physics C class started center of mass, many could calculate the center of mass with equations but had a hard time visualizing what that actually meant. A common problem involves materials of different densities stuck together, for example a piece of aluminum and a piece of iron. To make a real life version I found a piece of Styrofoam that was the same thickness as a piece of scrap wood. I drilled three holes in the wood, stuck three dowels into the holes and stuck the dowels into the Styrofoam. I wrapped the whole thing in paper to make it appear uniform but I did tell students it was made of two different materials. I showed it to students and asked what information they would need to solve for the center of mass. Of course I play with them a bit and after each response I say, "Ok, now you can solve it right?" to which they predictably respond, "No, we need XYZ too!" Eventually, I give them the dimensions of the whole thing and let them solve for it. The dimensions are listed on the paper below (the "total mass" includes the paper in case they ask).
They are not surprised that the center of mass is closer to the wood side but they are surprised that for this particular arrangement it's actually on the wood. It's a simple practice problem but once they're done I can balance the piece on my hand at (almost) the exact position they predicted, about 5 cm in from the wood side. Students that struggle with this homework problem were successful with this in-class practice problem.

Another simple one my colleague Jessie Chen shared with me can be done by every student in your class on the cheap. Like less than $1 cheap. Most dollar stores sell packs of cards for $1, or even a double pack if you're lucky. Each student will need one plastic playing card (or index card) folded at a right angle along the length of the card. Place it on the corner of the table with one corner hanging off the edge of the table. Place two pennies on the card so that one is on the portion on the table and one is on the portion hanging off the table. You can use a pen or pencil to press on the card so that when it moves it pivots around that point. Flick the vertical part of the card on the side that is hanging off the table. This causes the card to move so that it is no longer supporting the penny hanging off the table and it will fall straight down due to gravity. On the other side the vertical portion of the card will push forward, applying a horizontal velocity to the penny and making it shoot off the table in a half a parabola shape. You can hear (and see) the two pennies hitting the ground at the same time. Many of us have a fancy machine that demos this for us, sometimes called a "Drop/shot" or a Newton's Second Law machine, and those work great, don't get me wrong. But to be able to hand these to my students and have them try it, nothing can be better than that!
Saturday, December 03, 2016
Roll the dice
Studying the Law of Universal Gravitation can be heavy (ba dum tss) for students. Each year my students push through the long equations and we go without a lab for about a week. That's pretty unusual in my classes and they can feel the change. If a student asks why we aren't doing a lab I usually reply, "Well I can't haul Jupiter in here to measure it so ...."
Practice problems were always difficult for students, more about living by the Order of Operations (PEMDAS) then actually understanding the problem. Some would take one look at that period of revolution equation and say "No, nuh uh, not gonna make me. Nope."

I tried to make them fun by creating word problems. It wasn't just calculating the Force of Gravity between you and Jupiter, "Let's compare that to the Force of Gravity between you and the doctor that delivered you! Jupiter's gravity doesn't affect you and astrology is bunk!" But still going through problems together wasn't engaging students.
A few years ago I had an idea to make our practice calculations into a dice game. One di has problems to solve and the other different planets. There are actually two different planet di so that students can choose. Here is a print ready file, I suggest thicker paper to give it some structure. They take some time to assemble but you can use them for years to come.

The kids loved it. They probably work through more practice problems than they would have if I had just supplied them with certain ones to do and they were very invested in letting chance choose which they would calculate. A new development this year was that they are so used to checking their answers with me while they whiteboard they wanted to know the "answer." That was harder to do as I walked around the room since there were so many variations. I decided to create and project an answer chart in Excel.
Depending on how your school or district is defining "physics" from the NGSS framework you may or may not be finding yourself teaching more Earth & Space Science. We had our own sort of NGSS Draft among Chemistry, Physics and Biology trying to divide up the Earth & Space Science topics. In my district Physics ended up, rightly so I feel, with HS-ESS1-4:
This goes well with HS-PS2-4 about the Law of Universal Gravitation:
I'm still working on adding more of Kepler's Laws into the curriculum, there is an outline here on this Disciplinary Core Idea about it.
Practice problems were always difficult for students, more about living by the Order of Operations (PEMDAS) then actually understanding the problem. Some would take one look at that period of revolution equation and say "No, nuh uh, not gonna make me. Nope."

I tried to make them fun by creating word problems. It wasn't just calculating the Force of Gravity between you and Jupiter, "Let's compare that to the Force of Gravity between you and the doctor that delivered you! Jupiter's gravity doesn't affect you and astrology is bunk!" But still going through problems together wasn't engaging students.
| Your birth Mass (kg) | Jupiter & Doctor (kg) | closest distance (m) | Universal Gravitational Constant | Force of Gravity (N) |
| 4 | 1.90E+27 | 588000000000 | 6.67E-11 | 1.47E-06 |
| 4 | 100 | 0.1 | 6.67E-11 | 2.67E-06 |

The kids loved it. They probably work through more practice problems than they would have if I had just supplied them with certain ones to do and they were very invested in letting chance choose which they would calculate. A new development this year was that they are so used to checking their answers with me while they whiteboard they wanted to know the "answer." That was harder to do as I walked around the room since there were so many variations. I decided to create and project an answer chart in Excel.
Depending on how your school or district is defining "physics" from the NGSS framework you may or may not be finding yourself teaching more Earth & Space Science. We had our own sort of NGSS Draft among Chemistry, Physics and Biology trying to divide up the Earth & Space Science topics. In my district Physics ended up, rightly so I feel, with HS-ESS1-4:
| HS-ESS1-4. | Use mathematical or computational representations to predict the motion of orbiting objects in the solar system.[Clarification Statement: Emphasis is on Newtonian gravitational laws governing orbital motions, which apply to human-made satellites as well as planets and moons.] [Assessment Boundary: Mathematical representations for the gravitational attraction of bodies and Kepler’s Laws of orbital motions should not deal with more than two bodies, nor involve calculus.] |
|---|
| HS-PS2-4. | Use mathematical representations of Newton’s Law of Gravitation and Coulomb’s Law to describe and predict the gravitational and electrostatic forces between objects. [Clarification Statement: Emphasis is on both quantitative and conceptual descriptions of gravitational and electric fields.] [Assessment Boundary: Assessment is limited to systems with two objects.] |
|---|
Saturday, November 19, 2016
Inertia of Fall Leaves
This video has gone viral with good reason, its super cool.
In this slow mo video we see an amazing example of inertia as the bed of leaves remain as the net is lowered beneath them. What else can you discuss about with this video?
In this slow mo video we see an amazing example of inertia as the bed of leaves remain as the net is lowered beneath them. What else can you discuss about with this video?
Saturday, October 08, 2016
Inertia Ball Demo
Many people have some version of this Inertia Ball (available from Sargent Welch, and more) and may use it for an example of inertia similar to how I have in the past. There are several videos online including this one that demonstrate the classic demo (although I don't mention tensile strength yet):
This year I asked students in groups to predict what would happen before I did it. Students were to take a few minutes of discussion; some students came up to inspect the string and gently lift the ball to see heavy it was. I asked each group to share out what they thought would happen when I pulled the string slowly; the majority of the groups correctly guessed that the top string would break. After I did the demo I asked students to discuss again what would happen if the bottom string was pulled quickly. This time groups were split, some saying that the top string would break again and some that the bottom string would break. At this point I introduced students to the word "Inertia," they had not been introduced to it before although several already knew it and start singing the "Bill Nye: The Science Guy" introduction song.
Many of these inertia balls also have a third loop on the side of the ball. I ask students what would happen when I pulled the string from this loop directly to the side. "Are you doing it quickly or slowly?" they ask and I tell them they can think of it either way but when they share out they will have include their choice in their description. Again groups are split, some think that if I pull slowly the top string will break again, others think that if I pull it quickly the side string will break. I pulled the side string slowly at first and students saw the ball shift to the side but the top string held. I briefly said that this looks like a force in the horizontal direction did not affect the vertical direction. I reminded them that we saw a similar directional independence in our projectile unit. I let the ball hang freely again then pull the bottom string quickly and it breaks.
 During my first period of the day while students were discussing I decided to add to this demo and make a tennis ball with the similar three eye hooks. I hung the ball and asked the students what they thought would happen if I pulled on the bottom string. Again I let them choose if they would like to think of it being pulled slowly or quickly. This time the top string breaks regardless of the bottom string being pulled quickly or slowly. Without prompting students start discussing why it happens, "Its not heavy enough!" or "See, I told you, it didn't have enough inertia."
While I gave these instructions on my whiteboard I made a powerpoint that has a visual for students as well as the questions.
For high school teachers, this connects well with the NGSS Science & Engineering Practices. Below are the excerpts I thought were most aligned to this activity:
Asking Questions:
Many of these inertia balls also have a third loop on the side of the ball. I ask students what would happen when I pulled the string from this loop directly to the side. "Are you doing it quickly or slowly?" they ask and I tell them they can think of it either way but when they share out they will have include their choice in their description. Again groups are split, some think that if I pull slowly the top string will break again, others think that if I pull it quickly the side string will break. I pulled the side string slowly at first and students saw the ball shift to the side but the top string held. I briefly said that this looks like a force in the horizontal direction did not affect the vertical direction. I reminded them that we saw a similar directional independence in our projectile unit. I let the ball hang freely again then pull the bottom string quickly and it breaks.

While I gave these instructions on my whiteboard I made a powerpoint that has a visual for students as well as the questions.
For high school teachers, this connects well with the NGSS Science & Engineering Practices. Below are the excerpts I thought were most aligned to this activity:
Asking Questions:
O that arise from careful observation of phenomena, or unexpected results, to clarify and/or seek additional information.
O to clarify and refine a model, an explanation, or an engineering problem.
Modeling:
O Develop, revise, and/or use a model based on evidence to illustrate and/or predict the relationships between systems or between components of a system.
Monday, October 03, 2016
Air Pressure Rocket on a Hot Day
I use my Arbor Scientific Air-Powered Projectile rocket every year. With my Conceptual Physics students we take the data as a class, determine the average time and use that to calculate the maximum height. With my older Physics students this year I decided to open it up. I told students how the rocket worked and asked them to write their own procedure to find the maximum height and initial velocity. Not surprisingly, groups independently determined that the best way to
determine this information was to time the rocket's entire flight and
then use half that flight time to determine the rest. Once students determined how they were going to test it, we went out to an open space and launched the rocket five times with the "low" washer and five times with the "high" washer. Each group collected their own data for their calculations but then I collected their results for each period.
I noticed during three periods of trials that the rocket launched sooner later on in the day. In the morning the rocket consistently launched after 5 pumps with the "low" washer and 7-8 pumps with the "high" washer. By the afternoon it launched after barely 4 pumps with the "low" and 5-6 with the "high." It was a warm day so temperature definitely played a role. Looking at archived temperature data for our area it was about 82 degrees for the first period's data, 90 degrees for the second and 97 degrees for the third. If you look at the consolidated data for all three periods you can see that the maximum heights and initial velocities decrease as the day went on.

I noticed during three periods of trials that the rocket launched sooner later on in the day. In the morning the rocket consistently launched after 5 pumps with the "low" washer and 7-8 pumps with the "high" washer. By the afternoon it launched after barely 4 pumps with the "low" and 5-6 with the "high." It was a warm day so temperature definitely played a role. Looking at archived temperature data for our area it was about 82 degrees for the first period's data, 90 degrees for the second and 97 degrees for the third. If you look at the consolidated data for all three periods you can see that the maximum heights and initial velocities decrease as the day went on.
My last period did get a chance to try the "super" washer. Now I wish I had tried it in the morning for comparison when it was (relatively) colder.
There are lots and lots of things you can do with this rocket. There is an additional set of wood angled blocks for consistent angled shots you can purchase.
Monday, September 26, 2016
Vernier's Ball Toss Lab
 I decided this year that if I was going to continue to take the time to teach students how to interpret kinematics graphs of motion (displacement-time, velocity-time and acceleration-time graphs) I was going to bring them up more often during the year. As we transition in my class from basic kinematics equations to projectiles I was looking for a lab that did just that. This is where it pays to keep more resources than you currently use in your curriculum. I found a pdf I had downloaded from Vernier using motion detectors and a ball. The lab looked simple enough and I tried to reproduce the results myself.
The original instructions had called for a wire basket to be placed over the motion detector to protect it from the ball's return. I tried this with a tennis ball and found it very difficult to get the tennis ball to go up and down directly above the sensor. After lots of attempts (seriously like 50) I was able to get three sets of data to work with:

After tweeting to @VernierST I was able to get a few suggestions that made it basically fool proof:
1. Instead of a small tennis ball use a larger basketball (more reflective surface for the sonar).
2. Instead of a wire basket, which I didn't have enough of anyway, try putting two books on either side of the sensor.

Since my books are shorter I had students put two books on either side of the sensor as it was facing up on the table-top (above a picture from their lab). Students got great results and were able to focus more on analyzing the graphs using the tools in LoggerPro. Below is a sample set with the points I asked students to mark in their lab. Overall the lab was actually pretty quick and reliable. I think I could even move up the timing of the lab in my unit as an introduction to gravity rather than a review. Here is the lab I used.

Thursday, September 08, 2016
New goals & gravity oops
My regular Physics class starts the year with basic graphing skills and learning how to interpret graphs of motion. Tuesday we used Vernier Picket Fences and Photogates to determine the acceleration due to gravity.

Usually the next day I have students create another planet or moon in our Solar System to create the same graphs based on their acceleration due to gravity (activity here). Starting with the acceleration-time graph (constant horizontal line) students find the area under the curve to plot the velocity-time graph (line with a positive slope) and the area under that curve to plot the displacement-time graph (a power curve).
By this time in the unit my students understand the relationship between the three graphs for something moving with a constant acceleration. They've even graphed something similar by hand; and they saw the same shape with their lab (above). So I found myself wondering, "Why am I making them do it again?" I gave a small quiz last week and noticed that students were having trouble with tangent lines to approximate the slope of a curved line.
So I re-evaluated what I wanted students to learn/ practice with this activity:
- Students need to practice drawing accurate tangent lines and determining their slopes.
- Students should understand that while a constant acceleration creates a positive linear velocity-time graph and a power curve on the displacement-time graph the acceleration will not always have the same value.
- Students often find the area under the curve to find velocity from acceleration-time graphs but need practice finding the slope of a displacement-time graph to determine the velocity and eventually acceleration.
After reflecting on this I changed the activity. I took the acceleration due to gravity at the different locations in our Solar System and worked the data backwards to create the displacement-time graphs for each one. (data here) I printed out enough copies for students to work in pairs and laminated them; I also laminated graph paper. Students were given the displacement-time graphs Wednesday and asked to practice their tangent skills to determine the instantaneous slope at several points. They used these values to create a velocity-time graph on the graph paper using dry erase pens. Note: Overhead projector pens work as well and since they are finer tip would probably have worked better.

Students dove into it, determined to get very close values to the actual acceleration due to gravity. I soon found however that many were trying to use power regressions to solve it; I have quite a few students in AP Calculus. Others found the slope at the beginning and end of the curve, connected those two dots and called it a day. Students were calculating accelerations due to gravity for Mars or Mercury at 400+ m/s2! After some help around the room most students were better about using the tangent method, finding five to six points, paying closer attention to scale, and felt pretty good about their calculations. Yet as students came up to check their answers with me they were consistently twice as high as the actual value. Enough students had almost twice the values that I went back to check my data.
I had calculated d = at2 not d = (1/2)at2.
As my students would say, *face palm*; I totally blame the toddler-induced lack of sleep. The students were doing it right (good) and they didn't really know the acceleration due to gravity on other planets anyway so they didn't catch my mistake (even better). In the end I decided it would be a good way of introducing the equation next week and discussing why it is so important to include that (1/2).
I've fixed the data (available again here) and the printing pages (pdf or google doc) and plan to do this again next year. I have very sparse grid lines; depending on your students' math level you might want to give them more grid lines. In the end students were able to practice a skill, broaden their understanding of a concept and I didn't have to grade anything. Aside from my miscalculation, it was a win all around.

Usually the next day I have students create another planet or moon in our Solar System to create the same graphs based on their acceleration due to gravity (activity here). Starting with the acceleration-time graph (constant horizontal line) students find the area under the curve to plot the velocity-time graph (line with a positive slope) and the area under that curve to plot the displacement-time graph (a power curve).
By this time in the unit my students understand the relationship between the three graphs for something moving with a constant acceleration. They've even graphed something similar by hand; and they saw the same shape with their lab (above). So I found myself wondering, "Why am I making them do it again?" I gave a small quiz last week and noticed that students were having trouble with tangent lines to approximate the slope of a curved line.
So I re-evaluated what I wanted students to learn/ practice with this activity:
- Students need to practice drawing accurate tangent lines and determining their slopes.
- Students should understand that while a constant acceleration creates a positive linear velocity-time graph and a power curve on the displacement-time graph the acceleration will not always have the same value.
- Students often find the area under the curve to find velocity from acceleration-time graphs but need practice finding the slope of a displacement-time graph to determine the velocity and eventually acceleration.
After reflecting on this I changed the activity. I took the acceleration due to gravity at the different locations in our Solar System and worked the data backwards to create the displacement-time graphs for each one. (data here) I printed out enough copies for students to work in pairs and laminated them; I also laminated graph paper. Students were given the displacement-time graphs Wednesday and asked to practice their tangent skills to determine the instantaneous slope at several points. They used these values to create a velocity-time graph on the graph paper using dry erase pens. Note: Overhead projector pens work as well and since they are finer tip would probably have worked better.

Students dove into it, determined to get very close values to the actual acceleration due to gravity. I soon found however that many were trying to use power regressions to solve it; I have quite a few students in AP Calculus. Others found the slope at the beginning and end of the curve, connected those two dots and called it a day. Students were calculating accelerations due to gravity for Mars or Mercury at 400+ m/s2! After some help around the room most students were better about using the tangent method, finding five to six points, paying closer attention to scale, and felt pretty good about their calculations. Yet as students came up to check their answers with me they were consistently twice as high as the actual value. Enough students had almost twice the values that I went back to check my data.
I had calculated d = at2 not d = (1/2)at2.
As my students would say, *face palm*; I totally blame the toddler-induced lack of sleep. The students were doing it right (good) and they didn't really know the acceleration due to gravity on other planets anyway so they didn't catch my mistake (even better). In the end I decided it would be a good way of introducing the equation next week and discussing why it is so important to include that (1/2).
I've fixed the data (available again here) and the printing pages (pdf or google doc) and plan to do this again next year. I have very sparse grid lines; depending on your students' math level you might want to give them more grid lines. In the end students were able to practice a skill, broaden their understanding of a concept and I didn't have to grade anything. Aside from my miscalculation, it was a win all around.
Monday, July 25, 2016
Arcade Physics
I was trapped at attending a party at Chuck E Cheese yesterday and while being drug from game to game by the kids I noticed a few presented some interesting Physics applications.
The first was called Barrel of Monkeys after the long popular board game and featured the same iconic hand holding monkeys. This demo video goes through the game premise but at 40 seconds in you can notice some pendulum characteristics:
As the demo plays on we can see that as the monkeys in the chain increases the time. Timing would be difficult without some video editing and the length of the pendulum would have to be discussed in units of "monkeys." Ask students to analyze it and see if it holds true to what they have learned about Physics.
The second game that caught my eye was this "Slam A Winner" game that included a bouncy ball dropped through a tube towards a spinning wheel of holes. Each hole had a different ticket amount on it, of course the larger valued holes have yellow rings around the holes to increase bounce possibilities. Students could be given the height the ball drops through and figure out how long it would take to travel through it. If they know the time it takes the ball to fall they can figure out how much the wheel should be allowed to turn before they drop the ball if they know its radius. Should you drop the ball when the hole you want is a quarter of a turn away? half a turn? less? I would simplify the game for students by ignoring the bouncing part.
There were quite a few more that didn't quite behave as expected, usually due to parts of the game designed to make winning harder to do. You can ask students to analyze a game for basic Physics properties (mechanics, kinematics, collisions, etc.) asking them which parts of the game :
1. Follow principles of Physics as you would expect
2. Don't seem to be following Physics and why
Of course the air hockey table was great low friction fun; even if the two year old kept knocking the puck into his own goal.
The first was called Barrel of Monkeys after the long popular board game and featured the same iconic hand holding monkeys. This demo video goes through the game premise but at 40 seconds in you can notice some pendulum characteristics:
As the demo plays on we can see that as the monkeys in the chain increases the time. Timing would be difficult without some video editing and the length of the pendulum would have to be discussed in units of "monkeys." Ask students to analyze it and see if it holds true to what they have learned about Physics.
The second game that caught my eye was this "Slam A Winner" game that included a bouncy ball dropped through a tube towards a spinning wheel of holes. Each hole had a different ticket amount on it, of course the larger valued holes have yellow rings around the holes to increase bounce possibilities. Students could be given the height the ball drops through and figure out how long it would take to travel through it. If they know the time it takes the ball to fall they can figure out how much the wheel should be allowed to turn before they drop the ball if they know its radius. Should you drop the ball when the hole you want is a quarter of a turn away? half a turn? less? I would simplify the game for students by ignoring the bouncing part.
There were quite a few more that didn't quite behave as expected, usually due to parts of the game designed to make winning harder to do. You can ask students to analyze a game for basic Physics properties (mechanics, kinematics, collisions, etc.) asking them which parts of the game :
1. Follow principles of Physics as you would expect
2. Don't seem to be following Physics and why
Of course the air hockey table was great low friction fun; even if the two year old kept knocking the puck into his own goal.
Thursday, February 18, 2016
Gravity's just a habit
Few people have more fun with physics—while being paid for it—than physics teachers. The band members of OK Go are an exception to this rule. It was not hyperbolic to characterize their video for "This Too Shall Pass" as an instant classic.
And if you haven't enjoyed their video for "Upside Down & Inside Out", consider this post to be a public service. It would be parabolic to characterize this one as an instant classic. Here's the video. And you'll want to go full screen.
OK Go - Upside Down & Inside Out
Such a work of video wonderfulness deserves a worthy "making of" companion. Once again, OK Go doesn't disappoint.
OK Go - Upside Down & Inside Out: Behind the Scenes - How We Did It
If you know of additional resources related to this video gem, let us know in the comments.
And if you haven't enjoyed their video for "Upside Down & Inside Out", consider this post to be a public service. It would be parabolic to characterize this one as an instant classic. Here's the video. And you'll want to go full screen.
OK Go - Upside Down & Inside Out
Such a work of video wonderfulness deserves a worthy "making of" companion. Once again, OK Go doesn't disappoint.
OK Go - Upside Down & Inside Out: Behind the Scenes - How We Did It
If you know of additional resources related to this video gem, let us know in the comments.
Sunday, January 24, 2016
Ninth Planet?!
I just finished my mini Astronomy Unit in my Conceptual Physics classes so my students are very space-centric right now. Many of them approached me very excited about the possibility of a(nother) ninth planet that has been in the news. I did tear up a bit with pride when they were able to discuss if it would be a real planet as defined by the International Astronomical Union. We discuss the changing critera for planethood when we read The Pluto Files by Neil deGrasse Tyson and how that mirrors how "real science" is done. If you're interested, my Pluto Files curriculum that follows the book is here.
The IAU's current definition of a planet (as discussed here with a history of Pluto) is:
A celestial body that (a) is in orbit around the Sun, (b) has sufficient mass for its self-gravity to overcome rigid body forces so that it assumes a hydrostatic equilibrium (nearly round) shape, and (c) has cleared the neighbourhood around its orbit.
 That last part is what kicked Pluto out of the Planet Club; it's orbit is littered with other Kuiper Belt Objects including objects that are the same size or even larger, like Eris. Now such objects are considered Dwarf Planets because they meet the first two criteria above but not the third.
Although this potential ninth planet, called Planet Nine, has not been directly observed or photographed, evidence of its existence was strong enough to prompt Cal Tech researchers to make the announcement last week. Mike Brown and Konstantin Batygin found perturbations in the orbits of other Kuiper Belt Objects that they feel must have been caused by a planet ten times or more larger than Earth. This is how Uranus, Neptune and Pluto were found although the movement caused by Planet Nine's orbit is much more complex. This method of discovery is also something we discuss in class; when scientists noticed something off about the planets' orbits they looked for a reason. Investigation driven by curiosity! Below is an infographic from Space.com that summarizes the findings.

The IAU's current definition of a planet (as discussed here with a history of Pluto) is:
A celestial body that (a) is in orbit around the Sun, (b) has sufficient mass for its self-gravity to overcome rigid body forces so that it assumes a hydrostatic equilibrium (nearly round) shape, and (c) has cleared the neighbourhood around its orbit.
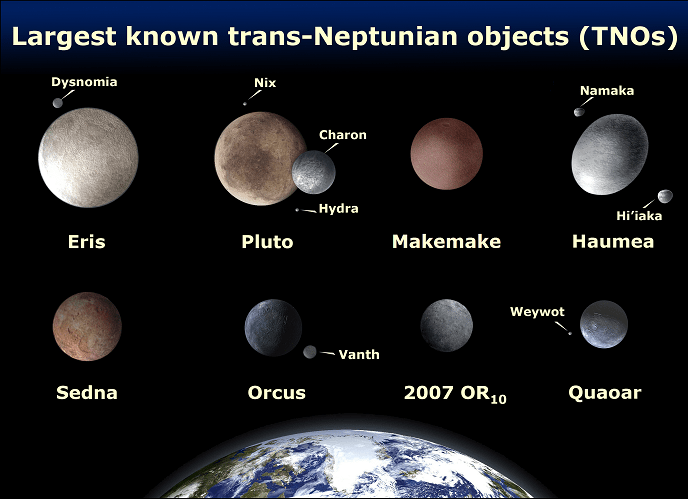
Although this potential ninth planet, called Planet Nine, has not been directly observed or photographed, evidence of its existence was strong enough to prompt Cal Tech researchers to make the announcement last week. Mike Brown and Konstantin Batygin found perturbations in the orbits of other Kuiper Belt Objects that they feel must have been caused by a planet ten times or more larger than Earth. This is how Uranus, Neptune and Pluto were found although the movement caused by Planet Nine's orbit is much more complex. This method of discovery is also something we discuss in class; when scientists noticed something off about the planets' orbits they looked for a reason. Investigation driven by curiosity! Below is an infographic from Space.com that summarizes the findings.

Tuesday, November 24, 2015
Engineering A Dart Launcher
We have five Nerf-obsessed neighbor boys who regularly have team turf wars across our neighborhood. It is adorable and we always find the small foam darts tucked under bushes and shrubs. My two year old finds them all the time and triumphantly brings them to me (they have a "return" pile set aside). One of our neighbors was playing out front with a two foot white pipe and while I watched he launched a small dart easily 40 feet in the air! Needless to say I was interested, if this was a store made toy I knew what was going on my Christmas list.
I called him over and he was more than happy to show me. He had made it at a birthday party recently; I made a mental note to forgo goody bags the next time one of my kids' had a birthday. His PVC pipe is probably 3/4" diameter and had a balloon duct taped to one of the pipe. He had stuck a straw into a form dart and held it in place with more duct tape. My neighbor's model had camouflage duct tape down the side ("That's to look cool," he told me) and two straight end connectors on each end. He let me give his a go and I determined the end pieces were not necessary. Each time I played with it, ahem, experimented with the dart launcher I was surprised at the height it achieved.
 It didn't take long for the dart launcher to catch my daughter's attention and she asked, "Mommy can we make one?" Well who can say no to that? I had already been taking a mental inventory of the PVC I had on hand so we headed to the garage. I sent my kids to find Nerf darts and I found two pieces of PVC that were too short for other projects. By the time they returned with Nerf darts I had procured straws and balloons. I cut the straight necks off the balloons and duct taped them to the ends of the PVC. The foam darts were put on to the straws and taped together. All in all it took me five minutes to build two launchers.
 I did vary the launcher for my two year old for safety as seen above and left. His PVC pipe was much shorter and there was not as much give on his balloon. I pulled the balloon farther up onto the pipe so that it could not be pulled back as far. I also used a larger and heavier dart on his straw so that it wouldn't be able to go as far. Of course, he had trouble actually launching it anyway so I shouldn't have been too worried.
My kids and our neighbor that had inspired it all happily ran outside to play with them. Our neighbor found that he could launch his original lighter dart in my son's "toddler safe" launcher just as high as his original. He liked the more compact version for mobile combat and spent the next hour running around the yard with my daughter chasing their darts. You can also launch a foam dart without a straw but it does not go as high as one attached to a straw. I was so impressed with the height of the darts I started thinking about how to use it in my classroom. I know, that probably comes as no surprise.
 I found a simple plan on a "Frugal Fun 4 Boys" blog that was similar to what we had made. I decided that since the dart launcher has several launching variables I wanted to use it as an engineering activity. I wrote up an activity (remember its a draft format!) that explained how to make the small launcher and outlined an all-class competition. The plan is assign one launch variable to each group: launch angle, balloon pull length, dart weight, straw length, etc. Each group will test the variable for maximum dart range using identical launchers and then report their findings to the rest of the class. Ideally they are also practicing some data collection skills by being careful not to change anything but their assigned variable. The whole class should be able to summarize these findings and determine the best set-up for their dart launcher to achieve maximum dart range. I'm hoping to then test each class' optimum set-up against each other in an all-class competition. I won't be teaching projectiles until the beginning of second semester but I will let you know how it goes!
I plan on purchasing a few of these refill packs so I don't have to diminish our neighborhood ammunition supply.
I called him over and he was more than happy to show me. He had made it at a birthday party recently; I made a mental note to forgo goody bags the next time one of my kids' had a birthday. His PVC pipe is probably 3/4" diameter and had a balloon duct taped to one of the pipe. He had stuck a straw into a form dart and held it in place with more duct tape. My neighbor's model had camouflage duct tape down the side ("That's to look cool," he told me) and two straight end connectors on each end. He let me give his a go and I determined the end pieces were not necessary. Each time I played with it, ahem, experimented with the dart launcher I was surprised at the height it achieved.
 It didn't take long for the dart launcher to catch my daughter's attention and she asked, "Mommy can we make one?" Well who can say no to that? I had already been taking a mental inventory of the PVC I had on hand so we headed to the garage. I sent my kids to find Nerf darts and I found two pieces of PVC that were too short for other projects. By the time they returned with Nerf darts I had procured straws and balloons. I cut the straight necks off the balloons and duct taped them to the ends of the PVC. The foam darts were put on to the straws and taped together. All in all it took me five minutes to build two launchers.
 I did vary the launcher for my two year old for safety as seen above and left. His PVC pipe was much shorter and there was not as much give on his balloon. I pulled the balloon farther up onto the pipe so that it could not be pulled back as far. I also used a larger and heavier dart on his straw so that it wouldn't be able to go as far. Of course, he had trouble actually launching it anyway so I shouldn't have been too worried.
 My kids and our neighbor that had inspired it all happily ran outside to play with them. Our neighbor found that he could launch his original lighter dart in my son's "toddler safe" launcher just as high as his original. He liked the more compact version for mobile combat and spent the next hour running around the yard with my daughter chasing their darts. You can also launch a foam dart without a straw but it does not go as high as one attached to a straw. I was so impressed with the height of the darts I started thinking about how to use it in my classroom. I know, that probably comes as no surprise.
 I found a simple plan on a "Frugal Fun 4 Boys" blog that was similar to what we had made. I decided that since the dart launcher has several launching variables I wanted to use it as an engineering activity. I wrote up an activity (remember its a draft format!) that explained how to make the small launcher and outlined an all-class competition. The plan is assign one launch variable to each group: launch angle, balloon pull length, dart weight, straw length, etc. Each group will test the variable for maximum dart range using identical launchers and then report their findings to the rest of the class. Ideally they are also practicing some data collection skills by being careful not to change anything but their assigned variable. The whole class should be able to summarize these findings and determine the best set-up for their dart launcher to achieve maximum dart range. I'm hoping to then test each class' optimum set-up against each other in an all-class competition. I won't be teaching projectiles until the beginning of second semester but I will let you know how it goes!
I plan on purchasing a few of these refill packs so I don't have to diminish our neighborhood ammunition supply.
Monday, February 09, 2015
Conservation of momentum: not always your friend
Make of this what you will, gentle readers. But don't doubt the physics! We've got combustion, fluid flow, conservation of momentum / Newton's 3rd law, and an inclined plane.
Firefighters try to extinguish a car fire when suddenly...
And remember: if you're going to set your car alight on the top of a hill, have the courtesy to set the parking brake!
Firefighters try to extinguish a car fire when suddenly...
And remember: if you're going to set your car alight on the top of a hill, have the courtesy to set the parking brake!
Tuesday, November 04, 2014
Groovy… but I won't show it in class
Except as a springboard to a discussion of "What did they do wrong this time?"
But it is groovy. The world's largest vacuum chamber is used to perform the a variation of age-old physics classic, "penny and feather" free fall experiment.
Brian Cox visits the world's biggest vacuum chamber - Human Universe: Episode 4 Preview - BBC Two
Here's a video clip that I do show in class: A hammer and a feather dropped on the Moon.
Feather & Hammer Drop on Moon
Brian Cox is many kinds of wonderful, but showing free fall in a vacuum chamber using high-speed (slow motion) video, alone, acts to deceive.
A common misconception among physics learners is that gravitational acceleration depends on atmospheric pressure. Things float in space because there's no air in space. There's no reason to think g in the giant vacuum chamber is 9.8 m/s2. All video of free fall in the evacuated chamber is artificially slowed. We never see the vacuum chamber free fall in real time.
The lesson could be interpreted that things fall more slowly in a vacuum. On Earth as it is in Heaven. Or the Moon, at least.
But it is groovy. The world's largest vacuum chamber is used to perform the a variation of age-old physics classic, "penny and feather" free fall experiment.
Brian Cox visits the world's biggest vacuum chamber - Human Universe: Episode 4 Preview - BBC Two
Here's a video clip that I do show in class: A hammer and a feather dropped on the Moon.
Feather & Hammer Drop on Moon
Brian Cox is many kinds of wonderful, but showing free fall in a vacuum chamber using high-speed (slow motion) video, alone, acts to deceive.
A common misconception among physics learners is that gravitational acceleration depends on atmospheric pressure. Things float in space because there's no air in space. There's no reason to think g in the giant vacuum chamber is 9.8 m/s2. All video of free fall in the evacuated chamber is artificially slowed. We never see the vacuum chamber free fall in real time.
The lesson could be interpreted that things fall more slowly in a vacuum. On Earth as it is in Heaven. Or the Moon, at least.
Wednesday, December 04, 2013
Dan Burns' awesome gravity demo goes viral
Watch this video before it the hit counter tops 1,000,000 views (if it hasn't already)! Apparently it's been topping Reddit (sorry; I'm not a Reddit aficionado) and it merited a Huffington Post.
Gravity Visualized
This is our own Dan Burns at a PTSOS session (PTSOS3, to be exact—hence the comment about returning to electricity and magnetism) from last year.
He's explaining the pedagogy and content of his spandex gravity model to new teachers. It's the kind of thing we've always done at PTSOS. And his little gem hit the Internet's viral funny bone (to mix metaphors). To which I say, "Huzzah!" And now I feel bad that I don't have a groupie shot with Dan.
Gravity Visualized
This is our own Dan Burns at a PTSOS session (PTSOS3, to be exact—hence the comment about returning to electricity and magnetism) from last year.
He's explaining the pedagogy and content of his spandex gravity model to new teachers. It's the kind of thing we've always done at PTSOS. And his little gem hit the Internet's viral funny bone (to mix metaphors). To which I say, "Huzzah!" And now I feel bad that I don't have a groupie shot with Dan.
Monday, December 10, 2012
Hewitt-Drew-It! Skydiver Problem
In this screencast, Hewitt poses and solves a problem involving Suzie Skydiver, who dives and attains terminal velocity.
Hewitt-Drew-It! Skydiver Problem
Hewitt-Drew-It! Skydiver Problem
Saturday, November 17, 2012
I am done with Mechanics '12
Let this post serve as my annual notice of being done with Mechanics in Physics 1. California 9-12 Physics Standards in Motion & Forces and Conservation of Energy and Momentum are fully covered. We will cover Heat and Thermodynamics before the end of the semester.

I post this because I agree with Paul Hewitt's assessment that we physics teachers tend to linger in topics such as kinematics far too long. Then run out of time at the end of the year before getting to rainbows and why the sky is blue.
California's 9-12 Physics standards are often regarded as onerous and smothering. Some complain that there's too much stuff to cover in a year.
The "onerous and smothering" perception is due, in part, to the end of the era of The Physics Cowboy. The Physics Cowboy was the teacher who, alone, determined every aspect of the 180-day physics curriculum. Nobody told him what to teach, how to teach it, scope, or sequence. The Physics Cowboy ruled his domain, and it was good.
Standards and Assessment drove a dagger into The Physics Cowboy. An external body decided the content. An outrage!
Too much stuff? Perhaps. But I think it's more, "Too much stuff I don't want to teach and not enough of what I do want to teach." If you say there's too much to cover in a year but opt to teach projectiles (not included in the standards), there's a flaw in your logic.
Me? I create a pace that allows me to cover the standards within the school year. Do I cover the standards by the time of STAR test administration? No. STAR tests run about 6 weeks in advance of the end of the school year. And my pace allows for extensive work to be done in Electric and Magnetic Phenomena, the standard set which persists as a low-performance standout with students up and down the state.
To do all that and get to rainbows and blue skies, I must now leave Mechanics behind. We have three weeks of instruction (and one week of final exams) between Thanksgiving Break and Winter Break. In that time we will cover the standards in Heat and Thermodynamics.
Second semester opens with Intro to Electricity. Then it's Circuits, followed by Magnetism. Then it's Waves, Light, and Wave Optics. Covering the grooviest topics at the end of the year maintains student engagement in spite of pressures toward "Senioritis" and "Sun's Out, Brains Off".
Those physics standards mini-posters can be found here:
Dean's California 9-12 Physics Standards Mini-Posters
PODH, you say? Here ya go: it happened!
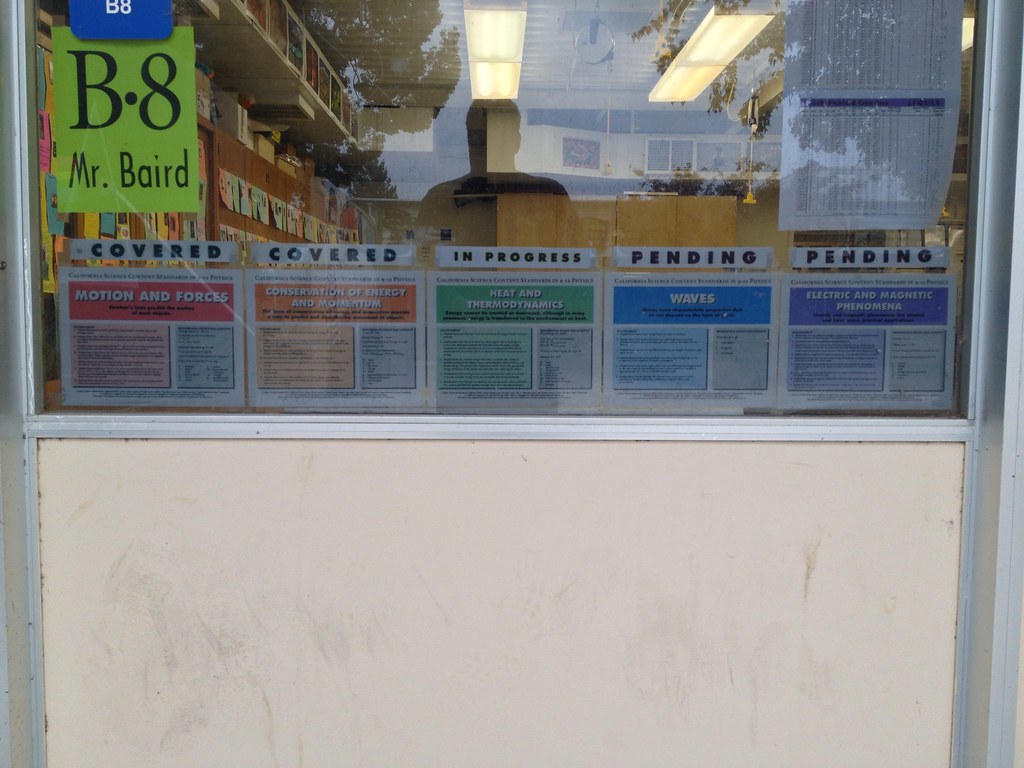
I post this because I agree with Paul Hewitt's assessment that we physics teachers tend to linger in topics such as kinematics far too long. Then run out of time at the end of the year before getting to rainbows and why the sky is blue.
California's 9-12 Physics standards are often regarded as onerous and smothering. Some complain that there's too much stuff to cover in a year.
The "onerous and smothering" perception is due, in part, to the end of the era of The Physics Cowboy. The Physics Cowboy was the teacher who, alone, determined every aspect of the 180-day physics curriculum. Nobody told him what to teach, how to teach it, scope, or sequence. The Physics Cowboy ruled his domain, and it was good.
Standards and Assessment drove a dagger into The Physics Cowboy. An external body decided the content. An outrage!
Too much stuff? Perhaps. But I think it's more, "Too much stuff I don't want to teach and not enough of what I do want to teach." If you say there's too much to cover in a year but opt to teach projectiles (not included in the standards), there's a flaw in your logic.
Me? I create a pace that allows me to cover the standards within the school year. Do I cover the standards by the time of STAR test administration? No. STAR tests run about 6 weeks in advance of the end of the school year. And my pace allows for extensive work to be done in Electric and Magnetic Phenomena, the standard set which persists as a low-performance standout with students up and down the state.
To do all that and get to rainbows and blue skies, I must now leave Mechanics behind. We have three weeks of instruction (and one week of final exams) between Thanksgiving Break and Winter Break. In that time we will cover the standards in Heat and Thermodynamics.
Second semester opens with Intro to Electricity. Then it's Circuits, followed by Magnetism. Then it's Waves, Light, and Wave Optics. Covering the grooviest topics at the end of the year maintains student engagement in spite of pressures toward "Senioritis" and "Sun's Out, Brains Off".
Those physics standards mini-posters can be found here:
Dean's California 9-12 Physics Standards Mini-Posters
Monday, November 12, 2012
Hewitt-Drew-it! Mass/Weight
In this screencast, Paul Hewitt distinguishes between mass and weight in a video from his classroom, then breaks strings attached to a ball in ways that clarify the distinction.
Hewitt-Drew-it! Mass/Weight
Hewitt-Drew-it! Mass/Weight
Monday, October 29, 2012
Hewitt-Drew-it! Tennis-Ball Problem
In this screencast, Paul Hewitt shows the solution to finding the maximum velocity of a horizontally-moving tennis ball that barely clears the net to remain in the court
Hewitt-Drew-it! Tennis-Ball Problem
Hewitt-Drew-it! Tennis-Ball Problem
Monday, October 22, 2012
Hewitt-Drew-it! Ball Toss
In this screencast, Paul Hewitt shows how the motion of a ball tossed by Phil Physiker can be carefully analyzed, with interesting distinctions.
Hewitt-Drew-it! Ball Toss
Hewitt-Drew-it! Ball Toss
Subscribe to:
Posts (Atom)