Sunday, December 11, 2016

Make your own Transit Light Curves

I highly recommend the educational activities from SETI; especially their Kepler Mission materials found here. There are NGSS aligned activities arranged by age level. I'm looking into the Transit Tracks activities to link Kepler's equations with the Kepler mission, light and our Universal Gravitation unit.

Within that document SETI describes a demo of the Kepler mission by passing a bead on a string in front of a light bulb in a dark room. There is a note off to the side that says:

Optional: Collect Real Data
If you have a light sensor, computer with sensor interface, graphing software, and a computer display projector, place the light sensor in the plane of the planet/ bead orbit and aim sensor directly at the light. Collect brightness data and project the computer plot in real time. Let the students comment on what they are observing. Instead of swinging beads, you may use a mechanism, known as an orrery, to model the planets orbiting their star. Instructions for building an orrery from LEGO™ parts may be found on the NASA Kepler Mission website at http://kepler.nasa.gov/education/ModelsandSimulations/LegoOrrery/

I don't have Vernier light sensors but I do have the Physics Toolbox Suite on my phone which uses the light sensor already on your phone. The app is free and has many different tools all using the internal properties of your phone. I find myself using it frequently and if I ever get tablets for my classroom I'll be using this much more frequently.

I played around with the idea over the weekend using a dim kid's light and passes my hand in front of it to model a transit. At first I tried a ceiling mounted light but I found that since its a CFL bulb there were small variations in the light that might confuse students. In class I would be using incandescent light bulbs anyway. The kids' dim flashlight had a fairly consistent output and the dips were caused by my hand in front of it in a completely dark room.

I would like to model something smaller than the light source like the bead on a string that SETI suggested. It will also be a good lesson about the difficulties of the mission as students won't see too much of a reduction in light unless the shadow of the bead passes right over the sensor on the phone. I don't have orreries but can challenge students to keep constant period orbits. Perhaps by next year I can develop something super simple like this DIY Orrey.

The nice folks in charge of the @PhysicsToolbox twitter account pointed out this The Physics Teacher article on the subject sing their light sensor for something similar.

After students learn how to read Transit Light Curves from the SETI activity I hope to have them make their own and model the same graph interpreting skills. It will only take one kid with a phone in each group to make this work and I think I'll have that covered.


Saturday, December 03, 2016

Roll the dice

Studying the Law of Universal Gravitation can be heavy (ba dum tss) for students. Each year my students push through the long equations and we go without a lab for about a week. That's pretty unusual in my classes and they can feel the change. If a student asks why we aren't doing a lab I usually reply, "Well I can't haul Jupiter in here to measure it so ...."

Practice problems were always difficult for students, more about living by the Order of Operations (PEMDAS) then actually understanding the problem. Some would take one look at that period of revolution equation and say "No, nuh uh, not gonna make me. Nope."

I tried to make them fun by creating word problems. It wasn't just calculating the Force of Gravity between you and Jupiter, "Let's compare that to the Force of Gravity between you and the doctor that delivered you! Jupiter's gravity doesn't affect you and astrology is bunk!" But still going through problems together wasn't engaging students.

Your birth Mass (kg)Jupiter & Doctor (kg)closest distance (m)Universal Gravitational ConstantForce of Gravity (N)
41.90E+275880000000006.67E-111.47E-06
41000.16.67E-112.67E-06
A few years ago I had an idea to make our practice calculations into a dice game. One di has problems to solve and the other different planets. There are actually two different planet di so that students can choose. Here is a print ready file, I suggest thicker paper to give it some structure. They take some time to assemble but you can use them for years to come.

The kids loved it. They probably work through more practice problems than they would have if I had just supplied them with certain ones to do and they were very invested in letting chance choose which they would calculate. A new development this year was that they are so used to checking their answers with me while they whiteboard they wanted to know the "answer." That was harder to do as I walked around the room since there were so many variations. I decided to create and project an answer chart in Excel.

Depending on how your school or district is defining "physics" from the NGSS framework you may or may not be finding yourself teaching more Earth & Space Science. We had our own sort of NGSS Draft among Chemistry, Physics and Biology trying to divide up the Earth & Space Science topics. In my district Physics ended up, rightly so I feel, with HS-ESS1-4:

HS-ESS1-4.Use mathematical or computational representations to predict the motion of orbiting objects in the solar system.[Clarification Statement: Emphasis is on Newtonian gravitational laws governing orbital motions, which apply to human-made satellites as well as planets and moons.] [Assessment Boundary: Mathematical representations for the gravitational attraction of bodies and Kepler’s Laws of orbital motions should not deal with more than two bodies, nor involve calculus.]
This goes well with HS-PS2-4 about the Law of Universal Gravitation:

HS-PS2-4.Use mathematical representations of Newton’s Law of Gravitation and Coulomb’s Law to describe and predict the gravitational and electrostatic forces between objects. [Clarification Statement: Emphasis is on both quantitative and conceptual descriptions of gravitational and electric fields.] [Assessment Boundary: Assessment is limited to systems with two objects.]
I'm still working on adding more of Kepler's Laws into the curriculum, there is an outline here on this Disciplinary Core Idea about it.

Wednesday, November 23, 2016

Understanding Even More Car Crashes

I posted a lesson to accompany the IIHS "classic", Understanding Car Crashes a few years ago. If that post doesn't ring a bell, click here. Links to the video and lesson can be found in that original post.

A related story percolated up through my social media feed a few days ago. National Public Radio's Goats and Soda produced a story about the Latin New Car Assessment Program (NCAP). NCAP ran a crash test that pitted entry level Nissan vehicles against each other: The American Versa vs. the Mexican Tsura.

Crash Test Dummies Show The Difference Between Cars In Mexico And U.S.

Here's the video:

2015 Nissan Tsura vs. 2016 Nissan Versa


[Executive summary: The American passenger fares much better than Mexican passenger.]

When news of the test went public, Nissan announced that Nissan Mexico would discontinue sales of the Tsura in a few months.

It could be that the timing of Nissan's announcement coinciding with NCAP's test was... coincidental. That is a real possibility.

On a tangentially related oldie-but-goodie, some folks think cars from yesteryear were tanks that would decimate today's light-weight counterparts. An instuctive crash test pits a 2009 Impala against a 1959 Bel Air. Watch the video to see how that one turned out.

2009 Chevrolet Impala vs. 1959 Chevrolet Bel Air


If you're a classic car enthusiast, drive carefully!

The lesson I constructed includes an exercise in which students look up the IIHS safety test of the car they drive (or are commonly driven in).

Saturday, November 19, 2016

Inertia of Fall Leaves

This video has gone viral with good reason, its super cool.

In this slow mo video we see an amazing example of inertia as the bed of leaves remain as the net is lowered beneath them. What else can you discuss about with this video?

Evolution of Physics Curriculum

As I NGSSify my curriculum I find myself removing some pieces of my curriculum that I've done for a long time. Sometimes they are replaced with better activities, sometimes they were dead weight, sometimes I'm sad to see them go. I'm not there yet but it is a process for which we still have several years as the NGSS assessments might be ready by 2018. You've got some time.

While making these curriculum choices I ask myself:
- Does this activity align with NGSS in content (addressing a Discipline Core Idea or Performance Expectation)?
- Or does it align with the Science & Engineering Skills?
- If not is it an essential skill to support NGSS acquisition? (i.e. graph making)
- Is it content that they need to support late NGSS content? (i.e. Newton's 1st and 3rd Laws)

As we approach the middle of the 2nd quarter I find that I am "behind" my past self by almost two weeks. This has meant moving Energy, Work & Power to second semester rather than cram it in first semester. My time crunch is due to a few big changes in my classroom that are still getting the kinks worked out:

1) This year I do not have required homework other than finishing labs. There are some "suggested homework" each night and the problems that I really like are worked into the class period. I suggest that struggling students do the homework each night, it is very briefly reviewed each day because less than a quarter of the students do it nightly. A lot of my students are in more than one AP class, sometimes I am their only non AP class, so if they are understanding the material they don't have to "waste" time doing homework if they don't need it.

2) So how do students know they should try the optional homework? Each week students take a low-stake weekly quiz based on the homework. That way they and I know how they well they are understanding the concepts. I grade their notebooks at the same time so that I can look over their labs for the week. Timing has been an issue so far. Sometimes the quizzes are too long and take most of the period. Absences have also delayed getting the quizzes passed back so in the future I think I will excuse the absent kids. This mean I don't have a chance to see how they are doing before the big assessment and the other quizzes in that category count more but it should improve the pass back time. I want students to have near immediate feedback on these formative assessments. I have been crudely tracking the standards addressed in each quiz in an Excel sheet but they have not been in a way that can be easily shared.

3) Students complete problems on whiteboards in small groups. This has been successful but sometimes not universally so depending on a few things. Some students dominate whiteboards just as they do labs so now I ask students to pass the marker on after each problem. Some students don't feel confident enough in their abilities to problem solve while others are watching. If the group is motivated to be "done" as fast as possible then they miss out on the conversations and growth to get something written ASAP. Yet some of the best problem solving think-out-loud collaborating discussions my students have ever had have taken place this year. They correct each other by citing previous activities, "Remember when she said this? Remember that one lab we did?".

Overall I like the changes and will be keeping them, with some revisions. I need to focus on making sure the weekly quizzes tackle common misconceptions just as much as calculation practice. I need to emphasize and normalize doing the suggested homework without making it seem required. It should feel like an opportunity for students; I want struggling students to want to do it to improve themselves. For whiteboards we have to set up community expectations that include all the students of the group at once and makes it a safe space for all of them to try, make mistakes and try again. And I have to work on my timing by probably further cutting some material. But that will be a topic for another post ...

Friday, November 11, 2016

Did the Coyote Catch the Roadrunner?

Fans of my Roadrunner Physics website might be wondering this after the site went black in early October. My school changed website hosts, orphaning it. Fortunately, our IT department transferred it intact to our new hosting service, thus once again thwarting the Coyote's plans. You can click on the above hyperlink or copy and paste the URL:

http://www.lghs.net/about_us/staff_directory/teacher_pages/dan_burns/road_runner_physics/

They also transferred my internationally popular Science on the Simpsons website. You can click on the hyperlink or go to this URL:

http://www.lghs.net/about_us/staff_directory/teacher_pages/dan_burns/science_of_simpsons/

Unfortunately, some of the formatting of the clip descriptions is cut off.  I hope to have this fixed soon. In the meantime, download your favorite clips so you don't have to worry about the site being inaccessible in the future. These clips are posted in accordance with the fair use provisions of the copyright act. They are for educational purposes, not entertainment. However, if your students are entertained by your creative educational use of them, that is OK.
 I was inspired to create the Roadrunner website by Dean Baird's description of his use of Roadrunner cartoons to teach physics. He posted specific information about what episodes had useful clips. I used this and my own personal research to assemble the collection that I use on the first day of class. Roadrunner cartoons show my students that they already know a lot about physics. Roadrunner cartoons are humorous because they defy the laws of physics. When the students chuckle at a scene, they are revealing that they have an inherent sense of some of the rules that the universe operates under. Sometimes we focus too much on student misconceptions. Often these are incomplete thoughts that are closer to the actual physics concepts than we may realize when we focus on what is wrong about the ideas. One example is the student belief that a bullet receives a larger force than the gun. I find it more effective to acknowledge the student's belief that SOMETHING is different about the interaction. That something is of course the acceleration because of the difference in the mass.

The Science on the Simpsons website has its origins when I collected clips on a VHS tape to show my Earth/Space Science class back in the 90s. Other teachers would borrow it and I often had to hunt it down when I wanted to show it. The Coriolis Effect and Bart's Comet clips were the most popular. This motivated me to create digital clips from my Simpsons DVD collection and post them online for every teacher to use. Since then I have interacted with people from around the world who send me appreciation emails and ideas for new clips. The Simpsons are popular in Germany, Spain, Great Britain, and Australia. A few teachers used the site to support their master's thesis. Another teacher wrote an article about using the Simpsons to teach science that was published in the Spanish Newsweek. He runs a Science on the Simpsons Facebook page too. I even got a congratulatory note from one of the Simpsons executive producers:

"Hi, Dan.  My brother-in-law works at Rockefeller U. and sent me your Simpsons/physics link.  I love it and sent it to some of my colleagues who actually know something about science.  Great work -- I hope people use it.

Best,
Rob LaZebnik
Co-Executive Producer
"The Simpsons"
Fox
10201 W. Pico Blvd.
LA, CA  90035
310369-4762"

I have been receiving emails from distraught teachers looking for the Science on the Simpsons and Roadrunner Physics websites. Please spread the word that they have moved. That would be "Excellent".

Sunday, November 06, 2016

Before the Flood

I am grateful to Bree Barnett Dreyfuss and Dan Burns for keeping The Blog of Phyz vibrant while I hunker down with the development of basic (non-lab based) Earth Science curriculum and juggle four preps, two of which are AP.

Last Sunday, National Geographic premiered Leonardo DiCaprio's Before the Flood, a worldwide journey of discovery, doom, and hope relating to the current state of climate change science and politics. He's not putting this highly-produced, cinematically stunning production behind any paywalls/ DiCaprio means for you to see it.

National Geographic: Before the Flood HD (Complete: 1h35m) TV-14


As it happens, my Earth Science students are in the midst of their unit on Climate, to be followed by their unit on Human Impact. Al Gore's An Inconvenient Truth and Alanis Morissette's Global Warming: The Signs and the Science are over a decade old now.

So I tinkered and toiled to develop a set of video questions to keep the students engaged in this otherwise passive activity. The intent is that it's enough to keep them focused but not so much they fall behind during the screening. This is what I produced.

Before the Flood Video Questions (PDF)

Another nice (and recent) production is National Geographic's Bill Nye's Global Meltdown (feat. Arnold Schwarzenegger). I leave it to others do develop curriculum for that one.


Tuesday, November 01, 2016

Science Films

The Museum of Moving Images has created this "Science & Film" teacher guide with a list of short science-related films for the classroom organized by discipline.
  
From their introduction page: 
"Filmmakers are making many different types of films and Museum of the Moving Image publishes Sloan Science & Film to enhance public understanding of science through film. This is a guide to 46 short narrative (fiction) films–all supported by the Alfred P. Sloan Foundation's nationwide film program–available for streaming in your classroom, which explore science and technology themes and characters. Our goal is to help teachers engage elementary, middle, and high school students in STEM learning.
- Films range from 4 to 33 minutes, averaging 20 minutes in length
- Each film correlates with National Standards, New York State Standards, and New York City Science Scope and Sequence (with a comprehensive appendix of all three attached), and can be customized to meet your needs
- Subjects include astronomy, biology, chemistry, ecology, evolution, genetics, mathematics, physics, psychology, technology, and the history of science
- Included with each film are possible questions to explore and science resources for further engagement"

The Physics portion starts on page 35 by the way.

Science & Engineering Practices poster

The Synopsis Outreach Foundation Sciencepalooza has worked with a graphic artist to create a visual of the NGSS Science & Engineering Practices poster. Its a great addition to your classroom and available here. A preview is below, I suggest you download it!

Saturday, October 29, 2016

Solar Tile Impact

Much of the tech world is abuzz with Elon Musk's announcement that Tesla will be producing glass solar roof tiles. They look as good as normal tile or slate or other roof materials but they are inconspicuous solar tiles. There are tons of articles out there but this video posted to @TeslaMotors twitter page caught my eye:


A kettlebell (I assume at least 10 lbs) is shown falling directly onto each tile sample being dropped from the same height and edited to be at the same time. The different materials respond differently; while the solar cell may not be functional after such a hit it structurally remains in one piece unlike the others.  But I was caught by the varying rebound heights. I downloaded the video and opened it in Vernier's Video Physics app on my iPad and started playing with it. This is the first time I had used it to follow an object's entire motion so its not the cleanest. I tracked the first kettlebell that fell onto the Terra Cotta tile on the far left:

I plan to use this in my energy unit. I can ask students to discuss the change in potential energy for each of the kettle bells as they fall. Students could look at the rebound height for each sample and discuss the loss of energy in each case. I'm hoping students will realize that the loss in potential energy means that the energy has gone elsewhere. You could discuss common product testing, brittle materials vs elastic ones, momentum and more. If you have one-to-one devices you could have students do the same analysis for each material so that they can get the same information for each.

Wednesday, October 26, 2016

This time machine makes a second last for twelve minutes

And it's only $2500 for the privilege.
Chronos 1.4 is the brainchild of engineer David Kronstein, who first demonstrated the camera’s hardware and recording capabilities with a production-level prototype under his YouTube handle ‘tesla500.’ The camera can record 1,057 fps at 1280 x 1024, and up to 21,650 fps at lower resolutions.
The math pencils out as follows:

When viewed at the standard video frame rate of 30 frames per second (fps), 21,650 frames would take about 722 seconds, or 12 minutes to watch.

The iPhone can natively capture 240 fps, which slows 1 second of action into (240/30) 8 seconds of viewing.

DPReview has an article on the Chronos 1.4, and there's a demo video as well.

Chronos High Speed Sneak Peek


UPDATE: Watching the sneak peek makes me think the native playback rate on this camera's files is 60 fps, in which case 1 second of action will blow by in a mere 6 minutes at the highest frame rate.

UPDATE 11/25/16: The Kickstarter campaign goal was achieved in five hours.

Sunday, October 16, 2016

Forces Match Graph: The Presidential Election Challenge

Untitled

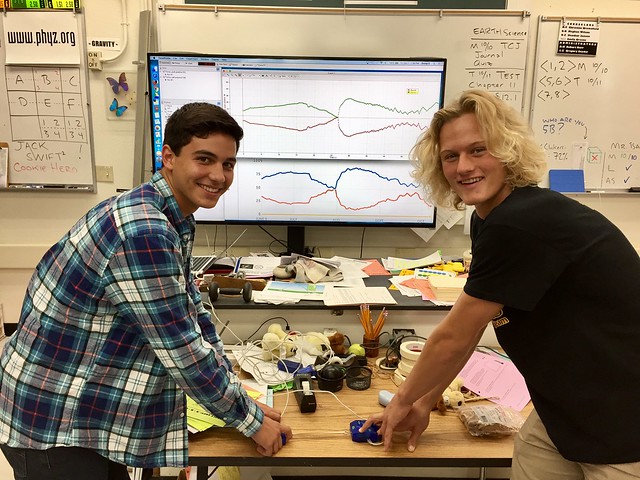
I developed an activity using force sensors to create a visual representation of Newton's Third Law.

The activity includes a brief exploration of the force sensor, then engages students within lab groups to conduct miniature tug-of-war sessions using the force while the computer records force vs. time data to plot a real-time graph.

The symmetry of the plots revels that whenever one object exerts a force on a second object, the second exerts a force on the first that is equal in magnitude and opposite in direction.

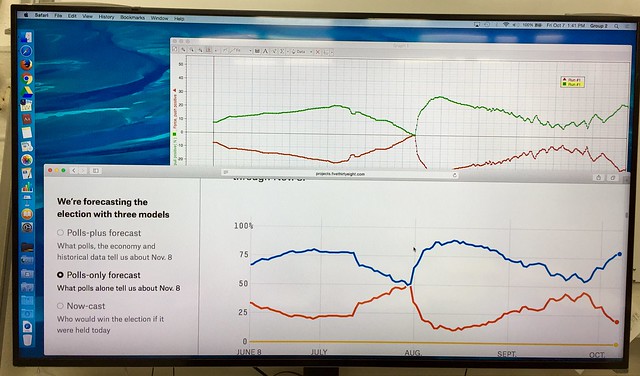
The plot also resembles the "probability of winning" graphs produced by Nate Silver's FiveThirtyEight team.

So I challenged early finishers of the lab to try their hands (literally) at reproducing the Presidential graph using force sensors. I thought the students did a fine job of it.

Untitled

Here's the student sheet for the activity. It's adapted from the one included in the Conceptual Physics lab manual authored by Paul Hewitt and me.

The Force Mirror

Nate Silver's graphs can be found at FiveThirtyEight.

Reliant Robin Revisited

To accommodate a school-day administration of the PSAT this Wednesday, classes will meet for 20 minutes. What can you do in 20 minutes? Last year, I developed a mini-lesson around Top Gear's segment on the Reliant Robin.

I added a few questions to that lesson this year. I feel best when there are a nice, round 10 questions.

Access the video here (I recommend downloading videos for classroom use):
Top Gear's Reliant Robin

Oh, and I did figure out how to post the video here for additional convenience. Isn't it nice to learn?


Updated question set and answer key:
Rolling through Roundabouts in a Reliant Robin @ TPT

What do you do with a 20-minute class session? Let me know in the comments.

Thursday, October 13, 2016

Traffic lights

Years ago while I was at the Exploratorium Teacher Institute an employee came in and had managed to get a bunch of real life traffic lights. They had asked a city worker who was changing them out what they were going to do with them and ended up walking away with a lot. I took home two green and one red and unfortunately left them to sit in a box all these years. I finally managed to check with Zeke Kossover about wiring them up and was surprised to learn that they ran off only 120 V. I had it in my head that they would need much more and I would have to use a transformer. So I bought a heavy duty plug for each light and hooked them up. You can find traffic lights of all varieties on eBay. It was very easy and now I have three giant lights!

I'm not quite sure what I will do with them but I have some ideas:
- Use the red and green lights to indicate to students when to keep working and when to stop on an activity.
- Use the red and green for a giant Colored Shadows demo (I haven't tested if this works yet).
- Have students use light sensors to investigate the light intensity at different distances. I expect that this is bright enough students from all over the classroom will be able to take data off this one light source. 

What are some other ideas about what I could do?

Monday, October 10, 2016

PVC Dart Dun Lab tips

I've written about making simple PVC dart gun shooters and how to use them in the classroom with NGSS. I just did this lab with my Physics students, after their projectile unit test because they did not have to calculate projectiles shot at an angle. It was a way to work in a design challenge with my students while letting them explore angled projectiles.

Students were shown how the shooter works and asked to find the largest horizontal range. They were to record their angle, launch height, etc. and discuss the design changes in between each trial. No additional questions, no conclusions, just a quick and fun experiment about experimental designs.

"Can we stand on the tables Mrs. B?" Sure!
"Can we pull the balloon back all the way?" Sure!
"Can we cut the straw?" Sure!
They just had to record how far it went and how they changed their experimental design.

Seven classes did this lab between my partner teacher and I, usually students worked in partners, spread out across the quad of our campus. We had a running record during the day to see who could in fact make it the farthest. The first few classes hit 38 m, later classes had an unconfirmed 53 m but the largest confirmed was about 45 m. Doing the experiment with so many older students we ran into a few new problems I'd like to warn you about:

Use brand name bullets.
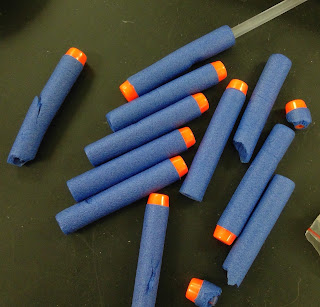
A quick Amazon search brings up lots of refill sets for the small Nerf bullets you need. We opted for a knock-off brand and got 200 bullets for $20. We expected to be set for life as I had previously only broken one Nerf bullet out of 20 with three classes of freshmen testing it last year. We were wrong. Bullets would tear after a single firing, the orange tip would come off upon impact and sometimes even just indentations on the side above the straw was enough to get poor results.


Have extra balloons.
Some of my football players decided to get into a "who can pull the balloon the farthest" contest and frequently broke their balloons. Sometimes it just happened in the course of the experiment. Have lots of extra balloons on hand to repair shooters with duct tape. We tried to use the same size and same thickness balloons for consistency. A few students noticed that the replacement balloon wasn't exactly the same length as before and might change their experiment. 

Careful with metric tapes.
I have one 50 meter windup tape, nine 10 meter windup tapes and one trundle wheel. By the end of the day I had to completely unwind the 50 m one in order to rewind it correctly and we were down two 10 m tapes. Students did not understand how far 10 m was and would run out the tape with such vigor they broke the internal spindle of the tape. They can not be wound again, if you shake them you can hear all the broken plastic pieces rattle around the inside of the case.

The trundle wheel was far superior for measuring and was easier to reset in between trials. Although I did have one student hole the trundle wheel at arm's length straight out parallel to the ground and asked how it worked. He kind of sighted along it, maybe he thought it was a laser level??

Saturday, October 08, 2016

Inertia Ball Demo

Many people have some version of this Inertia Ball (available from Sargent Welch, and more) and may use it for an example of inertia similar to how I have in the past. There are several videos online including this one that demonstrate the classic demo (although I don't mention tensile strength yet):
This year I asked students in groups to predict what would happen before I did it. Students were to take a few minutes of discussion; some students came up to inspect the string and gently lift the ball to see heavy it was. I asked each group to share out what they thought would happen when I pulled the string slowly; the majority of the groups correctly guessed that the top string would break. After I did the demo I asked students to discuss again what would happen if the bottom string was pulled quickly. This time groups were split, some saying that the top string would break again and some that the bottom string would break. At this point I introduced students to the word "Inertia," they had not been introduced to it before although several already knew it and start singing the "Bill Nye: The Science Guy" introduction song.

Many of these inertia balls also have a third loop on the side of the ball. I ask students what would happen when I pulled the string from this loop directly to the side. "Are you doing it quickly or slowly?" they ask and I tell them they can think of it either way but when they share out they will have include their choice in their description. Again groups are split, some think that if I pull slowly the top string will break again, others think that if I pull it quickly the side string will break. I pulled the side string slowly at first and students saw the ball shift to the side but the top string held. I briefly said that this looks like a force in the horizontal direction did not affect the vertical direction. I reminded them that we saw a similar directional independence in our projectile unit. I let the ball hang freely again then pull the bottom string quickly and it breaks.

During my first period of the day while students were discussing I decided to add to this demo and make a tennis ball with the similar three eye hooks. I hung the ball and asked the students what they thought would happen if I pulled on the bottom string. Again I let them choose if they would like to think of it being pulled slowly or quickly. This time the top string breaks regardless of the bottom string being pulled quickly or slowly. Without prompting students start discussing why it happens, "Its not heavy enough!" or "See, I told you, it didn't have enough inertia."

While I gave these instructions on my whiteboard I made a powerpoint that has a visual for students as well as the questions.

For high school teachers, this connects well with the NGSS Science & Engineering Practices. Below are the excerpts I thought were most aligned to this activity:

Asking Questions:
O that arise from careful observation of phenomena, or unexpected results, to clarify and/or seek additional information.
O to clarify and refine a model, an explanation, or an engineering problem.

Modeling:
O Develop, revise, and/or use a model based on evidence to illustrate and/or predict the relationships between systems or between components of a system.

Monday, October 03, 2016

Stithsonian YouTube Channel

Doug Stith is also part of the Exploratorium Teacher Institute and has been sharing videos on his Stithsonian YouTube Channel with us for awhile. He has quite the knack for producing simple, clean videos that demonstrate concepts. He writes these for middle school students but the phenomenon he focuses on are usually quite complex. They are great for showing to your classes and he's always adding more.

He just posted this one on two Hot Wheels cars and their free fall motion that would have stumped my high school students for a bit:
 
He often creates puzzling videos to teach his students how to observe. There are some that ask students to spot the change or "what's wrong here?" and others that are forward/ reverse and stduenst have to guess which this Seesaw puzzler:

was followed with the solution:
He has quite a few up there on a variety of topics; peruse as you wish and let him know if you find them useful!

Air Pressure Rocket on a Hot Day

I use my Arbor Scientific Air-Powered Projectile rocket every year. With my Conceptual Physics students we take the data as a class, determine the average time and use that to calculate the maximum height. With my older Physics students this year I decided to open it up. I told students how the rocket worked and asked them to write their own procedure to find the maximum height and initial velocity. Not surprisingly, groups independently determined that the best way to determine this information was to time the rocket's entire flight and then use half that flight time to determine the rest. Once students determined how they were going to test it, we went out to an open space and launched the rocket five times with the "low" washer and five times with the "high" washer. Each group collected their own data for their calculations but then I collected their results for each period.

I noticed during three periods of trials that the rocket launched sooner later on in the day. In the morning the rocket consistently launched after 5 pumps with the "low" washer and 7-8 pumps with the "high" washer. By the afternoon it launched after barely 4 pumps with the "low" and 5-6 with the "high." It was a warm day so temperature definitely played a role. Looking at archived temperature data for our area it was about 82 degrees for the first period's data, 90 degrees for the second and 97 degrees for the third. If you look at the consolidated data for all three periods you can see that the maximum heights and initial velocities decrease as the day went on.
My last period did get a chance to try the "super" washer. Now I wish I had tried it in the morning for comparison when it was (relatively) colder. 

There are lots and lots of things you can do with this rocket. There is an additional set of wood angled blocks for consistent angled shots you can purchase.

Monday, September 26, 2016

Vernier's Ball Toss Lab

I decided this year that if I was going to continue to take the time to teach students how to interpret kinematics graphs of motion (displacement-time, velocity-time and acceleration-time graphs) I was going to bring them up more often during the year. As we transition in my class from basic kinematics equations to projectiles I was looking for a lab that did just that. This is where it pays to keep more resources than you currently use in your curriculum. I found a pdf I had downloaded from Vernier using motion detectors and a ball. The lab looked simple enough and I tried to reproduce the results myself.

The original instructions had called for a wire basket to be placed over the motion detector to protect it from the ball's return. I tried this with a tennis ball and found it very difficult to get the tennis ball to go up and down directly above the sensor. After lots of attempts (seriously like 50)  I was able to get three sets of data to work with:

I wanted students to see what happened at the max height on both the displacement-time and velocity-time graphs and understand what it meant. I wanted them to identify the time that the ball was still being accelerated upwards by their hand (easier on the velocity-time graph by the way). I wanted students to see a constant slope of the velocity-time graph to remember that gravity is constant. I liked how it was coming out but still wanted to make sure that students had an easier time than I did with this lab.

After tweeting to @VernierST I was able to get a few suggestions that made it basically fool proof:
1. Instead of a small tennis ball use a larger basketball (more reflective surface for the sonar).
2. Instead of a wire basket, which I didn't have enough of anyway, try putting two books on either side of the sensor.

Since my books are shorter I had students put two books on either side of the sensor as it was facing up on the table-top (above a picture from their lab). Students got great results and were able to focus more on analyzing the graphs using the tools in LoggerPro. Below is a sample set with the points I asked students to mark in their lab. Overall the lab was actually pretty quick and reliable. I think I could even move up the timing of the lab in my unit as an introduction to gravity rather than a review. Here is the lab I used.

Simple Machine for the win!

Being in California my family takes the drought pretty seriously. We haven't watered our front or back lawn in years. And unfortunately it looks like it. To increase the curb appeal and still keep our water usage low we decide to convert much of our lawn to drought tolerant plants on drip with mulch. As part of the conversion we had to cover 792 square feet with cardboard, overlapping a foot or more at each transition, as a compostable weed block. Even with the start of school I couldn't collect enough cardboard boxes at school to do the job so we ordered a roll of cardboard 6 feet tall and 250 feet long. While it wasn't heavy per se, it was pretty awkward to roll out the 20+ foot lengths I needed.  I had an old diameter wooden closet rod that was over 8 feet long so I shoved that through the middle of the roll and raised it up on two sawhorses.

Since it was above the ground I could easily pull on the end as far as I needed to and the cardboard would roll right off. But then I noticed that the whole roll, well, rolled. In the photo you can see the closet rod was pretty close to the back (right) of the sawhorse. It had started even closer to the front (left). Every few rolls I would have to readjust the rod on the sawhorse and bring it closer to the front. It didn't roll much but every 20 feet or so I would have to adjust it.

That got me thinking. This could be a great example for a Physics class that discusses the Mechanical Advantage of simple machines.  Ask students why the rod rolled, why didn't it roll very much? Usually the "distance in" is the "effort force" which would be the axis in the middle, in this case the closet rod. The "distance out" is the "resistant/ result force" which would be the whole roll acting as a wheel. This may seem backwards for this example since I was moving the wheel and observing the axis roll as a result. Students could calculate the Ideal Mechanical Advantage using the radius of the closet rod (standard 1.25" = 3 cm) and the cardboard "wheel" (2 feet = 30 cm). We would have to assume the machine is 100% to calculate it using distances and not forces.
You could expand the problem for students asking them about the circumference of the closet rod (axis) and how many turns before the rod might fall off the saw horse (assume its 18" wide).


Tuesday, September 13, 2016

Space Time Cord-inates

This is an example of a little idea that grew, changed and evolved and I'm still not done with it.

A colleague asked for some ideas about free fall and I remembered an activity often called Tin Pan Alley; here is a video demonstrating it. Usually done as a demonstration, hex nuts are tied to a piece of string and dropped from a tall height on to a pie pan or other metallic plate. The sound is better on a thicker reusable pie pan  than the thinner single-use ones. First students are shown a string with the hex nuts equidistant, say 20 or 30 cm. When the string is dropped the sound of each hex nut hitting the pan gets closer to the next hex nut than the last. A second string has hex nuts that are at specific (increasing) distances so that when it is dropped the sounds are equal times apart.

After suggesting this activity to my colleague I began to think about it more and decided to use it in my own kinematics unit. In what felt like a stroke of brilliance I thought of turning this teacher-led demo into a student run inquiry activity. I wanted to hand students ten hex nuts, a pie pan and some string and ask them to determine the distance of hex nuts that would create even interval sounds through experimentation. In the first draft I dashed off I actually titled it "Free Falling Nuts." After remembering I teach in a high school I realized it needed a new title.

But there was a sticking point, how can students be sure that the sounds are in fact even intervals? I decided to try and implement some technology.

I had downloaded the free Physics Toolbox app a few months ago and started to play with its many functions. Its an awesome app I strongly recommend downloading. There is a sound meter on there that records decibel levels over a time axis. I wanted students to use this free app to capture their hex nut hits so that they could compare the intervals between them. I also had Vernier Microphones and wanted to try using them as well. I wrote the whole thing up but before I decided to do it I thought I should try it. Turned out to be a good thing.

My colleague Matt and I decided to try it out before we gave the task to our students. We calculated the distances required for even time intervals with 0.1 s or 0.2 s, etc. and made a few prepared strings. We found that the sounds were so short that neither the Physics Toolbox sound meter nor the Vernier Microphones could pick up the sounds well enough to determine the time intervals. We tried amplifying the sound on a large stool, tried recording and slowing down the recording, etc. Without a 1:1 classroom we didn't want to rely on video analysis. We were forced to abandon the idea of students determine the distances by sound. And given that we wanted to use this as an introduction activity we didn't want students to calculate the distances between the hex nuts yet.

So I was back to the idea of a teacher-led demo. I decided to ask students to predict, discuss and then explain what they were hearing. I wrote this google slide presentation to guide the activity. The background data for calculating the distances for different time intervals is here, first calculated out by Matt. The larger the equal time interval, the longer the string. I was limited to a few meters given my ceiling height, something to keep in mind.


Thursday, September 08, 2016

New goals & gravity oops

My regular Physics class starts the year with basic graphing skills and learning how to interpret graphs of motion. Tuesday we used Vernier Picket Fences and Photogates to determine the acceleration due to gravity.


Usually the next day I have students create another planet or moon in our Solar System to create the same graphs based on their acceleration due to gravity (activity here). Starting with the acceleration-time graph (constant horizontal line) students find the area under the curve to plot the velocity-time graph (line with a positive slope) and the area under that curve to plot the displacement-time graph (a power curve).

By this time in the unit my students understand the relationship between the three graphs for something moving with a constant acceleration. They've even graphed something similar by hand; and they saw the same shape with their lab (above). So I found myself wondering, "Why am I making them do it again?" I gave a small quiz last week and noticed that students were having trouble with tangent lines to approximate the slope of a curved line.

So I re-evaluated what I wanted students to learn/ practice with this activity:
- Students need to practice drawing accurate tangent lines and determining their slopes.
- Students should understand that while a constant acceleration creates a positive linear velocity-time graph and a power curve on the displacement-time graph the acceleration will not always have the same value.
- Students often find the area under the curve to find velocity from acceleration-time graphs but need practice finding the slope of a displacement-time graph to determine the velocity and eventually acceleration.

After reflecting on this I changed the activity. I took the acceleration due to gravity at the different locations in our Solar System and worked the data backwards to create the displacement-time graphs for each one. (data here) I printed out enough copies for students to work in pairs and laminated them; I also laminated graph paper. Students were given the displacement-time graphs Wednesday and asked to practice their tangent skills to determine the instantaneous slope at several points. They used these values to create a velocity-time graph on the graph paper using dry erase pens. Note: Overhead projector pens work as well and since they are finer tip would probably have worked better.


Students dove into it, determined to get very close values to the actual acceleration due to gravity. I soon found however that many were trying to use power regressions to solve it; I have quite a few students in AP Calculus. Others found the slope at the beginning and end of the curve, connected those two dots and called it a day. Students were calculating accelerations due to gravity for Mars or Mercury at 400+ m/s2! After some help around the room most students were better about using the tangent method, finding five to six points, paying closer attention to scale, and felt pretty good about their calculations. Yet as students came up to check their answers with me they were consistently twice as high as the actual value. Enough students had almost twice the values that I went back to check my data.

I had calculated d = at2 not d(1/2)at2.

As my students would say, *face palm*; I totally blame the toddler-induced lack of sleep. The students were doing it right (good) and they didn't really know the acceleration due to gravity on other planets anyway so they didn't catch my mistake (even better). In the end I decided it would be a good way of introducing the equation next week and discussing why it is so important to include that (1/2).

I've fixed the data (available again here) and the printing pages (pdf or google doc) and plan to do this again next year. I have very sparse grid lines; depending on your students' math level you might want to give them more grid lines. In the end students were able to practice a skill, broaden their understanding of a concept and I didn't have to grade anything. Aside from my miscalculation, it was a win all around.

Sunday, September 04, 2016

Perusall Trial Update

Back in June I wrote a Blog of Phyz post about the social media textbook reading website Perusall. I set up a Perusall class for teachers to try out. I posted a reading assignment, a paper by Joe Redish called Changing Student Ways of Knowing. I invited teachers to create a student account and participate by reading and commenting on this article. I promised to release grades on September 1st. Thirty-two teachers registered for my Perusall class and took a look at what Perusall can do. Seven teachers left a total of 18 comments. The artificial intelligent agent that scores comments on Perusall gave twelve the maximum score of 2, six received a score of 1. There were no zeros! These were pretty good scores compared to what my students averaged.
I was a little disappointed by the amount of participation in the teacher trial of Perusall. Because the default for automatic grading is 15 students, I had to ask their tech support to grade the assignment. The discussion would have been more interesting if we had a group of 20 commenting like I used with my students. Perhaps I didn't pick an interesting enough article. I still believe in the potential of this tool that encourages students to read textbooks by making it more relevant and useful for them. I am about to start using Perusall in this year's classes. I will use it for the full year and collect data about students use and perceptions. Perusall is free if you upload your own readings, I use the OpenStax physics textbook. Look for another update about Perusall next summer and maybe another teacher trial.

Thursday, September 01, 2016

The Resource Area for Teaching is a Life Raft for Teachers with Limited Budgets

The Resource Area for Teaching (RAFT) was mentioned in a recent discussion on the PTSOS email list. I decided to contact RAFT to see if they could support PTSOS in some way. RAFT Site Manager Ofelia Delgadillo soon replied to my email inquiry with several ways RAFT could help PTSOS, our program for new physics teachers. I won't mention specifics here because I don't want to give away any of the surprises for those coming to the 9/17 PTSOS workshop (registration is still open). I do want to describe my experience visiting the San Jose RAFT location and how they can support physics teachers wanting to do more hands-on activities.

I easily found RAFT on Ridder Park Drive because it is a little past the Santa Clara County Office of Education. I went to the membership desk and joined. The $40 membership fee might be an obstacle to some teachers but it is only $25 to renew. If you can gather a group of 10, the new membership price is only $20 each. Many teachers should be able to get their school to pay for a membership. Either way, it will probably pay for itself on your first visit. As I waited for them to complete my registration, I noticed several teachers making use of the teacher "maker space" called the Green Room. It contains a lot of the equipment teachers need but don't always have access to like laminating machines, book binders, and button makers. After getting my membership card, I went back outside to get a shopping cart.

My first goal was to see if they had some whiteboards for modelling activities. I had to resist looking at all the lab kits as a passed through the front aisles, more on those later. I soon found several boxes full of framed 2' x 3' whiteboards donated by Silicon Valley companies. They were only $5 each. You can make your own for less money but some teachers would find that difficult and/or time consuming. The frames made them look more professional and sturdier. Many still had writing from the last time they were used. Who knows, maybe there is a billion dollar idea still on one of them! I picked out a class set of 10 of the lighter ones and navigated my now loaded cart through the back aisles. These contained art and office supplies, books, extra chachkies from corporate events, and numerous random surplus items like old VHS tape containers and biotech vials. A more creative teacher could work wonders with many of these items but I loaded up on sidewalk chalk.

In the very back is an area where volunteers work. They sort through donated items, update inventory, and package and price items. This would be an ideal place for high school students to get some community service hours. I also noticed the volunteers were assembling the lab kits that drew my attention when I entered. I decided it was time to take a look at those.

The lab kits covered many areas of science but many would be perfect for elementary, middle, and high school physics students. Each kit contains everything you need to build a hands-on device including detailed illustrated instructions, NGSS standards, "To Do and Notice" instructions à la Exploratorium, a description of the background science, and links where you can learn more. I saw many variations of old standbys like roll-back cans, hoverpucks, Benham's disks, and simple motors. There were a few intriguing ones that I was unfamiliar with like roller racers and static merry-go rounds. You can purchase single kits or lab packs of 10. The single kits averaged about $1 and the 10 packs $10. I had to restrain myself from buying them all and managed to leave with 6 of the 10-packs covering a variety of physics topics. Here are some pictures I took of the lab kit displays:
Another great resource RAFT offers is professional development. I have not participated in it but a quick look at their website shows they have a useful program worth exploring. They have scheduled workshops and will customize training for your school or district.
After taking a good look at what they have to offer I am sure you are asking, how can I get in on this? There are 2 RAFT locations in the lucky San Francisco Bay Area and one in Denver, Colorado. Sadly, the Sacramento location has closed. That is hard to believe knowing that the top supporters of education in California, the governor and the state legislature, spend a lot of time there. Perhaps the Sacramento RAFT will return in the future. If you are within driving distance of any RAFT location I highly recommend you plan a visit soon. If you are not, you are in luck, you can order many of their items online. I noticed that there were over 100 of the lab kits available plus many more items in their online store. If you are having trouble visualizing this amazing place, here is a video tour:
My only criticism of RAFT would be to maybe get a better membership card machine: