If you aren't plugged into Derek Muller's Veritasium YouTube channel, it's time to correct that oversight.
His latest exploration involves hydrodynamic levitation. It's a phenomenon very different from the Coanda effect-based airstream levitation. And it constitutes a summertime fidget spinner I can wholeheartedly endorse!
Hydrodynamic Levitation
Muller is, of course, armed with high-speed videography. He recently added schlieren photography to his arsenal. I'm delighted to support him on Patreon; the guy does great stuff that's always fun to watch.
Thursday, June 29, 2017
Wednesday, June 28, 2017
Skepticism in the Classroom: "Wireless" Bungee
Bree Barnett Dreyfuss recently pointed out this amusing feat of daring-do to me. Take a look at this breathless tale of magnetically-braked cordless bungee jumping.
As a veteran of bungee jumping, I was thrown off by the use of the term "wire" in this context. "Rope" or "cord" are common terms used to reference the bungee, but not "wire". The term is obscured a bit via use of a second language (translation issues?). But by the end, the need for the use of that specific word is clear.
In any case, it seems not everybody picked up on the clues that the whole spot was a spoof. That's what Snopes is for: Bungee Leap of Faith.
But magnetic braking is far from unheard-of. Engineered use of eddy currents/Lenz's law has been deployed on a large scale for the benefit of thrill-seekers at amusement parks for years.
It seems the Ikea production team took some cues from this classic Mercedes Benz barrel roll fake. A team of nervous scientists working furiously toward a singular moment. An accomplished daredevil willing to risk life and limb for the sake of science and adventure. This one really goes over the top (!) in terms of cinematography and soundtrack. I like this version, which includes a wink at the end.
Tangent; If you missed the Bungee Physics Extravaganza the was born of my Victoria Falls leap. just click that link.
Tuesday, June 27, 2017
PGS: Give your students quantum numbers
Visitors to my classroom sometimes compliment me on its level of organization. I think my classroom is often in a state of high entropy, but such is the eye of the beholder. I confess some compulsion toward organization: there is enough randomness built into running a lab class in high school. If not held back a little bit, it can easily cascade out of control.
My school opened in 1963 and continues to operate in the buildings it opened with. My classroom is also my lab; it's a "shoebox" (no islands or peninsulas). It has electrical outlets that drop down from the ceiling. It has three functional sinks, a few gas jets, and more outlets along a long, narrow countertop. Below the countertop and along the back wall, there is classroom storage. I have a demonstration lab bench in the front of the classroom, a flatscreen. There are Ethernet jacks and electrical outlets along a recently installed racetrack along two walls. And there is a wireless access point on the ceiling in a corner.
The bulk of the floor space is occupied by 18 two-student tables and 36 chairs. Their positions and orientations can be modified at any time.
The default classroom instruction (sage on the stage) mode is three columns of six tables. We used to limit lab courses to 32 students, so two tables in the back would be unoccupied. This arrangement is neither innovative nor creative; it could be disparaged with the harshest aspersion known in education: "traditional".
 One of my early-career epiphanies was that students shoulder much better stewardship of lab apparatus when each item of apparatus is labeled specifically for use by individual lab groups. So nearly every item in my lab carries some kind of group-specific identification. I use letters A through H. It's awkward when Group C is found using Group E's apparatus. And when something goes wrong/missing, the chain of custody is readily apparent. No group hopes to end up on the "Phyz Foul" list maintained on the whiteboard in the front of the classroom.
 I develop a seating chart very early in the school year based on student seating preferences (front/middle/back). Thereafter, we do a seating chart shuffle every 20 school days, with an emphasis on performance-based heterogeneity and individual choice in mind.
In recent years, I've had occasion to collect and sort student work for later return to the students. I'm a big fan of milk-crate file boxes, so they're what I use for the temporary storage. With hanging files and manila folders, I could create files for each student labeled by last names. But that requires alphabetical sorting of each assignment and wastes manila folders at a high rate.
I realized that my seating chart serves as a very useful organizational / classification scheme. Each seat within each group could be assigned a number, 1–4. Add to that the period number, and each student on the year's roster has a unique PGS (period, group, seat) address during any given seating chart. Student 5F2 is in 5th period, group F, seat 2.
 Students write their PGS code on work they turn in. Sorting the work is a breeze. File crates with hanging files and manila folders are useful in perpetuity.
For computer-based activities (PhET sims, etc.), students 1 and 2 can turn around so that everybody's working around the back table. If the computer (we use laptops) is positioned correctly, all students can reach it.
For more sprawling labs, students 1 and 2 can move to the opposite side of their table, which can be pushed (lifted) to adjoin the 3-4 table.
 If the orientation of the letters and numbers (right to left, etc.) looks backward somehow, that's intentional. The orientations are designed to be logical in the student perspective.
This is a simple organizational tool that I find useful in my instruction. It's a small thing. But sometimes it's the small things that can make a big difference in day-to-day operations.
My school opened in 1963 and continues to operate in the buildings it opened with. My classroom is also my lab; it's a "shoebox" (no islands or peninsulas). It has electrical outlets that drop down from the ceiling. It has three functional sinks, a few gas jets, and more outlets along a long, narrow countertop. Below the countertop and along the back wall, there is classroom storage. I have a demonstration lab bench in the front of the classroom, a flatscreen. There are Ethernet jacks and electrical outlets along a recently installed racetrack along two walls. And there is a wireless access point on the ceiling in a corner.
The bulk of the floor space is occupied by 18 two-student tables and 36 chairs. Their positions and orientations can be modified at any time.
The default classroom instruction (sage on the stage) mode is three columns of six tables. We used to limit lab courses to 32 students, so two tables in the back would be unoccupied. This arrangement is neither innovative nor creative; it could be disparaged with the harshest aspersion known in education: "traditional".


In recent years, I've had occasion to collect and sort student work for later return to the students. I'm a big fan of milk-crate file boxes, so they're what I use for the temporary storage. With hanging files and manila folders, I could create files for each student labeled by last names. But that requires alphabetical sorting of each assignment and wastes manila folders at a high rate.
I realized that my seating chart serves as a very useful organizational / classification scheme. Each seat within each group could be assigned a number, 1–4. Add to that the period number, and each student on the year's roster has a unique PGS (period, group, seat) address during any given seating chart. Student 5F2 is in 5th period, group F, seat 2.

For computer-based activities (PhET sims, etc.), students 1 and 2 can turn around so that everybody's working around the back table. If the computer (we use laptops) is positioned correctly, all students can reach it.
For more sprawling labs, students 1 and 2 can move to the opposite side of their table, which can be pushed (lifted) to adjoin the 3-4 table.

This is a simple organizational tool that I find useful in my instruction. It's a small thing. But sometimes it's the small things that can make a big difference in day-to-day operations.
Sunday, June 25, 2017
In the Skeptic Zone with The Exploratorium's Paul Doherty
And Richard Saunders and Eugenie Scott.
Australian skeptic podcaster, personality, origami artist, and host of The Skeptic Zone Podcast, Richard Saunders crossed the Pacific to visit America. Here in Northern California, he visited Paul Doherty at the Exploratorium and Eugenie Scott at her backyard beehive.
Our friend, Paul Doherty, was literally in his element, and that comes across nicely. Eugenie Scott is noted for her work with the National Center for Science Education, a friend to any teacher hoping to teach the science of evolution or climate change in challenging environments.
Richard Saunders has long been on the front lines of skepticism and critical thinking. My students know him for his ingenious take-down of the Australian distributor of Power Balance bracelets.
All three of these people are heroes and inspirations to me.
In any case, have a listen!
Skeptic Zone, Episode #453 - 25.June.2017
Monday, June 19, 2017
Total Eclipse of the Sun Part 2
 |
| I won't have to worry about changing film for 2017 eclipse |
There are several considerations for selecting your observation spot. For me, the most important is the prospect for clear weather. When looking at various choices available to you, compare the probability for clear skies for the day and time of the eclipse. Another important factor is the length of the eclipse, but for me that is secondary. A total eclipse is one of those experiences for which the perception of the passage of time is highly altered. I was lucky to see one of the longest eclipses, 7 minutes of totality in 1991. The eclipse in Aruba was about half that duration at my location. Both seemed to last the same amount of time. I would select a location based on weather and then get close to the center line to maximize the duration. That is why you will find me in Madras, Oregon (2:00 min totality) on August 21st instead of Nashville, Tennessee (2:40 min totality). Do some research, there are many online sources for eclipse weather information. This chart shows the average cloud cover across the eclipse path.
If you are planning on photographing the total eclipse, my advice is do what I say, not what I did. I spent too much time fooling with my equipment in both of the eclipses I observed. For August 21st, I plan to snap a few pictures through my 80 mm refractor. I will not try and capture all the various phenomena associated with totality like Bailey’s Beads, the Diamond Ring, prominences, and the extent of the corona. My goal will be to have a nice personal souvenir, not to try and compete with the more experienced, skilled, and equipped eclipse photographers. They will share their results online. You can increase your chances of getting a good photograph by practicing on the Moon when it is near full. This will give you a good idea of what exposure to use and how large the image will be for your optics. I also plan on setting up my video camera to record the crowd, sky, and sound during the eclipse like I did in Aruba. I will not need to monitor it during totality. This will free me to observe as much of totality as possible using just my eyes and my 10 x 30 image stabilized Canon binoculars.
Observing a total eclipse without a solar filter is completely safe. It is the partial eclipse phase on either end of totality that is risky. It is not safe to look at any part of the Sun's surface (photosphere) for more than an instant. We have a natural instinct that prevents us from doing this. However, if you were determined to blind yourself, you could do it on any sunny day. What makes a partial eclipse a problem is our instinct is overridden by our curiosity. Furthermore, when it is a very thin crescent, the lower brightness can allow a person to look long enough to cause damage before wanting to look away. You won't notice the damage as it occurs, the eye does not feel pain. That is why it is important to have a variety of safe ways available to view the partial eclipse. Pinhole viewers, eclipse glasses, supervised telescopes/binoculars with solar filters firmly attached over the objective, and supervised telescopes/binoculars projecting images on screens are all good choices. A Sunspotter is one of the best tools if you have $430 to spend.
If you are lucky enough to be in the path of totality, you can look directly at the totally eclipsed Sun. You are now viewing the corona and chromosphere which are similar in brightness to a full moon. It is stunning to see in a telescope or binoculars but if you are looking when the eclipse ends, you will most likely damage your eye. It is important to know the duration of the eclipse at your location and stop looking about 30 seconds before it is predicted to end.
Just before the total eclipse and immediately after, there are two phenomena known as Baily’s Beads and the Diamond Ring. These occur when the only part of the photosphere that is visible is seen through valleys on the limb of the Moon. Baily’s Beads occurs when there is a crescent of valleys that the photosphere is peeking through. The Diamond Ring occurs when there is one last piece of photosphere visible. It forms the diamond and the corona forms the ring. Although many people have done it, including myself, it is not safe to look at even this last small part of the photosphere. I recommend looking at the Diamond Ring using a safe solar filter. That way when the total eclipse starts, your eyes will be more dark adapted so you can see more structure in the corona. More importantly, you will still be able to see when it is time to drive home! Most people that have seen the Diamond Ring directly saw it at the end of the eclipse. That is when I have seen it. It is the signal to look away from the Sun. It would be prudent to do so before the Diamond Ring but in my experience, most people don’t. The key is the duration of your look. I will not attempt to estimate a safe duration. I will only say it should be less than the time it takes to burn an image of it on your retina.
 |
| Gia on the beach |
 |
| Dan diving a shipwreck |
 |
| Warned to not be under sleeping iguanas |
 |
| The eclipse stamp shows Aruba was prepared |
 |
| This may be the most laid-back place to view a total eclipse |
 I took a few shots of the partial phases through my 80 mm refractor with a solar filter. Just before totality I wedged my video camera in a palm tree and aimed it toward my position and the ocean. I hoped to catch the Moon’s shadow approaching. I sat on the beach and awaited a spectacle that must be seen in person to appreciate. Someone near me was watching the time and shouted out fairly accurate and helpful time estimates of second and third contact. After the diamond ring appeared I looked up and gazed in slack-jawed wonder. I then alternated viewing through the refractor and naked eye views. I took a lot of pictures, bracketing the exposure I had determined would be the best for the corona. I took a few very short ones to try and show the chromosphere and some long ones to try and get Jupiter. I also hoped to get the Diamond Ring. My plan was to look for it visually and take the shot without looking in the camera viewfinder. It turned out pretty well with maybe a bit too much diamond, not enough ring.
 |
| No large prominences :( |
 |
| Long exposure shows Jupiter and moons but smeared Moon |
 |
| Picture of Diamond Ring worth risking equipment, but not eyeball |
 |
| Beat this misaddressed postcard back |
 |
| The photosphere has its charms too |
Thursday, June 15, 2017
Total Eclipse of the Sun Part 1
 |
| Not easy to get a good picture on a ship |
This is the first of a series of posts I will write about the upcoming total eclipse of the Sun that will be visible this year in a narrow swath that crosses the entire continental United States on Monday, August 21. In preparation for this eclipse, I dug out everything I had saved from the trip to see my first total eclipse of the Sun in July of 1991. At that time I was completing the physical science teaching credential program at San Jose State. My wife Gia and I took a cruise out of Los Angeles on Royal Caribbean's Viking Serenade. We sailed to Cabo San Lucas and then observed the eclipse from the Sea of Cortez. On board the ship was a long list of scientists that gave fascinating lectures before and after the big event. Among these were archaeoastronomer Ed Krupp from Griffith Observatory, cosmologist David Schramm from the University of Chicago, astronomer Donald Osterbrock from Lick Observatory, meteorologist James Sadler from the University of Hawaii, and geologist, astronaut, and senator Harrison Schmitt.
 |
| Brought along my Space Shots trading card for Schmitt to sign |
UCLA Extension offered a class during the cruise, Astronomy 425.84. I signed up for the college units and because I would be going to all the lectures anyway. As part of the class I was required to write a paper about my experience. While going through my eclipse momentos, I found my paper written in cursive on Royal Caribbean stationary. Since I got a solid A on it, I thought I would share it. Below is the text from my paper exactly as I wrote it except for a few corrections suggested by the spellchecker and a few added commas. The only additions are the pictures, videos, and their captions.
Seven Minutes of Spectacle, a Lifetime of Wonder
 |
| The Sun is the same in a relative way but you're older |
A sense of apprehension pervaded the ship on the morning of the eclipse. The towering cumulonimbus clouds that surrounded us looked threatening. However, those of us who attended the Pacific weather lecture knew that they would stay over the mainland and the peninsula. It was the high cirrus clouds that caused the most worry. They covered the sun most of the morning up to the first contact. Just before first contact the ship seemed to pull out from under them, revealing the Sun. I was observing through my 20 x 80 binoculars and was able to see that the Sun was finally clear. I detected first contact at 11:29 and 14 seconds, seeing it well before people using the solar screen viewers. Even though I had a compass and was paying attention to my orientation, first contact occurred almost 90 degrees from the part of the limb I was concentrating on!
The excitement grew as we monitored the moon’s progress across the solar disk using the binoculars, view screens, and the viewfinder of the video camera. It soon became clear that the center of the moon was going straight towards the center of the Sun’s disk. This was not going to be just a partial eclipse!
 |
| Shadow bands from another eclipse (Wolfgang Strickland) |
Now it was time for the main event. I removed the filters from my binoculars and video camera just as the crowd shouted. I looked up to see the most beautiful and eerie sight. It looked like no picture I have ever seen. I now know why people travel so far to see total eclipses, it is the only way to know what one looks like! The corona extended for about two moon diameters with two streamers approaching three and one half. Detailed structure could be seen throughout the corona. No photograph could show this wide range of lighting and structure. After my eyes had dark adapted some, I looked to see what planets and stars were visible. I quickly made out Venus, Jupiter, Mercury, Regulus, Canopus, Betelgeuse, and Sirius. I did not see Mars, Castor, or Pollux but the incredible view of the eclipsed Sun didn’t make it worth looking for them!
 |
| Eclipse with prominences drawn by dinner table partner Darly, age 5 |
The biggest surprise for me was the obvious naked-eye prominences. There was one large one to the north and several moderate size ones to the south. They had a beautiful pink-orange color. Through the 20 x 80 binoculars the large prominence showed a hook structure. With all the different factors that combined to make this a great eclipse I think being near sunspot maximum provided the best show. I will never forget the appearances of the prominences.
I was also surprised by how bright it was during the eclipse. I had been told to have a flashlight ready because it would be dark. It never got darker than sunset usually is. I believe this was due to the brighter than usual corona and the reflected light off the cumulonimbus clouds which nearly surrounded us. This probably explains why we didn’t see the approach or departure of the moon’s shadow.
 |
| I kept hoping Lurch would come out with a tray of drinks. |
Since the eclipse I have noticed a heightened interest in science and astronomy among the passengers. Our nightly stargazing is better attended and people are demonstrating an intense desire to learn more. People ask probing questions and make keen observations. A cheer arose in the dining room when those seated near the window observed the green flash. People left their tables and looked when the 31-hour moon was spotted. All of the lectures that I have attended since the 11th have been standing room only. I hope this renewed sense of curiosity in people is permanent and contagious! As a science teacher, it is great to see people respond to natural phenomena with wonder and excitement. I hope I can use the pictures and videos as well as my personal experience to convey this to my students. I hope it doesn’t require a total eclipse to spark people’s curiosity about our world and the universe!
 |
| Lens flare in long exposure shows chromosphere |
Dan Burns – July, 1991
In the next eclipse post I will share my experience observing the 1998 total eclipse of the Sun in Aruba. I will offer some advice for observing the eclipse this year. In the meantime, make your travel plans. I already have my substitute teacher lined up! Here is a one-stop place for information about this eclipse:
https://www.astrosociety.org/education/2017-solar-eclipse-information-resources/
I will be helping to put on this event in Madras, Oregon, maybe I will see you there:
https://www.lowellsolareclipse.com/
Monday, June 12, 2017
BAPOD: Bad Astronomy Photo of the Day
I feel like astronomy photos have a much higher possibility of being "fake" than do those of any other discipline. This is not to be confused with artistic representations of celestial objects we don't have actual pictures of. Often these artist's drawings are believed to be real, even if labeled, leading to more confusion. I will never forget showing students an artist's rendering of the Milky Way and pointing to one arm of its spiral saying, "And the Earth would be approximately here," when one student pipes up in utter disbelief, "Wow, who went that far to get that picture?"
Ummm... nobody. That was also the year I had a debate with a student that insisted The Martian was based on real events.
So astronomers, astrophysicists, planetary scientists, etc. has a tough time educating the public about their science as they combat some really bad misconceptions. [I won't even address the flat-earthers.] Their struggle is not helped when images like this go viral. Take a minute to look at it and think about everything you know about the sun and the moon.
Had a minute? If it doesn't come to you right away I have a few questions to help:
1. How are we able to see the sun?
I teach my students that some objects are luminous, meaning they give off their own light. Stars like our own sun are one of those things. We see it because it emits (or makes) its own light.
2. How are we able to see the moon?
Is it luminous like our sun? Some students would say yes but check the definition again. Does it make its own light? Well, no, nothing in our Solar System is luminous except for our sun ... so how are we able to see it if it doesn't make its own light? Right about now I would hear some students hesitantly saying, "Is it ... reflecting the sun's light?" Gold star for you! We see the moon (and all other non-star objects by the way) because they reflect light from the nearest star. The moon is illuminated by the luminous sun and it is that reflected light that we see.
3. So if we can see the illuminated moon, where should the sun be?
Hopefully you're at the forehead smacking moment. In order for the very full moon to be photographed it must be reflecting back the sun's light to the camera. The side of the moon that is facing the sun is always lit, and that half that is lit is not always facing the Earth. If you can see a full moon you have to be facing away from the sun and towards the side of the moon that is facing the sun, reflecting its light and thus able to be seen. It is not physically possible to catch a full moon and the sun in this shot as is above.
There are many other astronomers and amateur enthusiasts that can probably explain it better than I. In fact the Reddit, Twitter, Imgur and Facebook takedowns are pretty amusing if you're interested. The picture is apparently not new, the oldest post I could find was from 2014 on Google+ of all things. But I would like to make the point that some pretty basic understanding of the arrangement of our sun-moon-earth system let's you spot an (amazing but) obvious fake.
With the approaching total solar eclipse in North America, I suspect there will be a lot more of "Incredible photos you won't believe!" Because you probably can't, for good reason. My favorite example of making it obvious what the proper eclipse arrangements are comes from astrophysicist Dr. Katie Mack:
Dean adds: Having the invoked the namesake of Phil Plait's Bad Astronomy, we would be remiss not to throw him a link! An unreal picture of sunset at the north pole
Ummm... nobody. That was also the year I had a debate with a student that insisted The Martian was based on real events.
So astronomers, astrophysicists, planetary scientists, etc. has a tough time educating the public about their science as they combat some really bad misconceptions. [I won't even address the flat-earthers.] Their struggle is not helped when images like this go viral. Take a minute to look at it and think about everything you know about the sun and the moon.
Had a minute? If it doesn't come to you right away I have a few questions to help:
1. How are we able to see the sun?
I teach my students that some objects are luminous, meaning they give off their own light. Stars like our own sun are one of those things. We see it because it emits (or makes) its own light.
2. How are we able to see the moon?
Is it luminous like our sun? Some students would say yes but check the definition again. Does it make its own light? Well, no, nothing in our Solar System is luminous except for our sun ... so how are we able to see it if it doesn't make its own light? Right about now I would hear some students hesitantly saying, "Is it ... reflecting the sun's light?" Gold star for you! We see the moon (and all other non-star objects by the way) because they reflect light from the nearest star. The moon is illuminated by the luminous sun and it is that reflected light that we see.
3. So if we can see the illuminated moon, where should the sun be?
Hopefully you're at the forehead smacking moment. In order for the very full moon to be photographed it must be reflecting back the sun's light to the camera. The side of the moon that is facing the sun is always lit, and that half that is lit is not always facing the Earth. If you can see a full moon you have to be facing away from the sun and towards the side of the moon that is facing the sun, reflecting its light and thus able to be seen. It is not physically possible to catch a full moon and the sun in this shot as is above.
There are many other astronomers and amateur enthusiasts that can probably explain it better than I. In fact the Reddit, Twitter, Imgur and Facebook takedowns are pretty amusing if you're interested. The picture is apparently not new, the oldest post I could find was from 2014 on Google+ of all things. But I would like to make the point that some pretty basic understanding of the arrangement of our sun-moon-earth system let's you spot an (amazing but) obvious fake.
With the approaching total solar eclipse in North America, I suspect there will be a lot more of "Incredible photos you won't believe!" Because you probably can't, for good reason. My favorite example of making it obvious what the proper eclipse arrangements are comes from astrophysicist Dr. Katie Mack:
So next time a family or friend shares an "amazing astronomy" photo, take a close look, think critically and be prepared to (politely) rain on their parade.🌓🌎🌞 <-- lunar eclipse— Katie Mack (@AstroKatie) October 5, 2014
🌎🌓🌞 <-- solar eclipse
🌎🌞🌗 <-- apocalypse
Dean adds: Having the invoked the namesake of Phil Plait's Bad Astronomy, we would be remiss not to throw him a link! An unreal picture of sunset at the north pole
Friday, June 09, 2017
Radiacmeter & Dosimeter: #UnknownEquipment no more!
I thought I had another #UnknownEquipment post for @ThePTSOS but I managed to identify this one! While cleaning out a common prep room I came across an old cardboard box that has been sitting out on a table for literally a year (since the last time I cleaned the room). While opening it with my colleague Matt I said, "What is a dos-i-meter?" (Imagine me saying it like a kindergartener learning to read.)
He got all excited since he is a Navy veteran that worked on a nuclear sub. "I used one of these," he said, "But it didn't look like this!" The larger box had smaller boxes with a cylindrical radiacmeter and wooden dosimeter adapter kits.
 After reading the instructions for both we were able to get a better idea of what they did and how they worked. Well Matt already knew, but was very excited to see the "antique" version. Note the box is stamped April 1953! My school is old but we don't usually find equipment this old.
The cylindrical radiacmeter measures radiation exposure and would have been worn in the pocket of servicemen in the 1950s. This page has images of different models. The cost of this one is labeled as $26.00 in March 1951, which is approximately $243 in 2017! The instructions said:
A pocket radiacmeter which measures and indicates the accumulated dose of X and gamma radiation to which the wearer has been exposed. At one end of the radiacmeter is an optical eye-piece and at the other end is the charging contact. The radiacmeter contains an ionization chamber into which is mounted a small electrometer. A radiac-detector charger is required to charge the electrometer. A scale is calibrated in milliroentgens is mounted in such a manner that the amount of radiation to which the wearer was exposed since the charging of the electrometer can be read directly by holding the radiacmeter up to a source of light and looking into the eye-piece.

The dosimeter is the device that was needed to measure the radiation exposure after the fact which surprised me. I know some modern dosimeters give live alerts when radiation levels reach dangerous or lethal levels. These older models would only alert wearers if they looked through it after their suspected exposure. The Roentgen unit is actually pretty complicated, its scale depends on the type of radiation its exposed to and it has fallen out of use. This gives it some scale: "An exposure of 500 roentgens (~5 Sv) in five hours is usually lethal for human beings."
 The dosimeter adapter instructions provided some interesting information. The adapter was really a holder to make it easier to charge the radiacmeter as part of a larger circuit using a 1 megaohm resistor and two 45-V batteries. The Wikipedia link below says that the radiacmeter would need 150-200 V to charge! The huge resistor is added at the battery for safety. To check your radiation levels you look through the end of the radiacmeter towards a bright light. This allowed you to see the scale inside (at left). There was a warning on the instructions not to use the dosimeter near AC wiring as the "alternating field surrounding the probe will make the fiber vibrate 120 times per second and appear as a nearly invisible blur against the scale."
That gave me some more information to research. "Radiacmeter" didn't give me many results about this particular device as the label is outdated. It seems more appropriate to call it a "Radiacmeter-Dosimeter" as at the top of the instructions. The more common "Dosimeter" was too broad of a category but "pocket dosimeter" or "quartz fiber dosimeter" on Wikipedia yielded something more like what I had: "A quartz fiber dosimeter, sometimes called a self indicating pocket dosimeter (SIPD) or self reading pocket dosimeter (SRPD), is a type of radiation dosimeter, a pen-like device that measures the cumulative dose of ionizing radiation received by the device. It is usually clipped to a person's clothing and worn to measure one's actual exposure to radiation."
Continuing on in the article I learned that a dosimeter essentially acts as an electroscope! The quartz fiber is inside a sealed cylinder and attached parallel to an electrode. By connecting the circuit as describe above the electrode becomes negatively charged. By conduction the quartz fiber is as well and it repels from the electrode due to an electric force according to Coulomb's Law. Below is a schematic I found that shows the internal components:

This image shows the quartz fiber laying parallel to the hook of the electrode (looks just like a Leyden Jar huh?) and as it is repelled it is pushed away. A more modern image is here and very similar. If you were exposed to radiation then neutral atoms inside the cylinder would become positive and negative ions. The positive ions would be attracted to the negative electrode decreasing it's charge, decreasing the magnitude of the electric force as per Coulomb's Law and the quartz fiber would move closer to the electrode.
This image below from the Nondestructive Testing Resource Center shows the view through the eyepiece as well as the internal components of the dosimeter. The vertical line around 100 milliroentgen is the quartz fiber. With this orientation I assume that the fiber would be all the way to the left (at 0 milliroentgen) when fully charged and thus max deflection but there is no radiation present. If there was radiation exposure then the fiber's repulsion to the electrode will decrease and it would move closer. That means that the electrode would be on the right side (at the 200 milliroentgen side) I think.

Several times in the instructions it was mentioned that the dosimeter has to be recharged. So I worried that you might think you had been exposed to radiation as the quartz fiber drifted back towards the electrode (and the high side of the milliroentgen scale) as the charge leaked off it over time. How would you know if you'd actually been exposed?? The NDE had the details though: a dosimeter is expected to lose 2% of its charged in 24 hours. Whew! So if you charged it and recorded base levels at the beginning of each shift it would be fairly accurate.
So this tiny little thing left somewhere in my school for going on 65 years turns out to be pretty cool! And what can I do with it? Well now that I know how it works and what its used for I think it could be brought up a couple of times:
1. During electrostatics after students are introduced to traditional electroscopes I can show students how this is charged and how the quartz fiber moves along the scale. We can talk about which parts of the device should be an insulator and which should be a conductor and why.
2. During current electricity we could discuss the basic albeit super dangerous circuit required to charge this thing the size of a pen.
3. During our light unit as students are introduced to the electromagnetic spectrum we can discuss why only X or gamma (and sometimes beta) radiation would trigger this device. I want to ask students why looking at a bright light source wouldn't move the scale of the dosimeter. (And of course not let them try to look at the sun through it to test out any theories!)
4. During an optics unit we could look at the arrangement of the lenses inside the device and talk about their shape and their position.
Basically I want to use it all year. I would love to get it charged up but I don't know if I have a DC power source that can go that high. It may have to become my new favorite useless accessory just so people ask me what it is.
He got all excited since he is a Navy veteran that worked on a nuclear sub. "I used one of these," he said, "But it didn't look like this!" The larger box had smaller boxes with a cylindrical radiacmeter and wooden dosimeter adapter kits.
 After reading the instructions for both we were able to get a better idea of what they did and how they worked. Well Matt already knew, but was very excited to see the "antique" version. Note the box is stamped April 1953! My school is old but we don't usually find equipment this old.
 The cylindrical radiacmeter measures radiation exposure and would have been worn in the pocket of servicemen in the 1950s. This page has images of different models. The cost of this one is labeled as $26.00 in March 1951, which is approximately $243 in 2017! The instructions said:
A pocket radiacmeter which measures and indicates the accumulated dose of X and gamma radiation to which the wearer has been exposed. At one end of the radiacmeter is an optical eye-piece and at the other end is the charging contact. The radiacmeter contains an ionization chamber into which is mounted a small electrometer. A radiac-detector charger is required to charge the electrometer. A scale is calibrated in milliroentgens is mounted in such a manner that the amount of radiation to which the wearer was exposed since the charging of the electrometer can be read directly by holding the radiacmeter up to a source of light and looking into the eye-piece.

The dosimeter is the device that was needed to measure the radiation exposure after the fact which surprised me. I know some modern dosimeters give live alerts when radiation levels reach dangerous or lethal levels. These older models would only alert wearers if they looked through it after their suspected exposure. The Roentgen unit is actually pretty complicated, its scale depends on the type of radiation its exposed to and it has fallen out of use. This gives it some scale: "An exposure of 500 roentgens (~5 Sv) in five hours is usually lethal for human beings."
 The dosimeter adapter instructions provided some interesting information. The adapter was really a holder to make it easier to charge the radiacmeter as part of a larger circuit using a 1 megaohm resistor and two 45-V batteries. The Wikipedia link below says that the radiacmeter would need 150-200 V to charge! The huge resistor is added at the battery for safety. To check your radiation levels you look through the end of the radiacmeter towards a bright light. This allowed you to see the scale inside (at left). There was a warning on the instructions not to use the dosimeter near AC wiring as the "alternating field surrounding the probe will make the fiber vibrate 120 times per second and appear as a nearly invisible blur against the scale."
That gave me some more information to research. "Radiacmeter" didn't give me many results about this particular device as the label is outdated. It seems more appropriate to call it a "Radiacmeter-Dosimeter" as at the top of the instructions. The more common "Dosimeter" was too broad of a category but "pocket dosimeter" or "quartz fiber dosimeter" on Wikipedia yielded something more like what I had: "A quartz fiber dosimeter, sometimes called a self indicating pocket dosimeter (SIPD) or self reading pocket dosimeter (SRPD), is a type of radiation dosimeter, a pen-like device that measures the cumulative dose of ionizing radiation received by the device. It is usually clipped to a person's clothing and worn to measure one's actual exposure to radiation."
Continuing on in the article I learned that a dosimeter essentially acts as an electroscope! The quartz fiber is inside a sealed cylinder and attached parallel to an electrode. By connecting the circuit as describe above the electrode becomes negatively charged. By conduction the quartz fiber is as well and it repels from the electrode due to an electric force according to Coulomb's Law. Below is a schematic I found that shows the internal components:
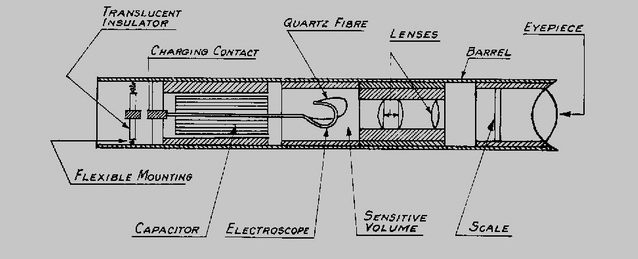
This image shows the quartz fiber laying parallel to the hook of the electrode (looks just like a Leyden Jar huh?) and as it is repelled it is pushed away. A more modern image is here and very similar. If you were exposed to radiation then neutral atoms inside the cylinder would become positive and negative ions. The positive ions would be attracted to the negative electrode decreasing it's charge, decreasing the magnitude of the electric force as per Coulomb's Law and the quartz fiber would move closer to the electrode.
This image below from the Nondestructive Testing Resource Center shows the view through the eyepiece as well as the internal components of the dosimeter. The vertical line around 100 milliroentgen is the quartz fiber. With this orientation I assume that the fiber would be all the way to the left (at 0 milliroentgen) when fully charged and thus max deflection but there is no radiation present. If there was radiation exposure then the fiber's repulsion to the electrode will decrease and it would move closer. That means that the electrode would be on the right side (at the 200 milliroentgen side) I think.
So this tiny little thing left somewhere in my school for going on 65 years turns out to be pretty cool! And what can I do with it? Well now that I know how it works and what its used for I think it could be brought up a couple of times:
1. During electrostatics after students are introduced to traditional electroscopes I can show students how this is charged and how the quartz fiber moves along the scale. We can talk about which parts of the device should be an insulator and which should be a conductor and why.
2. During current electricity we could discuss the basic albeit super dangerous circuit required to charge this thing the size of a pen.
3. During our light unit as students are introduced to the electromagnetic spectrum we can discuss why only X or gamma (and sometimes beta) radiation would trigger this device. I want to ask students why looking at a bright light source wouldn't move the scale of the dosimeter. (And of course not let them try to look at the sun through it to test out any theories!)
4. During an optics unit we could look at the arrangement of the lenses inside the device and talk about their shape and their position.
Basically I want to use it all year. I would love to get it charged up but I don't know if I have a DC power source that can go that high. It may have to become my new favorite useless accessory just so people ask me what it is.
Monday, June 05, 2017
The Ready Desk
[Trigger warning: Curmudgeonly post—kids are hereby warned to "Stay off my lawn!"]
The world has changed. Students are increasingly inseparable from their phones. 24/7/365. Their phone is increasingly the center of their world. All other activities, such as instructional classroom time, are mere background variations—different atmospheres in which their ongoing phone activities are conducted.
At the same time, I find my students are performing more poorly with each passing year. This even as I begrudgingly excise material they find especially frustrating, and minnow the math to a bare minimum. I'm chasing, but they're outrunning me.
There are many factors at play here, and this post will not attempt to cover all of them. Instead, I'll go for one: phones in the classroom.
Many students—especially the boys—enter the classroom with earbuds dangling over their ears or chests. Their pre-wired to listen to the playlist they made especially for your class. Many take their seat and proceed to continue their ongoing text sessions. Many feign forgetting the "no phones in class" policy and need frequent reminders. They work hard to keep the phone on and active on their lap or setting atop their backpack angled so they can at least read the latest updates during class.
And increasingly, they help themselves to available outlets to charge their phones during class. The poor device has been under such heavy use in first and second periods that by third period, they need a serious recharge.
Many willingly risk a Saturday School referral because the chat is that important to them. They'll set their burgeoning backpack on the desk to create a hide for their phone. Or spend extended intervals utterly transfixed—eyes locked on their crotches. They are lost to the world in anticipation of a response. And they could pass a lie detector test not knowing why they are performing so poorly in class. They have absolutely no idea.
The world has changed. So I must acknowledge the change and take appropriate measures. Some teachers leverage the pacifying effect of allowing students to "phone out" (zone out via phone use). I'm keen to have them learn the material. For now, this means separating students from their phones while in my class.
The solution I'm honing? The Ready Desk.
The Ready Desk is just my shorthand for students having what they should have in front of them during class. And—perhaps more importantly—not having what they should not have in front of them during class. It describes the state of their desk when they're ready to learn: The Ready Desk.
They need their pencil, today's handouts, their binder, and a scientific calculator. Nothing else. Everything else, including phones, textbooks, etc., can be stored in their pack, and their pack goes into The Rack.
I made space in my classroom to accommodate eight 4-cubby Ikea Kallas shelving units. That's space for 32 backpacks. I used the cubbies this year only for security situations (tests, exams, etc.). Next year, the rack will be an everyday thing.
An unintended benefit is the decluttering of the classroom desktop and floor space. Nothing to trip over; no more backpack "hides".
Will separating students from their packs force them—against their will—to engage in instruction? Probably not, but it might help many of them. Will some students redouble their efforts to maintain access to their fully operational phones? Probably, but they will need to be much more skilled than they need to be now. Is it a perfect solution will be free of any other possible unintended consequences? No.
But the tether between students and phones has become noticeably stronger each year. And student performance has declined. I am unwilling to do nothing about it, or wave a white flag of surrender.
Here is the handout I'll give to students early next year. (And by "next year," I mean approximately two months from now.)
The Ready Desk (PDF)
Thursday, June 01, 2017
Fall Leaves in a Spring Classroom
The video of a trapeze artist dropping into a net filled with leaves got a lot of attention last November after it was posted on YouTube. It now has almost 80,000 views and was described in a previous post on The Blog of Phyz by the every vigilant Internet scavenger, Bree Barnett Dreyfuss. It also led to a discussion on the PTSOS Yahoo discussion group. Most teachers thought it was a great demonstration of inertia. It looked to me like the tablecloth trick if you were to rapidly pull the tablecloth down, leaving the dishes apparently hanging in the air. Paul Robinson suggested that the effect wouldn't look as compelling for objects that were not affected by air resistance as much as leaves. I thought this was a good observation and wanted to test it. I also wanted to develop a way to do the Fall Leaves video as a demonstration in class.
After some thinking I decided I could use my spacetime simulator as the net, and coins in place of the leaves. I set things up on a weekend in my classroom and dropped a free weight in the center. This is the result with an iPhone 7 in 240 fps video mode:
I hope you agree that this was a satisfying result with some unanticipated phenomena. Look closely at the coins near the edge. They get pulled toward the center by the stretching of the fabric before the fabric pulls away from them. That gives them an initial velocity toward the center, causing the spell-binding collisions in the middle. Another thing to consider is the acceleration of the fabric surrounding the impact point. For the coins to appear to be suspended, the fabric must accelerate greater than 9.8 m/s/s. But the free weight is accelerating at 9.8 m/s/s when it hits, then its starts to decrease. This is a good puzzle to ask your students, how can the fabric have more acceleration than the weight? They should be able to figure out that the fabric is starting from rest and matching the free weight's velocity in a much shorter time than it took the free weight to reach this velocity. There are some surprisingly complex dynamics going on in this collision.
I wanted to test Paul Robinson's idea about air resistance. In place of coins, I placed packing pillows on the spacetime simulator and repeated. I was not surprised by the result:
If the packing pillows worked more like the leaves, they should have appeared to be suspended longer than the coins. They don't because the fabric does not allow air to flow through it like the trapeze net. As the fabric plows through the air it shields the packing pillows from air resistance. They fall almost like in a vacuum, staying with the fabric. I suspected this would happen because of the popular Hewitt demo where you drop a book with a piece of paper on top of it. They both fall together as the book plows through the air, allowing the paper to free fall. There is something more going on here as the packing pillows appear to stay with the fabric more than the coins. I suspect it is air flowing downward with the fabric. To reproduce the Fall Leaves video I would need to use a net so air resistance could act upward on the "leaves".
Obtaining a trapeze net was a non-starter for obvious reasons. I did some image searches of nets for ideas and decided on a cargo net. These come in a range of prices so I selected the largest, cheapest one I could find, the 100" x 140" by Grizzly Gear. It was only $12.95 from Amazon. The openings in this net were large so leaves wouldn't work. I decided to use colored 8.5" x 11" sheets of paper. Although I am sure I would have several volunteers, I decided to drop an inanimate object into the net instead of a student. My 20 lb medicine ball has many uses, this would be another good one. If you don't have one, a large bag of water or a large water balloon would be a good, inexpensive choice. It would add some other interesting elements to the slo-mo video! If you have other ideas for this demonstration, please leave them in the comments.
I needed students to support the net much like firemen holding a blanket for someone jumping from a burning building. Students also would need to place the paper on the net and drop the medicine ball, leaving me free to video it. I would need to pick a tall, trustworthy student to drop the ball accurately from the second floor from the roughly 4 meter height. If this idea gives you pause, it should work pretty well from about 2 meters like the Coins on Spandex demonstration. On the last day of class before finals, I had enough time to try this out. Here is our first attempt:
I thought there was a small chance the medicine ball would pass through the net opening, apparently the odds were much higher. We tried a second time and the ball hit a net intersection and it worked OK. Since I had 4 more classes of AP Physics, I could come up with improvements for each class. I attached some string to a small part at the center of the net, making a target for the medicine ball. The string decreased the size of the center openings and prevented it from stretching very far. We had a new problem, they stretched the net too much and the paper fell through as we were trying to place it. I had them move in some, this did the trick. It worked pretty well. I added a little more string just to be sure and had the next class hold the net up higher. This produced some satisfying results:
The only glitch is the ball rolled to the side a little and came out through the net, but only after causing the net to stretch all the way to the ground. I am going to try two more times tomorrow but without any more changes other than filming from a little further way. In each period I showed the students their video and also the coins on spandex. They seemed to like the coins the best but were glad they got to participate in the net version. I suggest you try doing both too. If you don't have a spacetime simulator, here is how to make one. You also could have the students hold the spandex like a blanket. I will probably do the net version of Fall Leaves again next year and show the coin video unless I come up with a whole new way avoid grading papers!
After some thinking I decided I could use my spacetime simulator as the net, and coins in place of the leaves. I set things up on a weekend in my classroom and dropped a free weight in the center. This is the result with an iPhone 7 in 240 fps video mode:
I wanted to test Paul Robinson's idea about air resistance. In place of coins, I placed packing pillows on the spacetime simulator and repeated. I was not surprised by the result:
Obtaining a trapeze net was a non-starter for obvious reasons. I did some image searches of nets for ideas and decided on a cargo net. These come in a range of prices so I selected the largest, cheapest one I could find, the 100" x 140" by Grizzly Gear. It was only $12.95 from Amazon. The openings in this net were large so leaves wouldn't work. I decided to use colored 8.5" x 11" sheets of paper. Although I am sure I would have several volunteers, I decided to drop an inanimate object into the net instead of a student. My 20 lb medicine ball has many uses, this would be another good one. If you don't have one, a large bag of water or a large water balloon would be a good, inexpensive choice. It would add some other interesting elements to the slo-mo video! If you have other ideas for this demonstration, please leave them in the comments.
I needed students to support the net much like firemen holding a blanket for someone jumping from a burning building. Students also would need to place the paper on the net and drop the medicine ball, leaving me free to video it. I would need to pick a tall, trustworthy student to drop the ball accurately from the second floor from the roughly 4 meter height. If this idea gives you pause, it should work pretty well from about 2 meters like the Coins on Spandex demonstration. On the last day of class before finals, I had enough time to try this out. Here is our first attempt:
Subscribe to:
Posts (Atom)