Monday, March 27, 2017

Chladni Singing

Chladni plates are a beautiful and dynamic example of resonance in two dimensions. Originally a bow was used (as seen in this Harvard demo video) to create two dimensional standing waves in a flat piece of metal in different shapes. More common now is to use a frequency driver to control the frequency of the standing wave. Here is a video that goes through a wide range of frequencies:


Whatever the method, you can demonstrate that higher frequencies produce shorter wavelengths and thus smaller patterns on the plates. You can talk about the fact that the pattern on the plate seems to abruptly change as a resonant frequency is reached. Ask students if the locations where salt gathers are nodes or antinodes of those standing waves. There is a lot to learn from something that is also mesmerizing to watch. If you're not super comfortable with the explanation yourself try showing your students this Physics Girl video that has a good explanation and information on the next steps in modern science.

I thought I'd seen everything about Chladni plates (including this music video they appear in) but then I learned of someone who can sing to a Chladni plate! Meara O'Reilly works at the Exploratorium museum of San Francisco and has enough voice control to sing to Chladni plates to create different patterns. Her website devoted to this phenomenon is here and an example is below. While amplified, this is produced by the human voice and not a frequency generator. It is amazing.

Saturday, March 11, 2017

dB line-up

I tend to stand on a soap box during my sound unit and take the opportunity to talk about sound safety. [Other related Blog of Phyz posts: quiet fireworks and firework sound safety.] I discuss decibel scales and show students several graphics with common noises and their values. Some of my favorites are below:
 

But it is sometimes hard for students to understand all the principles at once. I want to discuss allowed time duration, compare sounds they can relate to, talk about decibel reducing measures, and more. I find myself flipping back and forth between graphics during lectures and still not getting it all together.

I found this infographic that details over 60 noises with their decibel level, marked OSHA standards and suggested exposure times. The graphic itself is too large to view all at once but I loved the format. Noises were divided up as occupational or non-occupational noises. I typed up all of the activities with their decibel levels into a word document and selected 40 that I thought provided a range of activities students would relate to. I created another document for printing with the sounds, and OSHA recommendations. I cut out each one, mounted them to thicker bright paper and we were ready to go.

In class I explained the decibel scale to students and showed them a few examples. Then I passed out one sound slip to each student and asked them to arrange themselves into order from 0 dB and up. After they were arranged students took turns reading their sound and decibel rating. As they were sounding off (*
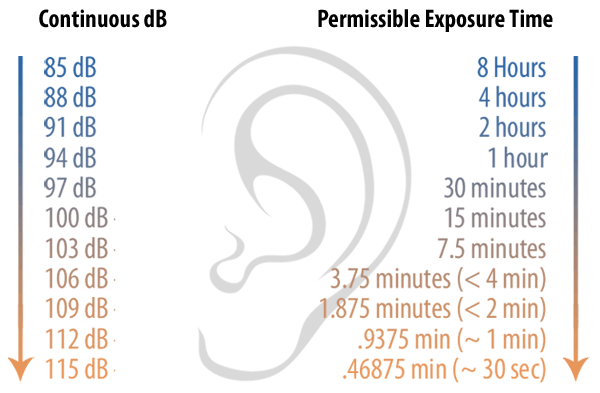
ba dum ching*)  I added in the cards describing the sound level (i.e. "comfortable 50 dB" or "Extremely Loud 100 dB") and the cards with suggested exposure times.

Students were surprised to learn the average decibel level of several common noise. They were shocked to see how many of them were past OSHA recommendations like "ear damage can occur here," or "unprotected noise exposure not allowed past this level." It gave them a chance to see all my talking points at once and they got to get up and move.

Space was an issue as 35 students shoulder to shoulder take up some space. I tried in my classroom for students to stand across the front of the room but they ended up in a weird convex arc and couldn't see or hear everyone else. I tried outside as pictured above but being right next to the street (on the other side of that fence) made it even harder to hear. In the future I would have arranged them in a circle around the room so that they could see everyone else. I would also hand students either a pictures of or the actual sound reducing devices where they would be needed to reduce the noises to a safe level. For example, students at 100 decibels would hold your basic foam ear plugs to show that their 20 dB reduction rating could lower those noises to a safe 80 dB. All in all I like the activity and look forward to refining it in the future.

Thursday, March 02, 2017

Dual purpose dimmer

At the 2017 Summer AAPT meeting in Sacramento Arbor Scientific had a booth in the exhibit hall showing off all their great demos. This Electricity & Magnetism Light Bulb demo caught my eye. It involves an incandescent light bulb with a long loose filament that can be turned on using AC or DC current. While on, a strong neodymium magnet is brought near the bulb with different results depending on the setting. When on DC the filament moves towards one pole of the magnet and away from the other. When on AC the filament vibrates when either pole of the magnet is brought close to it. I wanted one, but the reasonable price was still hard to manage for a once a year demo.

Last year I wanted to show my Conceptual Physics students a working dimmer switch and a simple light bulb. My retired father-in-law made me a self contained box with a dimmer switch and an incandescent bulb:
While shifting equipment around in my room I came across it again while my magnet cabinet was also open. As I recalled the Arbor Scientific demo I thought, "I wonder if...." and grabbed my biggest neodymium magnet. 

With the light bulb on dim so that the filament can be easily seen I moved the magnet close to the bulb. Since my bulb's filament wasn't as long as the one in Arbor Scientific's demo you don't see as much movement but it is vibrating! The second video is easier to see the motion. 


Now I know that my simple demo has a dual purpose and can be used in my current electricity unit and come back in my electromagnetism unit!