Showing posts with label photography. Show all posts

Monday, December 04, 2017

Advanced Studies in Artistic Lightning

Watch it big; watch it loud. But mostly, watch it.


Transient from Dustin Farrell (www.dfvc.com) on Vimeo.


And remember, deviations from physical realism serve not as disqualifies, but springboards for discussion here.

Thursday, July 20, 2017

Left Behind: Sunball Selfies

Many science instructors will be making the pilgrimage to totality for the August 21 solar eclipse. This will leave science students without their instructors during the event.

In a previous post, we offered a lesson plan to fill one day of a science teacher's absence. That was a question set to accompany showing The Universe: Total Eclipse.

What can students do on Monday, August 21 at the time of the eclipse (peaking at 10:17am in Sacramento)? It's a school day and students will likely be in class during most of the eclipse.

Perhaps your school has stocked up on eclipse viewers/glasses and will distribute them for students Monday morning. Then again, maybe not. It's important to convey the danger of looking at the sun during an eclipse.

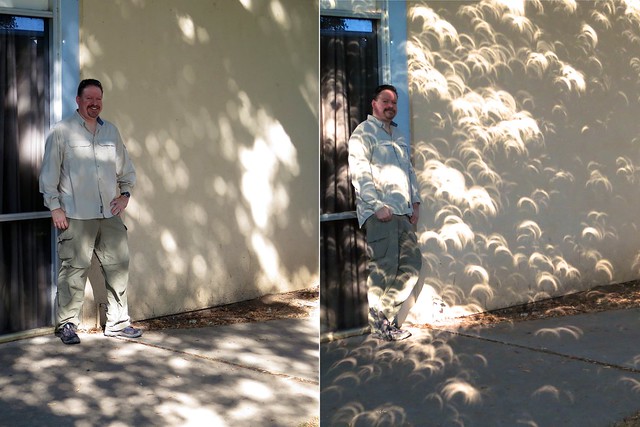
Conceptual Physics author, Paul Hewitt, reminds us that one of the best ways to enjoy an eclipse is to look down! The dappled light seen beneath trees is composed of pinhole images of the sun: "sunballs". When the eclipse is on, these sunballs turn into "suncrescents," pinhole images of the eclipsed sun. It is quite a spectacle. Some might even call it "amazeballs".

Here's an extra credit project that I will be assigning to my students for the eclipse:

Sunball Selfies (pdf) - Sunball Selfies (docx)

You will need to modify the document to use it at your school. And you don't need to be absent to use it. I used a similar assignment for the May, 2012 annular eclipse and students had great fun with it.

Sunball Selfies student album from May, 2012
2012 05 20 Eclipse Students

My own Sunball Selfies album from May, 2012
2012 05 20 Eclipse DB

Thursday, July 06, 2017

Rolling shutter explained by a YouTuber

The lesson is a nice complement to yesterday's photography post. Destin from Smarter Every Day produced a great rolling shutter explainer. Those weird motion-based video artifacts that your camera phone captures? Rolling shutter (not the "wagon-wheel" stroboscopic effect).

Destin's explanation benefits from his intentions and Phantom high-speed camera. And some great work in post-production. Next time I fly, I will book my tickets on "Smarter Every Day" airlines!

Wednesday, July 05, 2017

Polarization demonstrated by a photographer

In the era of digital photography and Photoshop, the use of filters in photography has declined. Some effects of photographic filters can be simulated in post-production software.

Polarization is not one of those things. I use a polarizer in my own landscape and (to some extent) wildlife photography quite heavily. (Links to that work can be found at The Treks of Phyz.)

This video recently bubbled up at Digital Photography Review (my favorite resource for digital camera news and reviews). It's a photographer's description and demonstration of polarizers. Nicely done, and it can certainly act as a springboard for the discussion of polarization in the classroom.

Take a look for yourself.

Wednesday, October 26, 2016

This time machine makes a second last for twelve minutes

And it's only $2500 for the privilege.
Chronos 1.4 is the brainchild of engineer David Kronstein, who first demonstrated the camera’s hardware and recording capabilities with a production-level prototype under his YouTube handle ‘tesla500.’ The camera can record 1,057 fps at 1280 x 1024, and up to 21,650 fps at lower resolutions.
The math pencils out as follows:

When viewed at the standard video frame rate of 30 frames per second (fps), 21,650 frames would take about 722 seconds, or 12 minutes to watch.

The iPhone can natively capture 240 fps, which slows 1 second of action into (240/30) 8 seconds of viewing.

DPReview has an article on the Chronos 1.4, and there's a demo video as well.

Chronos High Speed Sneak Peek


UPDATE: Watching the sneak peek makes me think the native playback rate on this camera's files is 60 fps, in which case 1 second of action will blow by in a mere 6 minutes at the highest frame rate.

UPDATE 11/25/16: The Kickstarter campaign goal was achieved in five hours.

Saturday, August 27, 2016

Olympics in motion pictures

I want to share all of these with my classes during kinematics! The NY Times posted these great Olympic moments in composite pictures. Often simple motion is modeled for students by showing the object in successive photos in the same image. By comparing the distances between the object over time students can get a sense of how quickly it is moving.
When viewing the page you will scroll down but will actually be moved to the right in order to see their full width. Some of the images like the one above seems to be taken in even intervals of time and would therefore be easier to compare. So how can you use them? Let's take a look:

Christian Taylor's gold winning triple jump:
Notice that Taylor's body makes a parabola while he's in mid air for the long jump. What might be surprising is that there is also a clear parabola in his bounds before his big jump. You can trace over the image along his center of mass and show students the parabola shape. You can also point out Taylor's change in position at the end during his jump and discuss his center of mass.

"On match point in their semifinal, the Brazilian team of Barbara Seixas and Agatha Bednarczuk ousted Kerri Walsh-Jennings and April Ross of the United States."
There are great parabolas to be seen in the projectile motion of this volleyball. The volleyballs are closer together at the top of the parabola because it is moving slower and will not travel as far in between each picture. 

Derek Drouin's winning high jump:
This image shows Drouin's change in speed as the distance between each changes. There is a great parabola during his high jump and you can see him change the position of his center of mass. 

Laurie Hernandez on the balance beam:
I would use this to show students that even when it seems like she's floating on air her center of mass is always supported by a base underneath her. In the first few images show her feet underneath her. The fourth shows Hernandez supported briefly by her hands. As she dismounts you can see a parabolic shape if you follow her center of mass through her flip. 

Anytime you can relate what you're studying to the "real world" for your students is a win.

Tuesday, July 05, 2016

Independence Day 2016 fireworks at Cal Expo

It's tough to have serious camera gear and sit out a big fireworks show. So I tend not to.

Photographers more serious than me (and that's nearly all of them) focus(!) on shooting(!) fireworks with a photographically interesting foreground. Maybe someday. I'm so simpleminded as to be enthralled with the fiery blossoms, themselves. And trying to get a few keepers after each show.

My recommendations (to myself, if no one else) after this year's experience:

• Lens: 15mm (or 24mm—70mm set to 24mm)
• Tripod is required to stabilize the camera; a bullhead or tilt/pan is need for aiming
• Cable release is required to control the shutter without wiggling the camera
• ISO: I will set mine to "L–1.0", the lowest ISO I can get my camera (Nikon D800E) to go to—it's faux ISO 50
• Mode: Manual
• Aperture: f/11 (at f/8 this year, I was still getting blowouts—admittedly, I was only at ISO L–0.7)

Note: The D800E's dynamic range when capturing RAW images is great enough that one can bring up underexposure in post. But once a pixel is blown out (overexposed), there's no bringing it back. A bit of underexposure is acceptable. Too much will require bringing everything up, including the relatively dark yet somewhat illuminated smoke, and nobody wants that.

• Shutter is set to "bulb"—pushing the cable release opens the shutter; letting it go closes the shutter
• Metering is irrelevant here; the camera isn't making any decisions about exposure
• Focus: Manual—I focused at a distant light pre-show and confirmed
• Image quality: RAW (no in-camera processing)
• Long-exposure noise-reduction: Off (to prevent any in-camera processing)
• Live view: Off

Having the correct settings is a start. Next, you have to aim decently enough to contain the glowing bursts. The real trick is knowing when to open and close the shutter. Open too late and you get "porcupines" (streaming trails that seem to come from inside a black sphere). Keep it open too long and the frame gets too busy. Blowouts ensue.

Post-processing is where you can bring up the exposure if needed. Beyond that, I can go completely crazy with saturation and other settings. By eschewing "interesting foreground," I am free of any post-processing inhibitions.

With all that in mind, here are the keepers I got this year.

Thursday, July 23, 2015

FLIR ONE 2.0 "See the Heat" camera now available*

I'm a fan of photography and imaging. I do a bit of photography, myself. I am a fan of Harold Edgerton's high-speed photography and videography.

I jumped on Casio's EX-F1 when it came out in 2008, and recommended it to physics teachers. My friend and colleague, Dan Burns, got one and came up with a simple rule for what to record in high speed: "If it moves, shoot it!"

When I heard that the heat imaging experts at FLIR were developing a consumer-level product, I looked it up. They were selling FLIR ONE, a camera/case combination for the iPhone 5/5S. I had an iPhone 4S, so I didn't bite. When I upgraded to an iPhone 6, the FLIR ONE was still not an option.

At CES 2015, FLIR announced the next version of FLIR ONE. It wasn't a case, but rather an attachment that connected to the iPhone via the Lightning connector.

As I was beginning my journey to wilds of Alaska, FLIR announced that the new ONE was shipping. By the time I got back to order one, the wait time was up to about six weeks.

Poke around FLIR ONE page.

Check out the marketing video; it's stronger on the funny than it is on the informative.


Or this one. A bit more informative…

Flir One Review


*I don't know how back-ordered they are now, but the sooner you buy, the sooner you'll get.

Tuesday, June 23, 2015

Samsung's "Transparent" Safety Truck

They finally did it: a truck with an index of refraction n = 1.0. Well, no. But still, this uses readily available technology to do something very groovy.

This seems like a great idea. It should be mandated for any large vehicle (trucks, RVs) on two-lane roads.

Samsung Safety Truck (Versión en Español)


Samsung Safety Truck (Versión en Español)

Sunday, March 22, 2015

The real world keeps taking away my real world physics

Once upon a time (a few years ago), a reasonable high school physics question was, "Why do the first broadcasters in a given television market get the lowest channel numbers on the dial?" In Sacramento, for example, that would be the NBC affiliate, KCRA, who got Channel 3. Channel 1 was never licensed to anyone by the FCC, and Channel 2 was given to the neighboring San Francisco market. The channel numbers correspond to broadcast frequencies: lower channel numbers broadcast on lower carrier frequencies. The corresponding longer waves are better at diffracting over hills and into valley, delivering commercial messages to more viewers.

But broadcast technology changed in 2009, so the problem is no longer relevant, as far as I know.

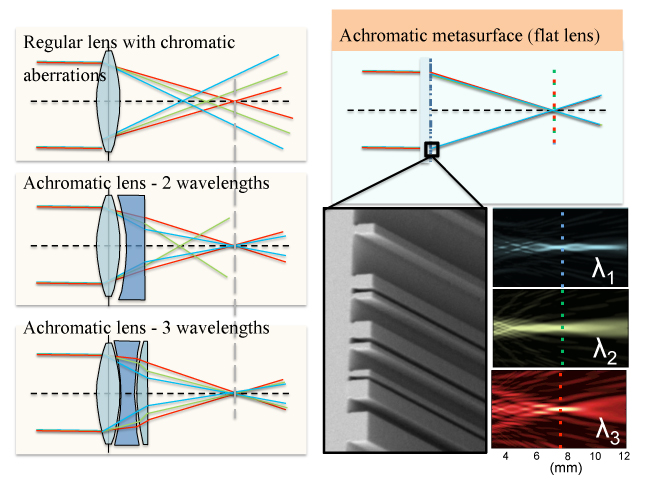
And now chromatic aberration? Researchers at Harvard have apparently developed a flat lens that focuses all colors at the same point.

Perfect colors, captured with one ultra-thin lens
NO NEED FOR COLOR CORRECTION—HARVARD PHYSICISTS’ FLAT OPTICS, USING NANOTECHNOLOGY, GETS IT RIGHT THE FIRST TIME


Well, we'll always have The Dark Side of the Moon.


Saturday, January 17, 2015

Fibonacci zeotrope sculptures

Sorry for the sudden aggregation binge. I should be working on my genuflection to The College Board (AP Physics 1 and AP Physics 2 syllabi), but my motivation for that exercise is so. very. low.

In the meantime, let's enjoy this confluence of Fibonacci numbers, 3D printing, and stroboscopy, shall we?

This San Francisco Globe article introduces it nicely.

And, of course, video.

Fibonacci Zeotrope Sculptures


Fibonacci Zoetrope Sculptures from Pier 9 on Vimeo.

"These are 3-D printed sculptures designed to animate when spun under a strobe light. The placement of the appendages is determined by the same method nature uses in pinecones and sunflowers. The rotation speed is synchronized to the strobe so that one flash occurs every time the sculpture turns 137.5º—the golden angle. If you count the number of spirals on any of these sculptures you will find that they are always Fibonacci numbers.

For this video, rather than using a strobe, the camera was set to a very short shutter speed (1/4000 sec) in order to freeze the spinning sculpture."

Sunday, November 16, 2014

FLIR One: A thermal imaging camera for your iPhone 5

The world is lousy with iPhone cases. They're available in all manner of designs to suite a wide variety of tastes and brand loyalties.

FLIR Systems has a $350 case for the iPhone 5/5S. It's a dual-camera thermal imaging system called FLIR One.

FLIR One is a battery case with two cameras whose lenses are in close proximity. One camera is sensitive to visible light, the other is sensitive to infrared light.When actuated, the two cameras collect images simultaneously. The FLIR One app processes the two images into one "thermograph" The app uses the visible light image to create outlines of hard edge boundaries of objects while the IR image is processed into false colors that fills the frame.

FLIR One


If I had an iPhone 5 or 5S, I'd be shooting the world with one of these things. I eagerly await a FLIR One for iPhone 6.

(FLIR is an acronym! Do you know what it stands for? I'll put the answer in the comments.)

Friday, July 05, 2013

Cal Expo fireworks photo shoot

Fireworks are a tempting subject for anyone with a camera. Since I count photography as a serious hobby, I am subject to this temptation.

But shooting fireworks is non-trivial. What aperture? What shutter speed? What ISO? Modern cameras have been programmed to record nice images in a variety of settings. But not so much for fireworks. A fast shutter, suitable for handheld shooting, is nearly useless (except, perhaps, during the finale). If you google "fireworks photography," you will find no shortage of photography tips.

Here's a reasonably good one I just came across (7/5/13) from Sigma.

Additional challenges arise when you are unfamiliar with the venue. How big will the 'works be in your field of view? Which way is the wind blowing?

I use a tripod and a 24-70mm lens. I now use an aperture of f/8 and a shutter speed of "bulb". I use a cable release to open and close the shutter. For my shoot in Washington, DC last year, my shots were a bit wider than they needed to be as I was a significant distance from the show. At Cal Expo last night, I was right at the show; I felt like my 24mm lens was too narrow. The results didn't necessarily bear that out.

Another challenge is focus. Last year, I used autofocus for each shot. Many shots were spot on, but some were off. The real problem with AF is that it needs a subject to focus on. But if you wait for a burst, then half-press to activate AF, the fragments are well into their trajectory by the time you begin your exposure. Spinning the focus out to a hard infinity doesn't necessarily get you critical focus, either.

It's tough to get good test shots to chimp (examine) during the show. Things happen fast. So last night, my experiment was to use AF on an exposure, chimp it, then switch to manual focus and not touch the lens. The focus seems good, though maybe not perfect.

A couple of things I might have done better... I wasn't sure I was going to out to show, and left it to the last minute. The battery in the camera was on its last bar. The spare battery in the charger was completely dead. My monstrous DSLR defaults to long exposure noise reduction. This may very well be a good thing, but it makes you wait for an interval equal to the exposure time until you can shoot again. It slows you down. Next time, I'll turn it off and see how badly that goes.

Based on advice I had seen, I set the ISO to 200. Since overexposures seemed more likely than underexposures, I'll go with 100 next time. I leave white balance to auto. There may be a better white balance setting to use, but I'm unaware of it.

The real art in shooting is deciding when to open and close the shutter. I try to open when I see a rocket going up and close when the fragments have played out. But it's rarely that simple once the show is on.

A photographer prefers to have a nice foreground in fireworks shots. I managed that for my DC shoot with the Washington Monument, the Lincoln Memorial, and the Potomac River. That option is not really available at Cal Expo. (Additional hazards at Cal Expo: Everyone doing their "safe & sane" fireworks in the parking lot. It's like driving through a war zone getting in and out. Getting out is non-trivial; patience is key. And the heavy metal tribute band that 98-Rock thought would be a good idea for pre-fireworks entertainment? Not so much. Next year, I gotta remember earplugs.)

The upside is that with only fireworks in the frame, one needs not show much (if any) restraint in post-processing. Amp up the contrast and saturation to your heart's content.

Here's what I got at Cal Expo last night. [Flickr album]


Here's what I got in Washington, DC last year. [Flickr album]

Wednesday, June 12, 2013

Groovy video tricks: Motion amplification

Exaggerating color changes at the pixel level reveals "microscopic" motion. It's all explained in the video! Hat tip to Laura Nickerson.


They say that some things once seen cannot be unseen. Now some things unseen can be seen.

Friday, June 07, 2013

Motors cardboard balls motion noise light space ART

The Festival of the Arts opens in my home town of Grand Rapids today. With a hat tip to College of Curiosity's Jeff Wagg, I share this in the spirit of physics and art. The lens work is also praise-worthy. To me, it brings to mind Koyaanisqatsi and Baraka.

Thursday, May 17, 2012

Eclipse sunball portraiture: Do it!

Better yet, have your students do it!

An annular eclipse will be passing through Northern California this Sunday. The more populated areas will get a partial eclipse, but that's fun, too.

And a nice opportunity to get photos like this one from Hewitt's Conceptual Physics 11th edition.


So I made it an extra credit opportunity for students who can pull off the photographic feat.

Details on the extra credit opportunity here. That's the student handout I'll give to my students.

UPDATE: Having scoped out potential locations, it struck me that the best places for the tree shadows/sunballs to hit might be a vertical surface (wall) rather than the ground (as depicted in the Hewitt shots). The eclipse peaks late in the afternoon. Shadows are long; the sunballs/crescents may be very distorted on the ground. Just a thought.

Sunday, January 01, 2012

High-speed photography to get the year moving

I don't do this stuff, myself. But Alan Sailer does it very well, indeed.

"A series of photos mostly taken with a home-built microsecond guided spark flash."

Take a look at http://flic.kr/s/aHsjnckLZ5

Hat tip to Kristjan Wager via Facebook.

Sunday, December 04, 2011

Iceland observations - independence and isolation

Ski week is a dangerous time for me. I rarely do much traveling, and that leaves me idle to search out summer travel opportunities. This year I found a photographer trip to Iceland offered by Andy Long of First Light Tours.

Iceland is known as a wonderland to landscape and nature photographers. It had been on my list for some time. I wanted to go, but I wanted to go with photographers. The First Light trip was a match, so I proceeded to book it.

Andy Long is a Colorado-based nature photographer who runs a variety of destination workshops every year. He partnered with Michael Kissane of f-Stop Tours in Iceland. Kissane was born and raised in St. Louis, but has lived in Iceland for several years. He's even fluent in Icelandic, and that's no mean feat.

The photo tour was June 24-July 2. I scheduled two additional nights in Reykjavik to extend my stay.

The forecast for Iceland was for temperatures in the 45°F–55°F, overcast with rain. I geared up and packed appropriately. David duChemin's observations in Iceland: A Monograph (iPad app) compelled me to upgrade my tripod. I did a bit of preparatory studying with Insight Guides' Iceland and Profilm's Iceland's Favorite Places.

The journey to Iceland was eventful due to less than professional performance by Delta Airlines. An FAA-imposed weather delay somehow resulted in a loss of my booked seat on the NY to Reykjavik leg of the trip. I'm sure I was supposed to count my lucky stars that I was able to score a bulkhead middle seat in place of the window seat I booked months earlier.

Upon arrival in Iceland, the group (6 photographers and 2 guides) was assembled and whisked off to Gardskaga, our initial shooting location. We got some bird shots, a couple of landscapes and a trip to the Seltún geothermal site in before dinner and rest in Reykjavik. This time of year the sun goes down at midnight and rises at 3am in Iceland. The sky goes somewhat dim, but never dark.

On Day 2, we journeyed north to Hraunfoss (Lava Falls) and Barnafoss (Children's Falls) (yeah, there's an unhappy story that goes with that name). before bedding down in Borgarnes.

On Day 3 day we hopped a ferry to Flatey (Flat Island) out in the Breiðafjörður Fjord. We spent our time on the island shooting birds and a bit of architecture. We returned and made our way to Arnarstapi for terns, fulmars, and a stone cold giant.

On Day 4 we headed for Þingvellir, a site of Icelandic historical significance and where you can straddle two continental plates (North American and Eurasian). From there, it was off to Geysir to take a shot at Strokkur geyser's pre-eruption hot water dome. Yellowstone has a better concentration of wild geothermal features, but I've never seen a geyser erupt like this one. Next was the thunder and mist Gullfoss (Gold Falls). We also took in a curious red-rock crater lake.

On Day 5 we spent some time in chilly solitude at the nicely appointed Flói Nature Reserve before stopping at Selfoss for lunch supplies and Sirius Konsum chocolate. Then it was off to Seljalandsfoss, an delicate, isolated, but popular waterfall. A slick, rocky, muddy, wet trail led around to the back side of the falls. Keeping gear dry and legs underneath were challenges, but image potential was great. Then to Skogafoss, a broader, louder, more popular falls. Then to Vík and Black Beach.

On Day 6 we got some morning puffin shots, then it was in to Jökulsárlón, a glacial lagoon. This was a treasure of great wonder; it was like a dynamic Bryce Canyon. More blue than red, but also in motion. We toured the lagoon in an open-air amphibious waterbus. Later we had a hay-wagon ride six kilometers across a tidal flat to Ingólfshöfði, a reserve that is home to great skua, razorbills, and puffins.

On Day 7 we went to Skaftafell National Park. We were able to hike out to the toe of Skaftafellsjökull. It was a nice trail through moss-covered rocky terrain. We missed Svartifoss somehow. I don't remember why.

On Day 8 we headed back to Reykjavik, retracing our route along the southern segment of Iceland's Ring Road and stopping here and there for pictures, lunch, and chocolate.

On Day 9 the photographer tour was over, but I stayed behind to wander the streets of the city. I got some nice architecture and graffiti shots.

On Day 10, I toured Þórsmörk with an small group and a local guide with a SuperJeep. It was nice to work up into the interior a bit. More of a nature tour than a treasure-trove of photo-ops.

Day 11 it was back to the US, California, and Sacramento. I saw a lot of Iceland and was lucky to have knowledgable guides. But I often felt a bit rushed (because I am, by nature, slow and deliberate). I'm sure the others considered me an impossible slow-poke daudler forever holding up the program.

I'd love to get back to Iceland; I feel like I missed more than I saw. I missed the Bare Landscapes fine art photography gallery exhibition by a few days.

My Iceland finalists photo album is on Flickr.

Sunday, October 30, 2011

Quadruple rainbow observed and shot

I am late to this post, but within the calendar month of the news. I'm slow! But many of these items I post so I can easily find them later.

In any event, here's the fairly undramatic photo:


MSNBC's story at the end of this link explains why the photo doesn't knock your socks off. The BBC's take is here.

One thing to notice, the camera is aimed sunward.

I give a fairly robust lesson in the physics and geometry of rainbows. You should be able to find the materials at these links:
1. "Understanding Rainbows" Springboard (student worksheet)
2. "Understanding Rainbows" Springboard (answers)
3. "Understanding Rainbows" Presentation (interactive QuickTime)

Among the things we learn: the primary rainbow shows up at about 40°-42° around the anti-solar direction, and the secondary is out at 51°-53°. We look away from the sun to see such rainbows.

The geometry of the tertiary rainbow places it 38°-43° from the solar direction. The quaternary rainbow is similarly sunward.

Images of the tertiary and quaternary rainbows are reminiscent of the discovery of the outermost planets. Photographers aim their cameras to where the faint rainbows should be, Without seeing the rainbows with their own eyes, they shoot the images nonetheless. They then post-process the hell out of the images, beefing up contrast and saturation. And voila! Third/fourth order rainbows are revealed.