Many science instructors will be making the pilgrimage to totality for the August 21 solar eclipse. This will leave science students without their instructors during the event.
In a previous post, we offered a lesson plan to fill one day of a science teacher's absence. That was a question set to accompany showing The Universe: Total Eclipse.
What can students do on Monday, August 21 at the time of the eclipse (peaking at 10:17am in Sacramento)? It's a school day and students will likely be in class during most of the eclipse.
Perhaps your school has stocked up on eclipse viewers/glasses and will distribute them for students Monday morning. Then again, maybe not. It's important to convey the danger of looking at the sun during an eclipse.
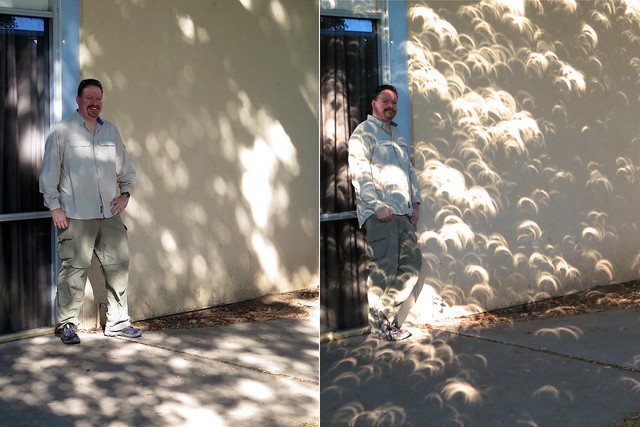
Conceptual Physics author, Paul Hewitt, reminds us that one of the best ways to enjoy an eclipse is to look down! The dappled light seen beneath trees is composed of pinhole images of the sun: "sunballs". When the eclipse is on, these sunballs turn into "suncrescents," pinhole images of the eclipsed sun. It is quite a spectacle. Some might even call it "amazeballs".
Here's an extra credit project that I will be assigning to my students for the eclipse:
Sunball Selfies (pdf) - Sunball Selfies (docx)
You will need to modify the document to use it at your school. And you don't need to be absent to use it. I used a similar assignment for the May, 2012 annular eclipse and students had great fun with it.
Sunball Selfies student album from May, 2012
My own Sunball Selfies album from May, 2012
High school physics education issues as seen by some American teachers: From content standards to critical thinking
Thursday, July 20, 2017
Tuesday, July 18, 2017
I have stopped recommending the AP1 and AP2 exams—when will you?
I expressed my misgivings about the AP Physics 1 and AP Physics 2 exams in a previous post. Once again, this is a rant. If you're not into rants, kindly scroll to the next post.
The purpose of this post is simply to show the global exam score distributions, three years into the redesign. I used the numbers posted by Total Registration.
First up: the final three years of the AP Physics B exam scores. Fives were earned by 15% of students, fours were earned by 19%, threes by 27%, twos by 17%, and ones by 22%. (Approximately one third succeeded with 4s and 5s.)
Next up: the first years of the AP Physics 1 exam. Fives were earned by 4% of students, fours were earned by 14%, threes by 21%, twos by 30%, and ones by 31%. (Approximately one fifth of candidates succeeded.)
Try not to judge too harshly those who have lost enthusiasm for algebra-based AP Physics.
To complete the Algebra-based exams, consider the AP Physics 2 exam. Fives were earned by 9% of students, fours were earned by 15%, threes by 34%, twos by 32%, and ones by 9%.
The College Board hastens to offer explanations for the precipitous plummet, especially in regard to AP1. The AP2 scores actually match the legacy APB results reasonably well. There's reason to speculate that many (if not most) AP2 examinees are successful veterans of the AP1 exam.
1. Teachers aren't teaching the new course correctly. They haven't undergone enough in-service retraining. (This is part of the admission that the AP1 and AP2 exams aren't really about physics anymore, but about Big Ideas. Physics topics are merely the canvas upon which the Big Ideas are painted.)
2. Too many students are taking the AP1 exam. This is where I'm trying to help. And you can, too. I assure my students that I will do my best to prepare them for the exams as they are. But I encourage them to not submit to the exam. This reverses a position I held for 25 years. If we work together, we can help to reduce the glut of AP1 examinees.
The Physics team at the College Board has replaced the muscular Camaro that was AP Physics B with shiny Lamborghinis called AP Physics 1 and AP Physics 2. Emulating the college course that examinees could test out of is now a long-abandoned goal. The new courses hope to be the richest, most immersive physics courses that could be imagined.
I don't find the course syllabi to be particularly practical for high school students. The courses go well beyond virtually all introductory college and university courses. The AP Physics B exam was more demanding than those administered at the college level. And the AP1 and AP2 exams amplify that disparity to 11.
Surely this escalation of difficulty of the AP1 and AP2 exams must have resulted in a global advancement of the way colleges and universities accept and interpret passing scores. If it has, I am unaware of it. In the old days of AP Physics B, college acceptance of passing scores was a crazy patchwork. To the best of my knowledge, the crazy patchwork remains unchanged even with the more stringent AP1 and AP2 exams.
You might wonder why AP Physics C instructors remain enthusiastic about their course and exam. They were unaffected by the AP Physics B redesign. Let's bring them into the mix.
While the AP1 and AP2 scores plummeted, the un-redesigned AP C Mechanics exam scores continued to flourish. Over the past three years, fives were earned by 31% of students, fours were earned by 28%, threes by 18%, twos by 13%, and ones by 10%. (Nearly 60% success rate.)
The score of 5 (highly qualified) now represents the mode.
The un-redesigned AP C Electricity and Magnetism exam scores did well, too. Over the past three years, fives were earned by 30% of students, fours were earned by 24%, threes by 14%, twos by 19%, and ones by 13%. (More than half succeed.)
The score of 5 (highly qualified) continues to represent the mode.
AP Physics C continues to be a physics content-based exam. That is, its blueprint refers to topics in physics instead of the more philosophical Big Ideas that form the core objectives of AP1 and AP2. This may well be a key to the continuing success enjoyed AP C examinees.
Of course there's more to this discussion. I'm obviously ventilating a bit here because this continues to be a source of frustration. AP Physics C is not a viable option at my school due primarily to its prerequisites. Intra- and inter- district competition for school enrollment prevents me from simply abandoning AP1 and AP2. If not for that, I would.
With haste.
Monday, July 17, 2017
Left Behind: The Universe - Total Eclipse
For instructors making the pilgrimage to totality for the August 21 eclipse, there is a chance school will be in session and lesson plans will need to be prepared for guest teachers (aka, substitutes).
One day could be covered by the showing of the "Total Eclipse" episode of the A&E documentary series, The Universe.
The program, episode 7 of season 5 (The Universe S5E7), originally aired September 16, 2010. It can be found online. I leave it readers to source the best version and to make it available for a classroom showing.
As I do for virtually all video programs I ever show in class, I have prepared a question set to accompany the episode. A sequence of questions that can be answered while the video plays tends to keep students appropriately focused. It is available, free of charge, at my nascent Teachers Pay Teachers website: The Resources of Phyz. I have found useful resources there and plan to add more to my own corner in the future. For now, the "Total Eclipse" question set is all that I have posted.
The Universe - Total Eclipse video questions
We will add to our "Left Behind" series with other activities for students not traveling to totality in future posts.
Thursday, July 13, 2017
Reining in the kilogram once and for all
It seems we're been here before. More than once. The kilogram: a pesky unit of measure that hasn't been behaving itself.
Derek Muller goes deep into the explanation of the newly redefined kilogram. The task is not trivial. I may need to rewatch this robust explainer a couple of times before it all sinks in. Have a seat and prepare to get your geek on: there will be mathematics!
How We're Redefining the kg
Derek Muller goes deep into the explanation of the newly redefined kilogram. The task is not trivial. I may need to rewatch this robust explainer a couple of times before it all sinks in. Have a seat and prepare to get your geek on: there will be mathematics!
How We're Redefining the kg
Sunday, July 09, 2017
Total Eclipse of the Sun - Part 3
As I mentioned in Part 2 of this four part series, I will be observing the August 21st total eclipse of the Sun from Madras, Oregon. My main reason for this choice is the prediction for low cloud cover as you can see on this chart from Eclipsophile:
The chart shows there are many other good choices, but Madras is one of the shortest drives for me, nine hours. Another reason I am going to Madras is I was asked to help with the Lowell Observatory Solar Eclipse Experience 2017. This event at Madras High School will include daytime activities and talks by astronomers on Sunday and Monday and night time star gazing on Sunday. If you are planning on being in the Madras area, I encourage you to purchase tickets for this event. In addition to the program of events, your $15 will get you a pair of eclipse glasses, access to a water station, food and beverage vendors, and the air-conditioned auditorium. The eclipse itself will be narrated by solar astronomers. In this post I will describe my contributions to the Lowell event and ideas for you to enhance your total and partial eclipse experience.
Rich Krueger contacted me last year about contributing to the Lowell Observatory Eclipse Event. Rich teaches at Flagstaff Arts and Leadership Academy and is a fellow SOFIA Airborne Astronomy Ambassador. Rich flew on SOFIA with Lowell Observatory Curator, Samantha Thompson. Lowell tapped Rich to help fill out the outstanding program they are preparing for the day before and day of the eclipse. Rich originally wanted me to recreate Eddington's total eclipse observation that confirmed Einstein's Theory of General Relativity. I had read Donald Bruns' article in Sky and Telescope and knew this was beyond my skill and bank account. Even Mr. Bruns is only doing half of the experiment. He plans to use undeflected star positions from the Gaia catalog. Eddington did not have this luxury! I assured Rich I would bring something else that would interest and engage the crowd. Others may try to measure the star field around the eclipsed Sun at the Eclipse Experience, but the deflections are so tiny nothing will be evident that day.
My first thought was to bring the Spacetime Simulator that I use in the viral Gravity Visualized video. I would do demonstrations like the ones in the video plus the new ones I have added. Another idea is to make a bent spacetime game by distributing a bunch of 0.5, 1, and 2 kg masses on the fabric. Place a goal on one side and launch a marble from the other. The marble represents a photon following the geodesic of the warped spacetime. The winner reaches the goal in the longest amount of time. Doing these activities should keep me pretty busy, but I wanted to develop something new too. I also suspect that I won't be the only one bringing a spacetime simulator since so many people have built their own with the help of this DIY video.
My next idea was to make a large convex mirror using a spaceblanket and a kiddie pool. I briefly alluded to this at the end of my post about making concave and convex mirrors with trashcan lids and spaceblankets. I was inspired to create a large convex mirror by the fisheye lens pictures taken in previous total eclipses. They show a 360 degree sunset with a brilliant but small eclipsed sun floating in the twilight. I also remembered the picture of the 1991 total eclipse over Mauna Kea. You can see the eclipsed sun and sky in the reflection of the silvered observatory dome on the left. I wondered what you could see in a large convex mirror placed flat on the ground. Maybe it would give a similar view to the unaided eye in real time.
I picked up a 45" wading pool from Big 5 Sporting Goods. I cut the presta valve from a bicycle tube, put it through a hole in the side of the pool, and sealed it with silicone adhesive. I used the top of the pool to mark a circle on the spaceblanket and cut it out. I used strapping tape to attach the spaceblanket over the top and started inflating it. It worked great, here is the result:
Outside the mirror showed the horizon and the whole sky. I should have left well enough alone but I was curious about how much more I could inflate it. I attached my portable air pump and added more air. The mirror stretched a little bit more but then reached its limit. Unfortunately I did not notice this until the side of the pool buckled. I would need to take it apart and reinforce it. Instead I decided to start from scratch with a bigger pool. I found a 59" kiddie pool at Toys backward R Us. Since spaceblankets are 52" wide, I obtained an oversized one that is 71" wide. To help prevent the pool from buckling I got some lawn edging to attach around the outside of the pool. I drilled holes and used bolts to secure it, then sealed each bolt with silicone adhesive. To prevent buckling, I used a
string to measure the mirror while inflating it. When the string showed the spaceblanket was not stretching anymore, I stopped inflating it. The larger mirror gave a satisfying view inside my classroom and outside in the full sun. I can't wait to see what it looks like during a total eclipse of the Sun. If I had to do it again I would stick to the smaller version. The large mirror barely fits into my Honda Odyssey and the oversize spaceblanket is not as reflective as the regular size. I may even make another smaller version to take instead of the large one since I will need room to transport a lot of equipment and gear to Madras.
I have been observing the Sun, solar eclipses, and transits with students for many years. As a result I have a good collection of solar observation equipment. The pièce de résistance is a Coronado Solarmax 70mm H-Alpha telescope (discontinued). I purchased this many years ago with a grant from the Home and School Club, Los Gatos High's version of the PTA. I made sure to come to one of their meetings after getting the telescope to show them the prominences, filaments, plages, and supergranules that students would get to see. If you want to get something similar for your school, the Coronado Personal Solar Telescope is very capable and more affordable at $599. I will bring a Meade 10" SCT with solar filter, 20x80 binoculars with solar filters, a box of eclipse glasses, and an 80mm refractor with a Sun Funnel. What is a Sun Funnel? That is what I thought when I first came across this solar observing aid. It is a safer way to do eyepiece projection, pointing an unfiltered refractor at the Sun and aiming the eyepiece toward a screen. Once focused, a nice large image of the Sun shows up on the screen. I have done this many times but always worried someone would look in the eyepiece and injure themselves. The Sun Funnel is placed over the eyepiece and projects the image on the back of a screen fastened to the other end. I followed the very clear instructions and made one in about 15 minutes after assembling the materials. If you have access to a small refractor, I highly recommend you build one. Small refractors can be purchased for less than $100 and work well with the Sun Funnel as long as you use an eyepiece and star diagonal that are made of metal, no plastic.
The partial phases of the eclipse can be observed without any additional tools. You can simply overlap
the fingers of each hand, making a waffle shape, and project pinhole
images of the Sun on the ground or other convenient surface. The
images can be improved by making pinholes in a screen and holding it
above a flat, light colored surface. The further the pinhole is from the
surface, the larger but dimmer the image will be. If the screen is in a
shaded area, the images can be seen easier. Some people even create a
design with the pinholes, creating an image made up of crescent Suns. There are many creative plans for pinhole projectors that are described elsewhere. You can even measure the diameter of the Sun
with a pinhole projector. The ratio of the diameter of the image to the
distance between the pinhole and the image is the same as the ratio of
the diameter of the Sun to the distance to the Sun. If there are trees,
bushes, or other objects with small openings, you may notice small
crescent images scattered across the ground, walls, etc. If you have
access to your eclipse site ahead of time, scout around at the same time
as the eclipse to locate the best examples. I won't have that
opportunity so I am stacking the deck. I am creating a pinhole pattern out of a prototyping or perf board. These are used for electronics
projects and have a grid of tiny, closely spaced holes. I use them for an
inverse square activity in workshops (click to download). I ordered a large one
(18x12.8 cm) that I will create a pattern on by masking selected holes.
I am undecided what that pattern will be, if you have an idea, leave a
comment. In Part 2 of this series I advised against using precious total
eclipse observing time to take pictures. However, you will have plenty
of time during the partial phases to photograph the crescent pinhole images, natural or contrived. That's what I did for the June 10, 2002,
partial eclipse at my home in California. Sky and Telescope published my photo
in the December issue of that year.
[Dean adds: for the May, 2012 eclipse, I made "eclipse portraiture" an extra credit project. My own "before and during" has been published in a few places.]
Another way to reveal the partial phases of the eclipse is to reflect a solar image from a mirror. I use this to bring the Sun into the classroom. I use a front-surfaced mirror to get a crisper image. I mask off the surface of the mirror except for a hole made with a paper punch. This produces a brighter image than a pinhole so you can project it over a longer distance to create a larger image. You still need to project the image into a shaded location to make it easily visible. I am going to place a sheet of white paper in a box for the eclipse.
Projecting a solar image is useful even if there isn't an eclipse going on. Imagine a solar image projected through your classroom door onto your whiteboard for the whole class to see. Large sunspots should be visible. After a little time, students will notice that the solar image moves. Propose the idea of determining how much time it would take the solar image to move all the way around, back to where it started. Draw a circle around the image and time how long it takes to move completely out of it. How many images would it take to complete one circle? The Sun's apparent size is about 0.5 degrees so 360/0.5 = 720. Multiply the time measured by 720, this should give about 24 hours. How about that! You can improve your answer by calculating the exact apparent angular size of the Sun for the current distance to the Sun on the day you do this activity. I also use a spectrometer to display the solar spectrum using the projected solar image as the light source.
As you can see, I will be very busy for the total eclipse on August 21st. Even if you can't make it under the path of totality, I hope you will be busy sharing this event with your students, family, and friends. I have used this post to give you some ideas to enhance the experience. I urge you to use them in your classroom beyond the Great American Eclipse day. The concluding post of this series will describe my experience in Madras. It will be interesting to contrast it to my first total eclipse experience that I described in Part 1 of this series. I also will be posting live on Twitter @kilroi22.
The chart shows there are many other good choices, but Madras is one of the shortest drives for me, nine hours. Another reason I am going to Madras is I was asked to help with the Lowell Observatory Solar Eclipse Experience 2017. This event at Madras High School will include daytime activities and talks by astronomers on Sunday and Monday and night time star gazing on Sunday. If you are planning on being in the Madras area, I encourage you to purchase tickets for this event. In addition to the program of events, your $15 will get you a pair of eclipse glasses, access to a water station, food and beverage vendors, and the air-conditioned auditorium. The eclipse itself will be narrated by solar astronomers. In this post I will describe my contributions to the Lowell event and ideas for you to enhance your total and partial eclipse experience.
Rich Krueger contacted me last year about contributing to the Lowell Observatory Eclipse Event. Rich teaches at Flagstaff Arts and Leadership Academy and is a fellow SOFIA Airborne Astronomy Ambassador. Rich flew on SOFIA with Lowell Observatory Curator, Samantha Thompson. Lowell tapped Rich to help fill out the outstanding program they are preparing for the day before and day of the eclipse. Rich originally wanted me to recreate Eddington's total eclipse observation that confirmed Einstein's Theory of General Relativity. I had read Donald Bruns' article in Sky and Telescope and knew this was beyond my skill and bank account. Even Mr. Bruns is only doing half of the experiment. He plans to use undeflected star positions from the Gaia catalog. Eddington did not have this luxury! I assured Rich I would bring something else that would interest and engage the crowd. Others may try to measure the star field around the eclipsed Sun at the Eclipse Experience, but the deflections are so tiny nothing will be evident that day.
My first thought was to bring the Spacetime Simulator that I use in the viral Gravity Visualized video. I would do demonstrations like the ones in the video plus the new ones I have added. Another idea is to make a bent spacetime game by distributing a bunch of 0.5, 1, and 2 kg masses on the fabric. Place a goal on one side and launch a marble from the other. The marble represents a photon following the geodesic of the warped spacetime. The winner reaches the goal in the longest amount of time. Doing these activities should keep me pretty busy, but I wanted to develop something new too. I also suspect that I won't be the only one bringing a spacetime simulator since so many people have built their own with the help of this DIY video.
My next idea was to make a large convex mirror using a spaceblanket and a kiddie pool. I briefly alluded to this at the end of my post about making concave and convex mirrors with trashcan lids and spaceblankets. I was inspired to create a large convex mirror by the fisheye lens pictures taken in previous total eclipses. They show a 360 degree sunset with a brilliant but small eclipsed sun floating in the twilight. I also remembered the picture of the 1991 total eclipse over Mauna Kea. You can see the eclipsed sun and sky in the reflection of the silvered observatory dome on the left. I wondered what you could see in a large convex mirror placed flat on the ground. Maybe it would give a similar view to the unaided eye in real time.
From Sky and Telescope 35mm slide set |
Wolfgang Strickling, 3/9/2016 Eclipse |
I picked up a 45" wading pool from Big 5 Sporting Goods. I cut the presta valve from a bicycle tube, put it through a hole in the side of the pool, and sealed it with silicone adhesive. I used the top of the pool to mark a circle on the spaceblanket and cut it out. I used strapping tape to attach the spaceblanket over the top and started inflating it. It worked great, here is the result:
45" Spaceblanket/Kiddie Pool convex mirror |
string to measure the mirror while inflating it. When the string showed the spaceblanket was not stretching anymore, I stopped inflating it. The larger mirror gave a satisfying view inside my classroom and outside in the full sun. I can't wait to see what it looks like during a total eclipse of the Sun. If I had to do it again I would stick to the smaller version. The large mirror barely fits into my Honda Odyssey and the oversize spaceblanket is not as reflective as the regular size. I may even make another smaller version to take instead of the large one since I will need room to transport a lot of equipment and gear to Madras.
I have been observing the Sun, solar eclipses, and transits with students for many years. As a result I have a good collection of solar observation equipment. The pièce de résistance is a Coronado Solarmax 70mm H-Alpha telescope (discontinued). I purchased this many years ago with a grant from the Home and School Club, Los Gatos High's version of the PTA. I made sure to come to one of their meetings after getting the telescope to show them the prominences, filaments, plages, and supergranules that students would get to see. If you want to get something similar for your school, the Coronado Personal Solar Telescope is very capable and more affordable at $599. I will bring a Meade 10" SCT with solar filter, 20x80 binoculars with solar filters, a box of eclipse glasses, and an 80mm refractor with a Sun Funnel. What is a Sun Funnel? That is what I thought when I first came across this solar observing aid. It is a safer way to do eyepiece projection, pointing an unfiltered refractor at the Sun and aiming the eyepiece toward a screen. Once focused, a nice large image of the Sun shows up on the screen. I have done this many times but always worried someone would look in the eyepiece and injure themselves. The Sun Funnel is placed over the eyepiece and projects the image on the back of a screen fastened to the other end. I followed the very clear instructions and made one in about 15 minutes after assembling the materials. If you have access to a small refractor, I highly recommend you build one. Small refractors can be purchased for less than $100 and work well with the Sun Funnel as long as you use an eyepiece and star diagonal that are made of metal, no plastic.
http://www.hoydalsvik.net/astrofoto/eclipse2008/ |
[Dean adds: for the May, 2012 eclipse, I made "eclipse portraiture" an extra credit project. My own "before and during" has been published in a few places.]
Another way to reveal the partial phases of the eclipse is to reflect a solar image from a mirror. I use this to bring the Sun into the classroom. I use a front-surfaced mirror to get a crisper image. I mask off the surface of the mirror except for a hole made with a paper punch. This produces a brighter image than a pinhole so you can project it over a longer distance to create a larger image. You still need to project the image into a shaded location to make it easily visible. I am going to place a sheet of white paper in a box for the eclipse.
Solar Spectrum using Red Tide spectrometer with Logger Pro |
Projecting a solar image is useful even if there isn't an eclipse going on. Imagine a solar image projected through your classroom door onto your whiteboard for the whole class to see. Large sunspots should be visible. After a little time, students will notice that the solar image moves. Propose the idea of determining how much time it would take the solar image to move all the way around, back to where it started. Draw a circle around the image and time how long it takes to move completely out of it. How many images would it take to complete one circle? The Sun's apparent size is about 0.5 degrees so 360/0.5 = 720. Multiply the time measured by 720, this should give about 24 hours. How about that! You can improve your answer by calculating the exact apparent angular size of the Sun for the current distance to the Sun on the day you do this activity. I also use a spectrometer to display the solar spectrum using the projected solar image as the light source.
As you can see, I will be very busy for the total eclipse on August 21st. Even if you can't make it under the path of totality, I hope you will be busy sharing this event with your students, family, and friends. I have used this post to give you some ideas to enhance the experience. I urge you to use them in your classroom beyond the Great American Eclipse day. The concluding post of this series will describe my experience in Madras. It will be interesting to contrast it to my first total eclipse experience that I described in Part 1 of this series. I also will be posting live on Twitter @kilroi22.
Colored Shadows Tough Problem
I have mentored and coached for the New Teacher Program through the Exploratorium's Teacher Institute for several years now. Many summers I get to work with teachers in their first few years of teaching as they participate in an intensive three week institute. I went through it myself ten years ago and it is a lot of great information and wonderful pedagogy. I learned more in those three weeks than in my entire credential program about teaching science.
It is exciting when a new teacher discovers or comes up with something that is so cool it has be shared. Summer 2016 Ajayi Lawrence was focused on light and took a journey through diffraction, color addition, filters, etc. There were several times that we took red, green and blue LEDs to darker exhibits to experiment. Lots of "Oh that was cool, do that again!" and talking out what we saw, especially when it was contrary to our predictions. (It's good to be wrong sometimes!)
While trying to set up a procedure for his students, Ajayi shone a red LED through the two filters of a pair of 3D glasses. The red light passed through the red filter and was almost completely blocked from the blue-ish filter, as expected. The blue light was blocked by the red filter and shone through the blue-ish filter. The green light was blocked by the red and shone through the blue-ish filter. (Now you seen why I say it was "blue-ish.")
Later we took the same pair of glasses to the Colored Shadows exhibit (which can be recreated in your classroom using this Science Snack) and snapped this great picture.
Ajayi and I both said that showing this picture to students and asking them to determine the colors of each filter would be a great way of assessing what they have learned about color addition and subtraction. This year in our color unit I showed this picture to my students and didn't tell them that they were 3D glasses. After some discussion they realized that the two lens of the glasses must be different, which reminds them of "old" 3D glasses. Most of your students will have never used red-blue 3D glasses before, by the way. After they discover that they have to think about what light passing through one of those filters would look like versus lighting being blocked by the filter.
This was done as a quick end of class activity to wrap up some other concepts. I would have preferred it to be discussed in small groups with whiteboards so that students could make their own drawings. I've written up a worksheet that is a little more guided, adding a portion on the colored shadows of hands I already use, that is available untested as a pdf. If you want to check your answer here is a visual key.
Friday, July 07, 2017
Lab equipment older than me
While continuing to clean my prep room (no end in sight!) I found more old Macalaster Scientific Corporation boxes similar to the radiacmeter and dosimeter I found a few weeks ago. I found four different pieces of equipment, it has been interesting to research them, find out what they were used for, and try to determine if they can still be used. The company seems to have stopped production in the 1960s, although upon searching for their equipment I see many familiar things. My dynamics carts from my Crash Cushions project are apparently made by Macalaster and potentially 50 years old. Perhaps new dynamics carts will be on my shopping list this year ...
Mass of an Electron Apparatus
This uses a "Magic Eye Tube" with a circular display that was used to tune radios in the 1930s. My equipment, shown below left, had to be used with an air core solenoid, shown below right. From what I can tell these can still be purchased for about $100 each (solenoid not included) and used as demo equipment.
The instructions puzzled me a bit as they referred only to assembly so I turned to the instructions of a similar modern version.
This video shows the magic eye tube changing as a radio is tuned in and out:
It took me awhile to realize that when not used with a radio, the magic eye would produce a straight edged fan shaped wedge that would be unchanged (bottom right). That is, unless a magnetic field is brought near it to bend the electrons and the fan shape on the display (bottom left). That is where the air solenoid comes in, constructed to be about twice the height as the fluorescent screen on top of the magic eye tube so that it sits at the center of the solenoid. The magnetic field around the solenoid when current is running through it effects the electrons on the fluorescent screen.
The explanation describes an experiment to determine the mass of an electron approximating the curvature of the "fan" shape using something else round. You seem to need to know multiple voltages, the current and turns in the solenoid (to determine's magnetic field strength) and the curvature of the bend. The instructions end with "Refer to physics text books for the formulae relating to the calculations for the strength of the magnetic field and the velocity of the electrons. From this information you can calculate the approximate mass of a single electron." Not quite spelling it out for us, is it?
I found this image and equations on Hyperphysics that I think match up with this experiment.
Potential Difference Kit
From the brief assembly instructions I think (1) I'm missing an insulating handle and (2) it is acting like an electrophorus. (Here is an Electrophrus Engineering activity by the way.) That is my guess at least, maybe someone else has a better idea of what this #unknownequipment is used for.
Tangent Galvonometer Kit
The dismantled frame (left) can be assembled (right) to make a base to hold a compass and a loop of wire. A compass (not found in the box) would be placed where the spool of wire is placed on the right. A square loop of wire is made around the four nails (two top, two bottom) that surround the compass resting on the base. This modern version shows the same set-up. There are fancier equivalents of this kit with secured circles of wire around mounted compasses. I've made similar set-ups for students with cardboard in class (start video about 30 seconds in).
I was surprised to read "This can also be used to determine the magnitude and direction of the horizontal component of the Earth's magnetic field." in the description. I found this explanation of the experiment but I'm not sure if this particular rudimentary kit would be successful. This kit is quite large, about a foot tall, and has sharp aluminum edges. This particular one has been defaced with an engraved swear word as well. While it could be useful, I can probably make some that are a bit easier to worth with.
Cathode Ray Tube
I figured it lit up when I saw it but Dan was able to tell me that this piece of #unknownequipment was a Cathode Ray Tube. This Lab Guy post shows how it could be hooked up and made to work like a small TV. That is way above my current summer level of work load though. Dan also said he powers one with a handheld Tesla Coil so until I procure one of those this may not be useful.
While I might be able to get some of these to work, some would require purchase of additional materials. One could find such vintage pieces on eBay but it begs the question, do you want to? They still hold some educational value, if their original purposes are known, but it may not be worth trying to get them to work. For the time being they will remain on a shelf with other vintage pieces I can't bear to part with.
Mass of an Electron Apparatus
This uses a "Magic Eye Tube" with a circular display that was used to tune radios in the 1930s. My equipment, shown below left, had to be used with an air core solenoid, shown below right. From what I can tell these can still be purchased for about $100 each (solenoid not included) and used as demo equipment.
This video shows the magic eye tube changing as a radio is tuned in and out:
The explanation describes an experiment to determine the mass of an electron approximating the curvature of the "fan" shape using something else round. You seem to need to know multiple voltages, the current and turns in the solenoid (to determine's magnetic field strength) and the curvature of the bend. The instructions end with "Refer to physics text books for the formulae relating to the calculations for the strength of the magnetic field and the velocity of the electrons. From this information you can calculate the approximate mass of a single electron." Not quite spelling it out for us, is it?
I found this image and equations on Hyperphysics that I think match up with this experiment.
I'm not 100% sure that this is the correct equation for finding the mass of an electron with a magic eye tube but it looks promising. The radius of the curve of the electron deflection due to the solenoid's magnetic field would be found by matching it to a circular object. Since it would be hard to accurately measure the radius of only part of a curve, the instructions suggest that if you find something else that has the same curvature but is a complete circle it will be easier to measure the radius. The magnetic field strength of the solenoid could be found by knowing the current through it and the number of coils. The voltage should be measured from the circuit, charge on one electron is known and that should reveal the mass of one electron.
Potential Difference Kit
From the brief assembly instructions I think (1) I'm missing an insulating handle and (2) it is acting like an electrophorus. (Here is an Electrophrus Engineering activity by the way.) That is my guess at least, maybe someone else has a better idea of what this #unknownequipment is used for.
Tangent Galvonometer Kit
The dismantled frame (left) can be assembled (right) to make a base to hold a compass and a loop of wire. A compass (not found in the box) would be placed where the spool of wire is placed on the right. A square loop of wire is made around the four nails (two top, two bottom) that surround the compass resting on the base. This modern version shows the same set-up. There are fancier equivalents of this kit with secured circles of wire around mounted compasses. I've made similar set-ups for students with cardboard in class (start video about 30 seconds in).
I was surprised to read "This can also be used to determine the magnitude and direction of the horizontal component of the Earth's magnetic field." in the description. I found this explanation of the experiment but I'm not sure if this particular rudimentary kit would be successful. This kit is quite large, about a foot tall, and has sharp aluminum edges. This particular one has been defaced with an engraved swear word as well. While it could be useful, I can probably make some that are a bit easier to worth with.
Cathode Ray Tube
I figured it lit up when I saw it but Dan was able to tell me that this piece of #unknownequipment was a Cathode Ray Tube. This Lab Guy post shows how it could be hooked up and made to work like a small TV. That is way above my current summer level of work load though. Dan also said he powers one with a handheld Tesla Coil so until I procure one of those this may not be useful.
While I might be able to get some of these to work, some would require purchase of additional materials. One could find such vintage pieces on eBay but it begs the question, do you want to? They still hold some educational value, if their original purposes are known, but it may not be worth trying to get them to work. For the time being they will remain on a shelf with other vintage pieces I can't bear to part with.
Thursday, July 06, 2017
Rolling shutter explained by a YouTuber
The lesson is a nice complement to yesterday's photography post. Destin from Smarter Every Day produced a great rolling shutter explainer. Those weird motion-based video artifacts that your camera phone captures? Rolling shutter (not the "wagon-wheel" stroboscopic effect).
Destin's explanation benefits from his intentions and Phantom high-speed camera. And some great work in post-production. Next time I fly, I will book my tickets on "Smarter Every Day" airlines!
Wednesday, July 05, 2017
Polarization demonstrated by a photographer
In the era of digital photography and Photoshop, the use of filters in photography has declined. Some effects of photographic filters can be simulated in post-production software.
Polarization is not one of those things. I use a polarizer in my own landscape and (to some extent) wildlife photography quite heavily. (Links to that work can be found at The Treks of Phyz.)
This video recently bubbled up at Digital Photography Review (my favorite resource for digital camera news and reviews). It's a photographer's description and demonstration of polarizers. Nicely done, and it can certainly act as a springboard for the discussion of polarization in the classroom.
Take a look for yourself.
Monday, July 03, 2017
Skepticism: Gwyneth's Goopy Body Vibes
Dan Burns recently directed my attention to a dust-up regarding a Goop-endorsed product. Goop is Gwyneth Paltrow's high-priced personal product brand/store and Body Vibes was an endorsed product available at Goop. Body Vibes' body stickers could work all manner of miracles
According to a Washington Post article, Body Vibes originally claimed to use materials engineered by NASA. After NASA refuted the claim, Body Vibes reworded their sales pitch to delete the NASA reference. Read the WaPo take-down for all the details.
If you thought Power Balance style scams were a thing of the past, think again. Body Vibes gets their "technology" from AlphaBio Centrix in Las Vegas. Watch this "disturbing" AlphaBio video. It was posted in 2015 and already had nearly 800 views when I came across it. (We can't all be Dan Burns.)
They had me at "We use sub-harmonic frequency to power our Bio Energy Patches". For such statements, we must deploy the most incendiary burn in the arsenal of physics: "Not even wrong". (For the uninitiated, that means it's so very wrong that it cannot even be considered as worthy of argument.) The genius of the product design and marketing is that you could get stickers for every need, from anxiety, to low-testosterone, to gluten free(?).
Bottom line: there will always be products like this and the products will always have a credulous customer base. Do what you can to make sure your students aren't taken in by these things.
Update: I almost forgot to include Stephen Colbert's Late Night take-down of Body Vibes.
Gizmodo's takedown: NASA Calls Bullshit on Goop's $120 'Bio-Frequency Healing' Sticker Packs
TANGENT: In the course of writing this post, I wandered over to what's left of the Power Balance company page. Not surprisingly, they're still selling bracelets. Waiting for that 2010 nostalgia craze to kick in, I suppose. Amusingly, the post-lawsuit "technology" behind the bracelet is described as "Power Balance holograms are created using a proprietary process featuring cutting edge three-dimensional imaging, which makes the hologram truly unique. The hologram is designed based on Eastern philosophies. Many Eastern philosophies contain ideas related to energy. These are commonly referenced as Chi or Chakras. There are a number of well known practices like acupuncture, meditation and Feng Shu, which are believed to affect these energies. The hologram is based on some of these same ideologies." A legal work of art!
Subscribe to:
Posts (Atom)